Online Magazine
Recent Posts
- Safeguard your Cellphone Photos
- Black & White to Color – Instantly
- Wearing Many Hats
- Video Roundup
- Rescuing Your Blurry Pictures
- Showing Their Age
- What is Your Angle?
- Panorama Photos
- Humorous Photos
- Close Ups
- Fisheye Pictures
- Photo Antiquities
- Printing Big
- Appreciating Scale
- Celebrity Sightings
Tags
More Places to Go
- Free "How-To" Books “How To” books for popular cameras 0
- Vist Us on Facebook keep in touch with us on Facebook 2
Archives
- July 2023 (1)
- March 2023 (2)
- February 2023 (1)
- December 2022 (1)
- October 2022 (1)
- September 2022 (8)
- August 2022 (9)
- July 2022 (1)
- June 2022 (1)
- June 2021 (1)
- May 2021 (1)
- March 2021 (5)
- February 2021 (4)
- January 2021 (2)
- April 2019 (1)
- March 2019 (1)
- February 2019 (1)
- October 2018 (2)
- April 2018 (1)
- March 2018 (4)
- February 2018 (1)
- November 2017 (1)
- August 2017 (1)
- June 2017 (1)
- April 2017 (1)
- March 2017 (5)
- February 2017 (2)
- January 2017 (1)
- October 2016 (1)
- September 2016 (1)
- August 2016 (1)
- July 2016 (1)
- May 2016 (1)
- April 2016 (1)
- March 2016 (2)
- February 2016 (1)
- January 2016 (2)
- December 2015 (1)
- November 2015 (1)
- October 2015 (3)
- April 2015 (1)
- March 2015 (5)
- February 2015 (1)
- January 2015 (4)
- December 2014 (2)
- November 2014 (5)
- October 2014 (2)
- September 2014 (1)
- August 2014 (2)
- July 2014 (1)
- May 2014 (1)
- April 2014 (5)
- March 2014 (5)
- December 2013 (2)
- November 2013 (18)
- October 2013 (1)
- September 2013 (1)
- August 2013 (1)
- July 2013 (1)
- June 2013 (3)
- May 2013 (1)
- April 2013 (2)
- March 2013 (1)
- February 2013 (1)
- January 2013 (1)
- December 2012 (1)
- November 2012 (2)
- October 2012 (2)
- September 2012 (5)
- August 2012 (2)
- July 2012 (1)
- June 2012 (1)
- May 2012 (1)
- April 2012 (4)
- March 2012 (1)
- February 2012 (1)
- January 2012 (3)
- December 2011 (1)
- November 2011 (3)
- October 2011 (1)
- September 2011 (2)
- August 2011 (2)
- June 2011 (3)
- May 2011 (4)
- April 2011 (8)
- March 2011 (8)
- February 2011 (10)
- January 2011 (6)
- December 2010 (11)
- November 2010 (14)
- October 2010 (6)
- September 2010 (12)
- August 2010 (2)
- July 2010 (4)
- June 2010 (3)
- May 2010 (1)
- April 2010 (1)
- March 2010 (2)
- February 2010 (1)
- January 2010 (1)
- December 2009 (1)
- November 2009 (2)
- October 2009 (2)
- September 2009 (1)
- August 2009 (3)
- July 2009 (2)
- June 2009 (1)
- May 2009 (2)
- April 2009 (1)
- March 2009 (2)
- February 2009 (1)
- January 2009 (3)
Beyond the Faces
06th May 2011
Adding Action to Portraits
As a grandfather with a camera, I’m very often snapping away when the grandchildren are nearby. So it shouldn’t be surprising that I have hundreds (maybe thousands) of photos of these kids in my collection.
Yesterday, three of them were out playing in our backyard. Here’s a few snapshots that I took. I’m a big fan of trying to incorporate action into these portraits. You be the judge of whether the action helps to make the picture.
| My favorites are the candids. These are shots where the subject is totally unaware. When they’re preoccupied with having a fun experience, they may not know that you’re “spying” with your camera.
|
|
 Obviously this is not a candid. Eden knows that I’m taking her photo |
 But here she is unaware that I’m snapping away |
|
|
|
| When it’s not possible to be totally candid you can use a semi-posed action shot. The action helps to avoid a face that’s preoccupied with the picturetaker.
|
|
 This full length portrait of Logan shows little motion |
 Here the angle of the shot emphasizes his action on the slide |
|
|
|
| With a little patience, you can turn a static shot into a live action photo. A few minutes after taking the photo on the left below, she was being doing calisthenics – making the photo on the right much more exciting.
|
|
 Here Ezra is clutching the wooden post that’s supporting the swing set |
 Here she’s showing me the agility that I wish I could still muster. |
|
|
|
While each of the left-hand photos are OK, I’ve learned that adding a little action to the mix can turn my snapshots into real “keepers”.
Do you agree?
Written by Arnie Lee
Action Tip # 6
25th October 2010
Continuous Shooting
Most digital SLR and many point-and-shoots have a feature called continuous shooting that lets you capture several photos in a very short period of time. This is also referred to burst mode. So at the soccer game, by keeping the shutter depressed you can capture your star player as she runs towards the action, swivels her leg into launch position behind her, quickly drives her kicking shoe forward and finally strikes the ball.
On a recent outing, I caught one of our future diving stars practicing at the pool. With the camera set to take continuous photos, I quickly fired off nine shots as she made her big leap into the water.
Pressing the shutter was the easy part.
After reviewing the photos, I wanted to be able to show the young girl’s diving exploits to others. One method is to make a composite of the action. Here’s a miniature composite:


Making a larger composite makes it easier to see the detail of each frame. However, the time and expense may cause you search for an alternative if you’re planning to make many such composites.
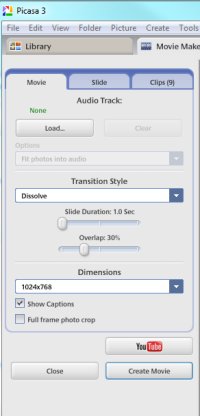
| Another way to show these is to convert the nine individual frames into a movie. One free and easy way to do this is to use Picasa 3*.
After starting Picasa, I added the nine photos to my library. Next I highlighted these nine frames and clicked on the Movie icon (towards the bottom of the screen). |
 |
| For Transition Style, I chose Disolve.
For Slide Duration, I chose 1.0 second. You can choose a longer time which lets you study each frame more, but I prefer the shorter duration which makes the action seem to flow more naturally. For Overlap, I chose 100%. For the diving action, this setting seems to provide the best effect. Then I click on the Create Movie button. This converts the 9 individual frames into a short movie. |
 |
In just a few seconds, Picasa turns the images into a short movie with which you can enjoy the action with others. Click here to see the movie.
Yes, you can have a fun using the camera’s continuous shooting mode. But sharing the action with the world makes the fun last much longer.
* Picasa is available for the PC and Mac by free download from Google.
Action Tip # 5
13th October 2010
Once again, patience counts
| Sometimes the only way to catch the perfect photo is to take a lot of them until you achieve the desired result. To retain the feeling of motion, I used a slow shutter speed (1/60th of a second). My goal was to “freeze” the young girl’s face, yet convey movement. After taking about twenty photos, I finally snapped one that I liked by being persistent (and patient). | |
 I took about twenty photos similar to this one using a relatively slow shutter speed. While it captures the motion of the young girl, overall the photo is too blurred. |
 Here I snapped while the young girl is at the top of her swing where her velocity is zero. By waiting for this exact moment, I’ve been able to stop most of the motion. |