Online Magazine
Recent Posts
- Safeguard your Cellphone Photos
- Black & White to Color – Instantly
- Wearing Many Hats
- Video Roundup
- Rescuing Your Blurry Pictures
- Showing Their Age
- What is Your Angle?
- Panorama Photos
- Humorous Photos
- Close Ups
- Fisheye Pictures
- Photo Antiquities
- Printing Big
- Appreciating Scale
- Celebrity Sightings
Tags
More Places to Go
- Free "How-To" Books “How To” books for popular cameras 0
- Vist Us on Facebook keep in touch with us on Facebook 2
Archives
- July 2023 (1)
- March 2023 (2)
- February 2023 (1)
- December 2022 (1)
- October 2022 (1)
- September 2022 (8)
- August 2022 (9)
- July 2022 (1)
- June 2022 (1)
- June 2021 (1)
- May 2021 (1)
- March 2021 (5)
- February 2021 (4)
- January 2021 (2)
- April 2019 (1)
- March 2019 (1)
- February 2019 (1)
- October 2018 (2)
- April 2018 (1)
- March 2018 (4)
- February 2018 (1)
- November 2017 (1)
- August 2017 (1)
- June 2017 (1)
- April 2017 (1)
- March 2017 (5)
- February 2017 (2)
- January 2017 (1)
- October 2016 (1)
- September 2016 (1)
- August 2016 (1)
- July 2016 (1)
- May 2016 (1)
- April 2016 (1)
- March 2016 (2)
- February 2016 (1)
- January 2016 (2)
- December 2015 (1)
- November 2015 (1)
- October 2015 (3)
- April 2015 (1)
- March 2015 (5)
- February 2015 (1)
- January 2015 (4)
- December 2014 (2)
- November 2014 (5)
- October 2014 (2)
- September 2014 (1)
- August 2014 (2)
- July 2014 (1)
- May 2014 (1)
- April 2014 (5)
- March 2014 (5)
- December 2013 (2)
- November 2013 (18)
- October 2013 (1)
- September 2013 (1)
- August 2013 (1)
- July 2013 (1)
- June 2013 (3)
- May 2013 (1)
- April 2013 (2)
- March 2013 (1)
- February 2013 (1)
- January 2013 (1)
- December 2012 (1)
- November 2012 (2)
- October 2012 (2)
- September 2012 (5)
- August 2012 (2)
- July 2012 (1)
- June 2012 (1)
- May 2012 (1)
- April 2012 (4)
- March 2012 (1)
- February 2012 (1)
- January 2012 (3)
- December 2011 (1)
- November 2011 (3)
- October 2011 (1)
- September 2011 (2)
- August 2011 (2)
- June 2011 (3)
- May 2011 (4)
- April 2011 (8)
- March 2011 (8)
- February 2011 (10)
- January 2011 (6)
- December 2010 (11)
- November 2010 (14)
- October 2010 (6)
- September 2010 (12)
- August 2010 (2)
- July 2010 (4)
- June 2010 (3)
- May 2010 (1)
- April 2010 (1)
- March 2010 (2)
- February 2010 (1)
- January 2010 (1)
- December 2009 (1)
- November 2009 (2)
- October 2009 (2)
- September 2009 (1)
- August 2009 (3)
- July 2009 (2)
- June 2009 (1)
- May 2009 (2)
- April 2009 (1)
- March 2009 (2)
- February 2009 (1)
- January 2009 (3)
Event Tip # 3 – James Taylor concert
10th March 2011
Having grown up in the late 60s, I was excited to learn that one of my contemporaries – James Taylor – was going to be performing in Grand Rapids on March 8th. I anxiously waited for tickets to go on sale, but they were quickly sold out in less than an hour. Fortunately, I found two available last minute tickets through StubHub so I was still in luck.
Through the years, I’ve done my fair share of event photography. But nowadays when I go to a concert or show, I’m usually attending as a spectator and not as a working photographer with a press pass. Since one of my hobbies is to collecting pictures of celebrities, I continue to take a small camera with me – just in case.
Typically, show venues are a mixture of dark backgrounds with strong spotlights. For effect, the performers are often “creatively lit” (read dimly). This stage lighting makes for a very contrasty scene.
So the challenge is to be able to use the theater’s available light to capture the performers. Flash is a no-no.
| Wait for the right moment | |
 Although my camera is set for dim lighting (ISO is set to 1600), the dim lighting forces a slow shutter speed – in this case about 1/25 second. Here the performer is moving slightly so I end up with a blurred image. Performer: Arnold McCuller |
 The solution to the blurred image is to carefully watch the performer and snap when he/she is in a more or less stationary position. With a little practice, you’ll be able to anticipate the times when the performer is positioned like a statue. |
| Adjust the exposure | |
 Most cameras determine the exposure by averaging the amount of light in a scene. On a dark stage with bright spotlights, the camera is usually “fooled” by the darkness. This overexposure causes the brightly lit faces to be washed out. Performer: James Taylor |
 To prevent the his face from being washed out, I set the camera to reduce the exposure. For this shot, I used the camera’s exposure compensation to make a -2 (f/stop) adjustment. Although his guitar is darker, his face is now properly exposed. |
For stage performances, you can use relatively inexpensive equipment. On this occasion I used a Canon SX210 IS point-and-shoot which has a 14X optical lens. Our seats were fairly close – the seventh row – but the lens allowed me to zoom in to grab a decent shot.
Just a quick note about courtesy: The auditorium was filled to the brim. Everyone paid for tickets with their hard-earned money so I go out of my way to keep as unobtrusive as possible when taking photos. I’m careful not to put my camera in front of another spectator and to be silent as I snap (usually a menu selection for “silent mode”). They are there for the performance, not to be disturbed by a rude and noisy picturetaker.
And since my real reason for being at the concert was to hear the performance, I make sure that I get to enjoy the music without being overly preoccupied with my camera. And by the way, the performance was great!
You can see more celebrity photos from my hobby celebrity collection here.
Written by Arnie Lee
Kids Tip # 5
06th November 2010
Taking pictures of kids is one of the most popular uses for digital cameras. This is another article that we present to you for taking better kids pictures.
| To Pose or not to Pose – the case for Candids When you ask a child to pose, you may get varying reactions, looks and faces. If your subject is cooperative you’ll probably end up with a nice portrait. But sometimes, catching your little one candidly – in a “surprise moment” – can often produce a more pleasing photo. |
|
 For this shot, we asked the young boy to smile for the camera. He cooperated with this open mouthed smile, but his pose otherwise seems kind of static. |
 Later in the day, we found him playing near the pool. Instead of posing him, we called out his name, he turned and we captured him looking more natural. |
 For this photo, the young lady was quite aware that we were taking her picture. We captured her with a nice smile |
 Using a telephoto lens, we waited patiently. She was unaware that we took this candid shot with a more relaxed look. |
 Here again we asked the young girl to stop what she was doing to take this shot. She cooperated by giving us a generous smile. |
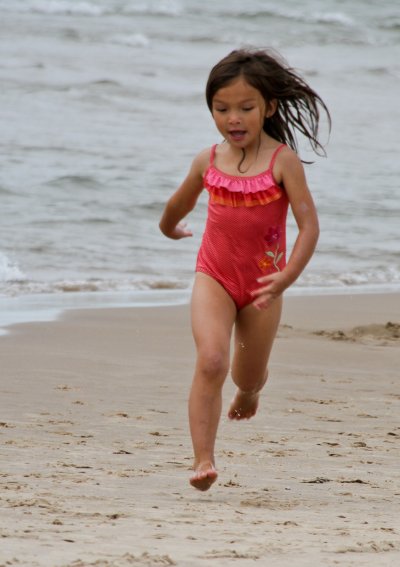 In this photo, you can see that we were able to capture her inner smile. We didn’t ask for one yet her running activity produced a great one. |
Of course these tips are subjective and there is no right nor wrong way – especially if the subject is your own child! Candids are just another tool to add to your gadget bag.
********************************************************
Action Tip # 6
25th October 2010
Continuous Shooting
Most digital SLR and many point-and-shoots have a feature called continuous shooting that lets you capture several photos in a very short period of time. This is also referred to burst mode. So at the soccer game, by keeping the shutter depressed you can capture your star player as she runs towards the action, swivels her leg into launch position behind her, quickly drives her kicking shoe forward and finally strikes the ball.
On a recent outing, I caught one of our future diving stars practicing at the pool. With the camera set to take continuous photos, I quickly fired off nine shots as she made her big leap into the water.
Pressing the shutter was the easy part.
After reviewing the photos, I wanted to be able to show the young girl’s diving exploits to others. One method is to make a composite of the action. Here’s a miniature composite:


Making a larger composite makes it easier to see the detail of each frame. However, the time and expense may cause you search for an alternative if you’re planning to make many such composites.
| Another way to show these is to convert the nine individual frames into a movie. One free and easy way to do this is to use Picasa 3*.
After starting Picasa, I added the nine photos to my library. Next I highlighted these nine frames and clicked on the Movie icon (towards the bottom of the screen). |
 |
| For Transition Style, I chose Disolve.
For Slide Duration, I chose 1.0 second. You can choose a longer time which lets you study each frame more, but I prefer the shorter duration which makes the action seem to flow more naturally. For Overlap, I chose 100%. For the diving action, this setting seems to provide the best effect. Then I click on the Create Movie button. This converts the 9 individual frames into a short movie. |
 |
In just a few seconds, Picasa turns the images into a short movie with which you can enjoy the action with others. Click here to see the movie.
Yes, you can have a fun using the camera’s continuous shooting mode. But sharing the action with the world makes the fun last much longer.
* Picasa is available for the PC and Mac by free download from Google.
« Older Posts — Newer Posts »