Online Magazine
Recent Posts
- Safeguard your Cellphone Photos
- Black & White to Color – Instantly
- Wearing Many Hats
- Video Roundup
- Rescuing Your Blurry Pictures
- Showing Their Age
- What is Your Angle?
- Panorama Photos
- Humorous Photos
- Close Ups
- Fisheye Pictures
- Photo Antiquities
- Printing Big
- Appreciating Scale
- Celebrity Sightings
Tags
More Places to Go
- Free "How-To" Books “How To” books for popular cameras 0
- Vist Us on Facebook keep in touch with us on Facebook 2
Archives
- July 2023 (1)
- March 2023 (2)
- February 2023 (1)
- December 2022 (1)
- October 2022 (1)
- September 2022 (8)
- August 2022 (9)
- July 2022 (1)
- June 2022 (1)
- June 2021 (1)
- May 2021 (1)
- March 2021 (5)
- February 2021 (4)
- January 2021 (2)
- April 2019 (1)
- March 2019 (1)
- February 2019 (1)
- October 2018 (2)
- April 2018 (1)
- March 2018 (4)
- February 2018 (1)
- November 2017 (1)
- August 2017 (1)
- June 2017 (1)
- April 2017 (1)
- March 2017 (5)
- February 2017 (2)
- January 2017 (1)
- October 2016 (1)
- September 2016 (1)
- August 2016 (1)
- July 2016 (1)
- May 2016 (1)
- April 2016 (1)
- March 2016 (2)
- February 2016 (1)
- January 2016 (2)
- December 2015 (1)
- November 2015 (1)
- October 2015 (3)
- April 2015 (1)
- March 2015 (5)
- February 2015 (1)
- January 2015 (4)
- December 2014 (2)
- November 2014 (5)
- October 2014 (2)
- September 2014 (1)
- August 2014 (2)
- July 2014 (1)
- May 2014 (1)
- April 2014 (5)
- March 2014 (5)
- December 2013 (2)
- November 2013 (18)
- October 2013 (1)
- September 2013 (1)
- August 2013 (1)
- July 2013 (1)
- June 2013 (3)
- May 2013 (1)
- April 2013 (2)
- March 2013 (1)
- February 2013 (1)
- January 2013 (1)
- December 2012 (1)
- November 2012 (2)
- October 2012 (2)
- September 2012 (5)
- August 2012 (2)
- July 2012 (1)
- June 2012 (1)
- May 2012 (1)
- April 2012 (4)
- March 2012 (1)
- February 2012 (1)
- January 2012 (3)
- December 2011 (1)
- November 2011 (3)
- October 2011 (1)
- September 2011 (2)
- August 2011 (2)
- June 2011 (3)
- May 2011 (4)
- April 2011 (8)
- March 2011 (8)
- February 2011 (10)
- January 2011 (6)
- December 2010 (11)
- November 2010 (14)
- October 2010 (6)
- September 2010 (12)
- August 2010 (2)
- July 2010 (4)
- June 2010 (3)
- May 2010 (1)
- April 2010 (1)
- March 2010 (2)
- February 2010 (1)
- January 2010 (1)
- December 2009 (1)
- November 2009 (2)
- October 2009 (2)
- September 2009 (1)
- August 2009 (3)
- July 2009 (2)
- June 2009 (1)
- May 2009 (2)
- April 2009 (1)
- March 2009 (2)
- February 2009 (1)
- January 2009 (3)
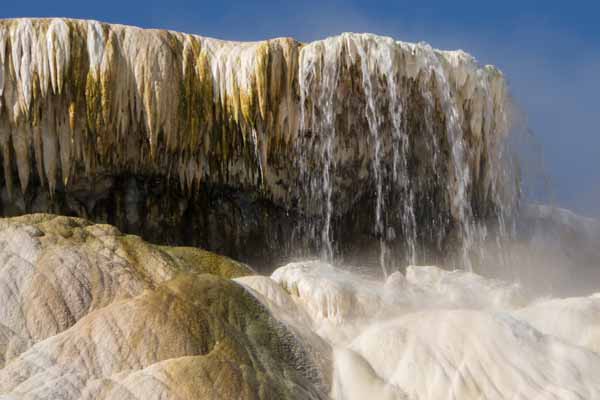
What a View
27th August 2014
Wide Angle to the Extreme
It’s eye-catching when I see a photo that “bends” the horizon.
This bend comes from the camera’s lens. Use a very wide angle lens and you’ll see the curved “barrel” distortion on the images. One well-known type of wide angle lenses is the fisheye. These lenses typically have a field of view approaching 180 degrees – allowing you to capture the entire scene in front of the camera.
Until recently, fisheye lenses were expensive. I have one that cost well over $1500. But when I was looking for an ultra-wide angle for my Sony equipment, I found an inexpensive lens made by Rokinon. With its $300 price tag, I was a little skeptical of the quality of images from such a low cost lens but decided to try it regardless.
Here’s a short gallery of some of the scenes that I captured during my first outing with the lens a few weeks ago.
|
|
|
 This is an 8mm f/2.8 fisheye. I wanted an ultra-wide angle for an extra Sony Nex7 mirrorless camera. |
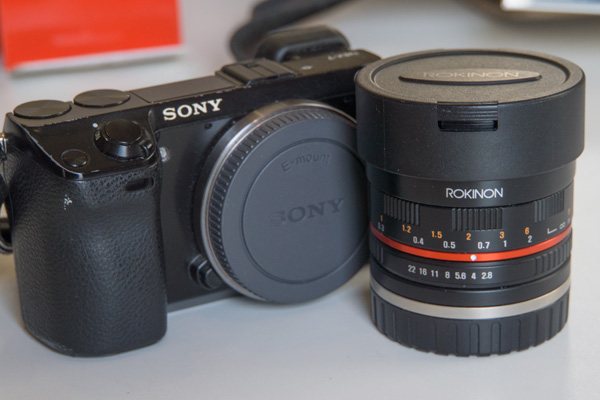 The Nex7 is very compact and lightweight. The Rokinon 8mm fisheye is also surprisingly compact. |
|
|
|
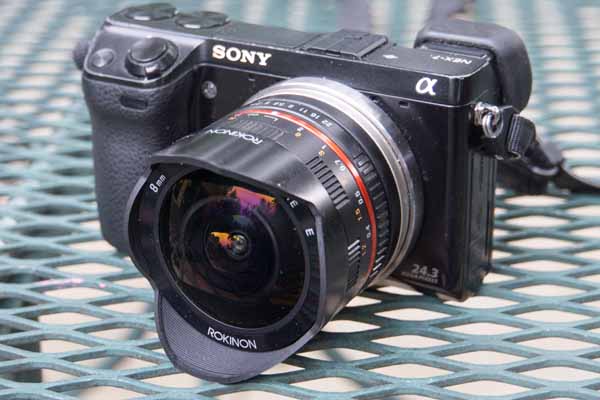 The Sony Nex7/Rokinon 8mm setup is only about 1/3 the size of my Canon 6D with a Canon 8-15mm fisheye – a true space and weight saver. |
 One of the first images that I recorded with the new lens was in the Tetons. I especially like the curved horizon. |
|
|
|
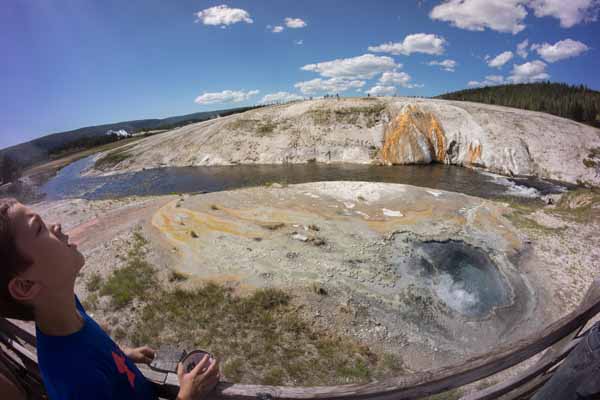 Here in Yellowstone you can see that the bridge rail curves upwards. The lens does not support the camera’s autofocus feature. |
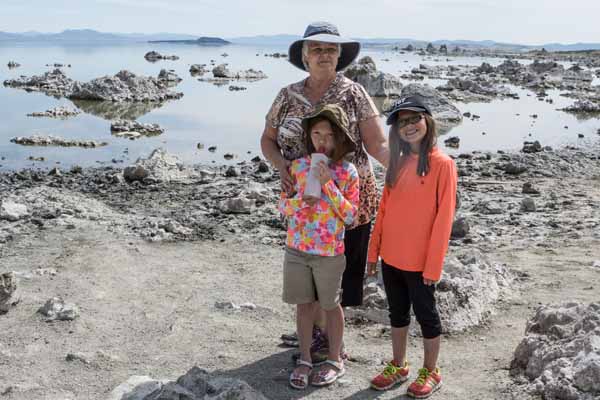
 However an 8mm lens has a very wide depth of field which makes focusing less critical as you can see in this image taken at Mono Lake. |
|
|
|
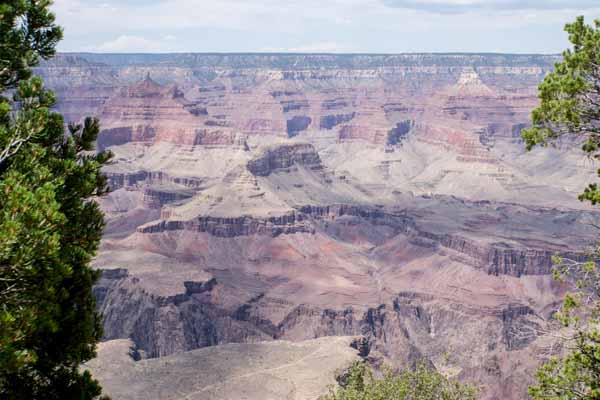
 At Grand Canyon, the bend in the horizon is amazingly scenic. The lens does not support autoexposure so I set the camera shooting mode to manual, set the lens aperture to f/8 and adjusted to the proper shutter speed. |
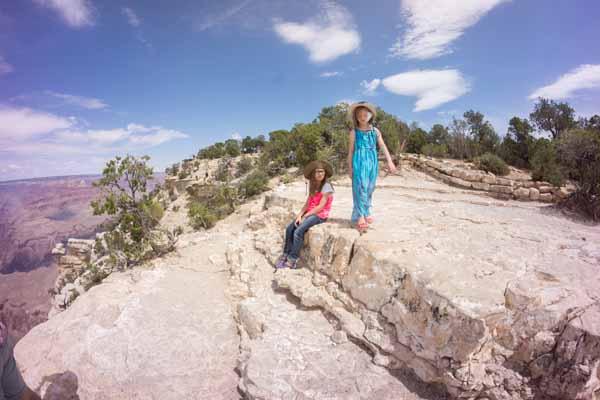 In both of these photos, you can see that the exposure for both a shaded and sunny scene were correct. Neither the manual focus nor the manual exposure requirements of this lens is a concern. |
|
|
|
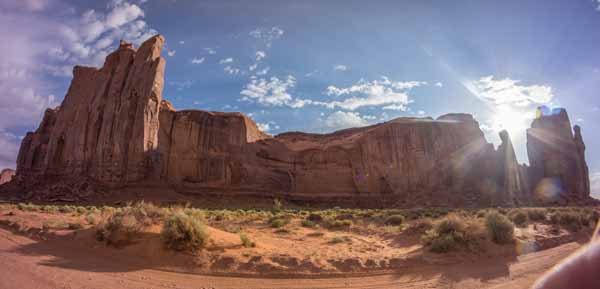 At Monument Valley I took advantage of the lens’ extreme wide view. Here I was able to take in a 180-degree view to photograph this huge monument within a single image. |
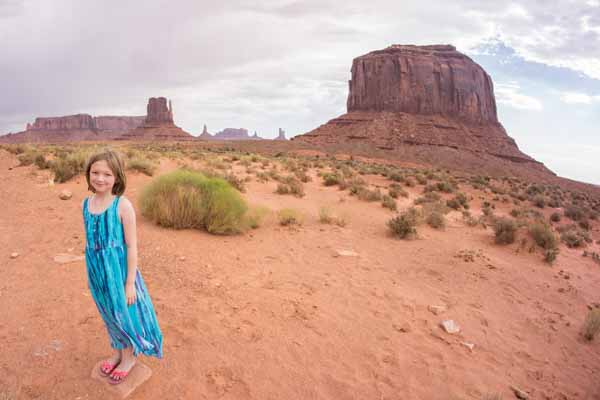 The fisheye excels for those of you who like shooting portraits that include the vast surroundings. |
|
|
|
 At Mesa Verde, we encountered another “tight squeeze”. However, we were able to capture this with the lens’ wide view. |
 In Rocky Mountain National Park, the lens took in not only the winter’s left over snow but the billowing overhead July clouds. |
|
|
|
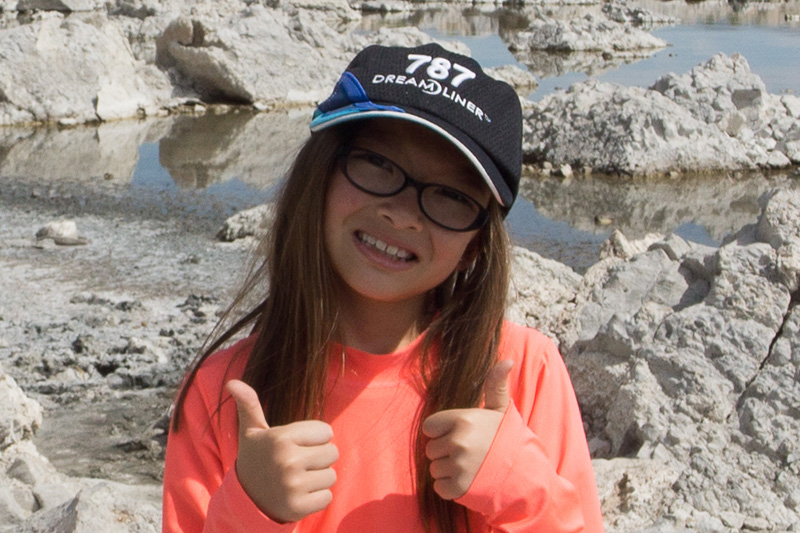
| What about the sharpness?
Here I’ve enlarged a small section of one of the above images. You can clearly see the detail in the face, the lettering of the cap and the tufa formations in the background. I found the sharpness of this inexpensive lens to be very acceptable. |
 |
|
|
|
After my short time with this lens, I am no longer skeptical of it’s quality. The images are tack sharp with very good color reproduction. If you’re on the lookout for an ultra-wide, include this lens in your search.
The Rokinon 8mm f/2.8 fisheye is also available for other camera models as well: Fuji, Samsung and Canon M mount. Other similar versions with a maximum f/3.5 aperture are available for Canon, Nikon, Sony A mount, Pentax and Olympus 4/3.
Written by: Arnie Lee
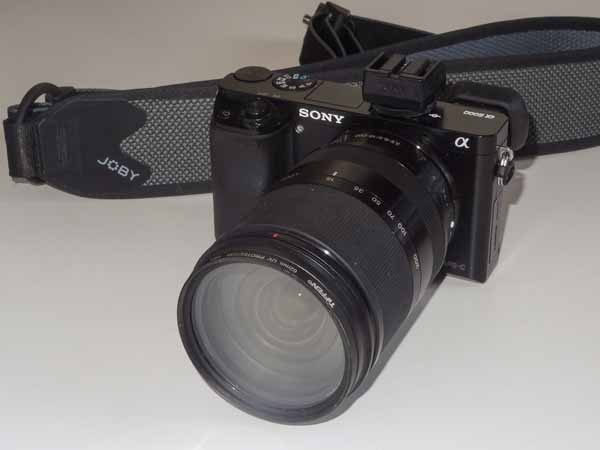
The Sony A6000 Mirrorless
14th August 2014
My 6300-Mile Field Test
On our recent vacation, my camera of choice was Sony’s newest mirrorless camera. While I also brought a much larger Nikon D700 conventional DSLR, I relied mostly on the the Sony A6000. As a comparison, I captured about 150 images with the Nikon D700 and more than a thousand images with the Sony A6000.
My setup was the A6000 coupled with Sony’s 18-200mm lens. This combination is lightweight and compact, produces quality images and just happens to fit beneath the driver’s seat for fast, convenient access.
Hopefully, the following photographic sampler illustrates the A6000’s versatility. I’ll add a few techie details afterwards.
 The A6000 is smaller than a conventional DSLR so it’s both lighter and more compact. |
 You can compare the sizes of the A6000 next to the conventional Nikon D700 DSLR. |
|
|
|
 The A6000’s high resolution 24MP sensor renders scenics with very high detail. |
 Additionally, the camera can capture subjects that have a wide range of exposure levels. |
|
|
|
 The A6000’s articulated LCD makes it easy to capture stills and closeups. |
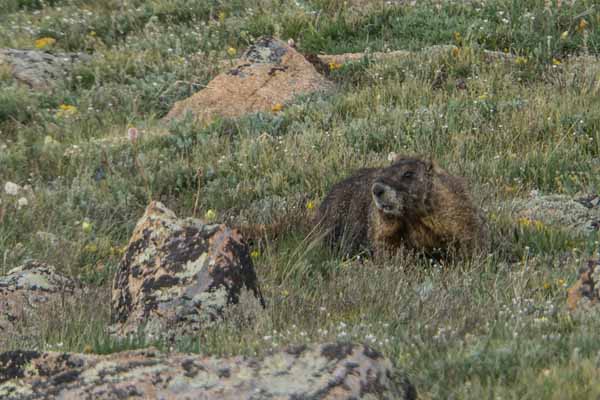 The much improved focusing system works well for wildlife shots. |
|
|
|
 With the 18-200mm lens, I can keep dry while still in on the action. |
 Here’s some quick, responsive focusing |
|
|
|
 The A6000’s bright viewfinder makes it easy to compose and frame in bright sunlight. |
 The electronic viewfinder previews the scene with the camera adjustments applied. |
|
|
|
 It handles action shots well and can capture up to 11 frames per second. |
 The exposure system works quite well with a wide variety of subjects. |
|
|
|
 I used the camera’s sweep panorama feature often to automatically produce some very pleasing large images. |
|
|
|
|
I suppose it doesn’t matter than I traveled 6300 miles with the camera other than I used it under a variety of conditions.
My “film” was a 32GB SD card, but I never filled it with the 200 pictures a day (the camera was set to record simultaneous RAW and JPG images). All in all, I’m very happy with the images that the camera produced. The one small gotcha is that the A6000 has a short battery life – probably due to the electronic viewfinder. Thankfully, I had an extra battery that I carried along.
Since this is my third Sony mirrorless camera, you can safely assume that I’d recommend this camera to others. In fact my daughter must have agreed with my assessment and purchased one.
For those interested, here’s a few of the technical specs for the A6000:
Sony A6000 os a mirrorless with a 24MP sensor. One of the reasons for choosing this camera is its fast and accurate hybrid focusing system that allows up to 11 frames per second capture. Other proven features are its “sweep panorama”, automated HDR capture, easy exposure bracketing, and Sony’s proven video recording.
List price for the A6000 body without lens is $650. The 18-200mm lens cost $850, more than the body but this single lens allowed me to enjoy the scenery without clutter of additional lenses.
Written by: Arnie Lee
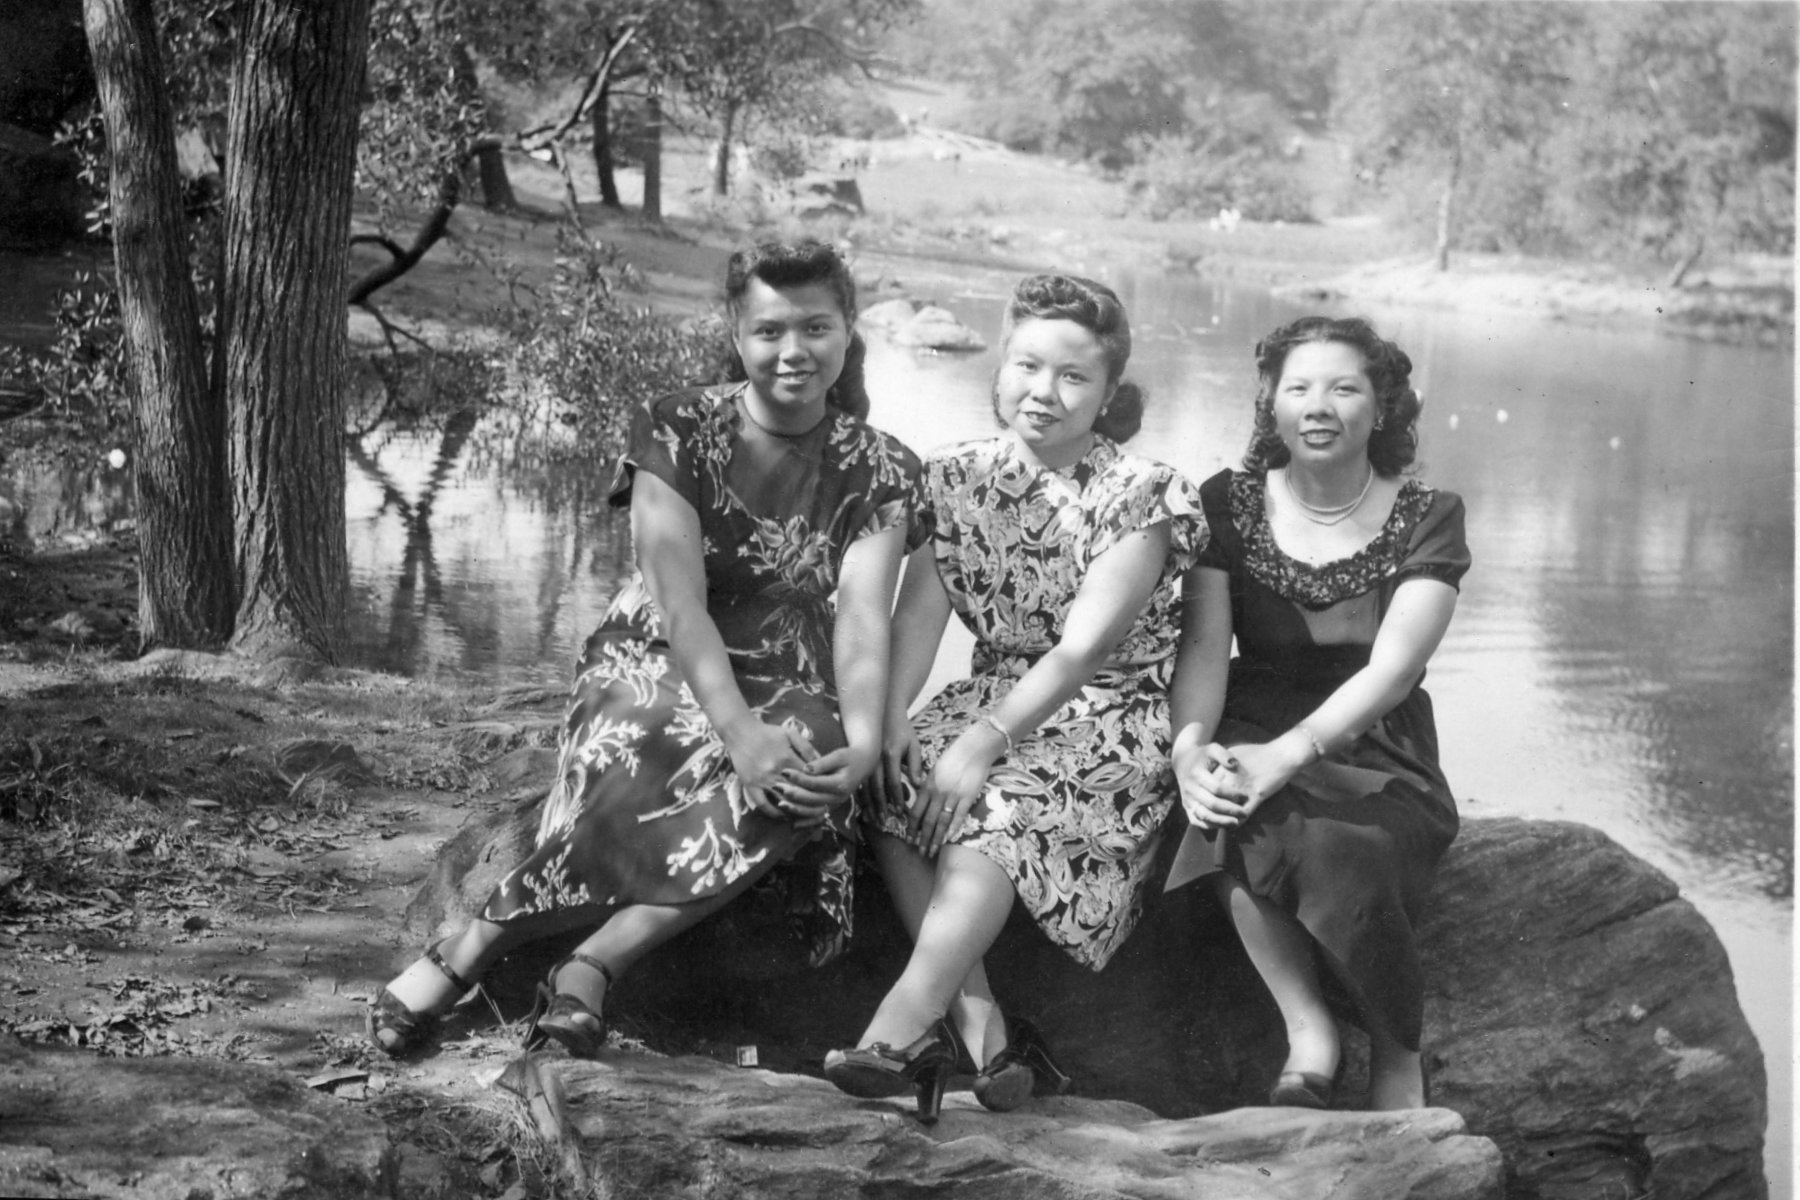
My Long Affair with Photography
18th April 2014
|
||||
| When the film was finally developed, we were thrilled to see the results. Here are two photos, one from the 40’s and another from the 50s, but they both share the same “feel” – the subjects are dressed up for a special occasion, some of them are posed comfortably and others more stiffly, but always in full black and white. | ||||
|
||||
| In the 50’s, color photos were reserved only for special occasions – owing to the higher expense. While Dad sometimes shot color, the cost of the film and print processing was too extravagant for normal use. But for those special times when he did use color, he would send the exposed film to one of the discount processing services to save money. The downside: developing by mail took an additional week to complete. | ||||
| I cut my teeth on Dad’s older twin lens reflex (TLR) and a Polaroid Swinger. Using the twin lens reflex was an exercise in patience. With only twelve exposures to a roll of 120 film, you made sure that you had a good shot before you released the shutter. With the Swinger, it was a blast to see instant photography. With today’s digital we’ve come full circle; we have another form of instant photography again. | ||||
| As a youngster with sparse earnings, I made do with Dad’s second TLR and the Swinger that served as my equipment. I came into luck when Uncle Tom, who was in the Air Force at the time, agreed to buy a camera for me at a huge discount on the Air Force Base PX. This became a lesson in patience: I’d wait a whole year until he returned from service overseas to get my hands on a state of the art Canonflex RM SLR camera. | ||||
| In the mean time, I learned to develop film and make my own prints. A small corner in the basement became my darkroom. I covered the windows to keep out the light, fashioned a processing area from discarded planks of wood and used Mom’s washroom sink to provide water for the chemicals. I spent many nights mixing developer, stop bath and fixer; processing film and making black and white prints. I started with a basic Testrite enlarger and later graduated to a fancy Durst 606 enlarger with a built-in color filter drawer. I was so immersed into this hobby that soon I learned to make my own color prints. It would take take three hours of preparation to make the first color “test” print and perhaps six hours to get an acceptable “final” color print. I can hardly believe that I had so much patience back then. | ||||
| To further my interest, something wonderful happened. Mom arranged for me to get a part time job with John Margotta, her past schoolmate who was now a professional photographer. For three years, after school I would head to John’s studio to learn the photography business. In the studio I was his assistant. I would hold lights and set up equipment for weddings, bar mitzvahs, anniversaries, birthdays, modeling shoots, funerals (yes, funerals) and more. I learned about lighting techniques, portrait techniques, posing techniques, action techniques, view camera technqiues and wedding cake cutting techniques too. And of course John taught me many darkroom techniques. I used most of my earnings to purchase more equipment. | ||||
| My photographic education continued. During high school I proudly served on the yearbook staff as one of the three student photographers with access to sporting and entertainment events. In the following examples, you’ll see that we continued taking black and white photos since the cost of color was prohibitive at the time. | ||||
|
||||


| During my college years, I completed my formal photo training by working at two different high end processing labs servicing the Madison Ave advertising agencies. In the 60’s, a process called “dye transfer” was used to make photographic reproductions for the high quality magazines like Vogue and Harper. Here is where I learned processing from the ground up: making color separations from original transparencies for printing using cyan, magenta and yellow dyes. Despite commuting between my home in New Rochelle and the photo labs in New York City and the long working hours, I thoroughly enjoyed the job as I continued to learn different aspects of photography. |
| At college I taught at the photography club and introduced my girlfriend to darkroom techniques. By the way, Kris is now my wife and hates the darkroom. I was a staff photographer for several university organizations and earned extra cash by photographing fraternity and sorority events. |
| Following college, Kris and I were married and shortly thereafter, photography took a backseat to raising a family, putting bread on the table and becoming involved in the software industry. Although I took and accumulated thousands of photos during this period, the bulk of these were of family faces and of the scenic vacation variety. |
| Skip forward 30 years to the mid-1990s. My company Abacus, was involved with flight simulation software and I’m taking more and more aviation related photos. I now find myself dabbling in the new world of digital photography. The stars are finally aligned and I’m ready to marry two of my long time interests: photography and aviation. With digital, the equipment and processing techniques are radically different from conventional film photography. |
| Several years ago, I received a surprise email from John Margotta, my photography mentor from the 1960s. I was happy to hear that at an age of 80+, he’s still immersed in photography. He’s produced some artistic renditions of still life using his “Photoshop-equipped darkroom”. His approach to photography is a lesson that hi-tech isn’t reserved only for the young. |
| Lucikly, I’m finding that most of the basics that I started learning 50+ years ago are still relevant. After all of these years, I remain very excited and passionate about my love of photography. |