Online Magazine
Recent Posts
- Safeguard your Cellphone Photos
- Black & White to Color – Instantly
- Wearing Many Hats
- Video Roundup
- Rescuing Your Blurry Pictures
- Showing Their Age
- What is Your Angle?
- Panorama Photos
- Humorous Photos
- Close Ups
- Fisheye Pictures
- Photo Antiquities
- Printing Big
- Appreciating Scale
- Celebrity Sightings
Tags
More Places to Go
- Free "How-To" Books “How To” books for popular cameras 0
- Vist Us on Facebook keep in touch with us on Facebook 2
Archives
- July 2023 (1)
- March 2023 (2)
- February 2023 (1)
- December 2022 (1)
- October 2022 (1)
- September 2022 (8)
- August 2022 (9)
- July 2022 (1)
- June 2022 (1)
- June 2021 (1)
- May 2021 (1)
- March 2021 (5)
- February 2021 (4)
- January 2021 (2)
- April 2019 (1)
- March 2019 (1)
- February 2019 (1)
- October 2018 (2)
- April 2018 (1)
- March 2018 (4)
- February 2018 (1)
- November 2017 (1)
- August 2017 (1)
- June 2017 (1)
- April 2017 (1)
- March 2017 (5)
- February 2017 (2)
- January 2017 (1)
- October 2016 (1)
- September 2016 (1)
- August 2016 (1)
- July 2016 (1)
- May 2016 (1)
- April 2016 (1)
- March 2016 (2)
- February 2016 (1)
- January 2016 (2)
- December 2015 (1)
- November 2015 (1)
- October 2015 (3)
- April 2015 (1)
- March 2015 (5)
- February 2015 (1)
- January 2015 (4)
- December 2014 (2)
- November 2014 (5)
- October 2014 (2)
- September 2014 (1)
- August 2014 (2)
- July 2014 (1)
- May 2014 (1)
- April 2014 (5)
- March 2014 (5)
- December 2013 (2)
- November 2013 (18)
- October 2013 (1)
- September 2013 (1)
- August 2013 (1)
- July 2013 (1)
- June 2013 (3)
- May 2013 (1)
- April 2013 (2)
- March 2013 (1)
- February 2013 (1)
- January 2013 (1)
- December 2012 (1)
- November 2012 (2)
- October 2012 (2)
- September 2012 (5)
- August 2012 (2)
- July 2012 (1)
- June 2012 (1)
- May 2012 (1)
- April 2012 (4)
- March 2012 (1)
- February 2012 (1)
- January 2012 (3)
- December 2011 (1)
- November 2011 (3)
- October 2011 (1)
- September 2011 (2)
- August 2011 (2)
- June 2011 (3)
- May 2011 (4)
- April 2011 (8)
- March 2011 (8)
- February 2011 (10)
- January 2011 (6)
- December 2010 (11)
- November 2010 (14)
- October 2010 (6)
- September 2010 (12)
- August 2010 (2)
- July 2010 (4)
- June 2010 (3)
- May 2010 (1)
- April 2010 (1)
- March 2010 (2)
- February 2010 (1)
- January 2010 (1)
- December 2009 (1)
- November 2009 (2)
- October 2009 (2)
- September 2009 (1)
- August 2009 (3)
- July 2009 (2)
- June 2009 (1)
- May 2009 (2)
- April 2009 (1)
- March 2009 (2)
- February 2009 (1)
- January 2009 (3)
Rescuing Your Blurry Pictures
02nd December 2022
The early days of picturetaking had me carefully setting up to take that spectacular photo, sending the film off to develop and patiently waiting for the prints come back from the photofinisher. Unexpectedly I experienced much disappointment when I looked through the returned pictures only to see my favorite subject as a blurred image. The cause may have been my sloppy focusing or me shaking the camera while using a slow shutter speed. No matter, the result was a missed opportunity.
When I review my large collection of photos – especially the older ones – I’m amazed how many aren’t “tack sharp”. Before the advent of autofocus cameras, we had to rely on manual focus techniques to keep the lens properly set. And before the advent of higher ISO film, we had to rely on stabilizing techniques to minimize the camera shake. In my younger days I must have been a photographer with sloppy habits and this explains why I have a bunch of blurry photos from back then.
A few weeks ago I learned of a software product that supposedly “fixed” blurred photos. After reading a couple of reviews of Topaz AI I decided to give it a try. In addition to sharpening images it can reduce image noise and can boost image resolution.
Topaz AI can be used by itself (standalone) or as a plug-in (helper) for Adobe Lightroom or Photoshop. I have used it as a standalone but most often as a plug-in for Lightroom.
Here’s a quick look at how Topaz AI can make those blurry pictures go away.
Below is a photograph taken with film in the early 1970’s using a manual focus camera. You can see that the original image on the left is not quite in focus.
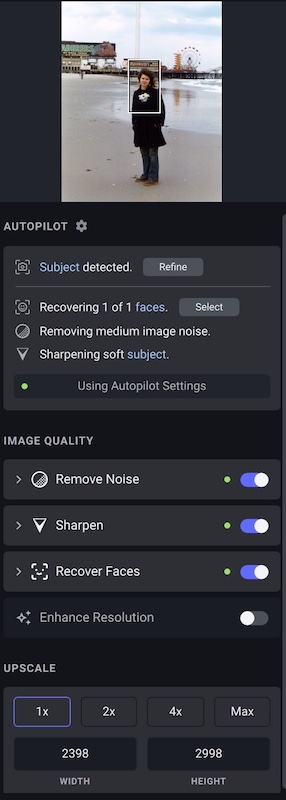
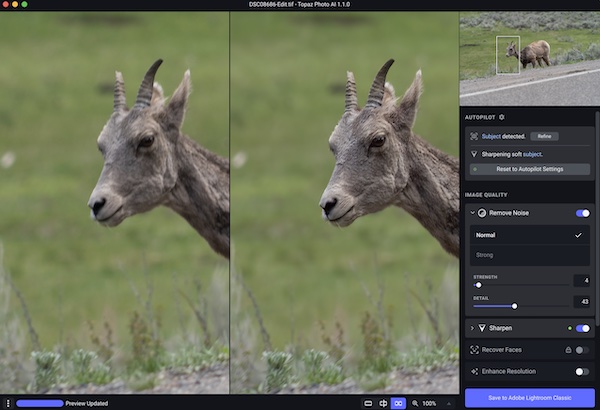
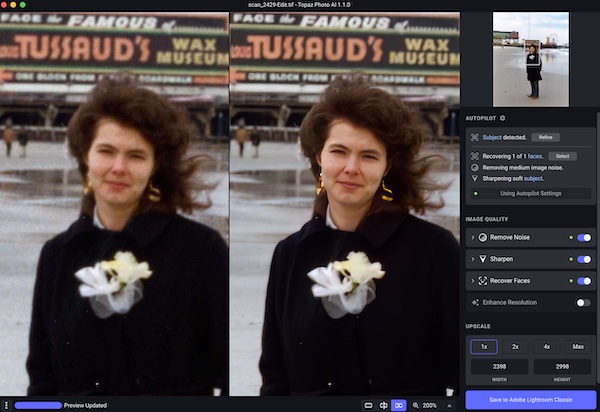 Here I’ve started Topaz AI to process the original image. This is the Topaz AI screen. On the left half of the split screen is the original image while the right half shows the improved image. On the far right is the control panel. By default the software analyzes the image and applies the changes that it believes will improve its appearance. |
|
|
This is an enlargement of the Topaz AI control panel. At the top is a thumbnail of the original image. Move the thumbnail rectangle to view different parts of the original image. In this case Topaz has used its Autopilot settings to find a subject’s face in the original image, apply medium noise reduction and sharpen the subject in the image. You can override these settings if you do not care the resulting changes. You can see that the buttons to Remove Noise, Sharpen and Recover Faces have already been activated (blue) but the Enhanced Resolution has not been activated (grey). If you want to increase the resolution of the original image (Upscale), you can do so by selecting 1X, 2X, 3X, 4X or Max. You might use this if you’d like to make a poster size enlargement from your original image. I did not increase the image resolution. The dimensions of the resulting image are displayed below the enhance resolution choices. |
 |
|
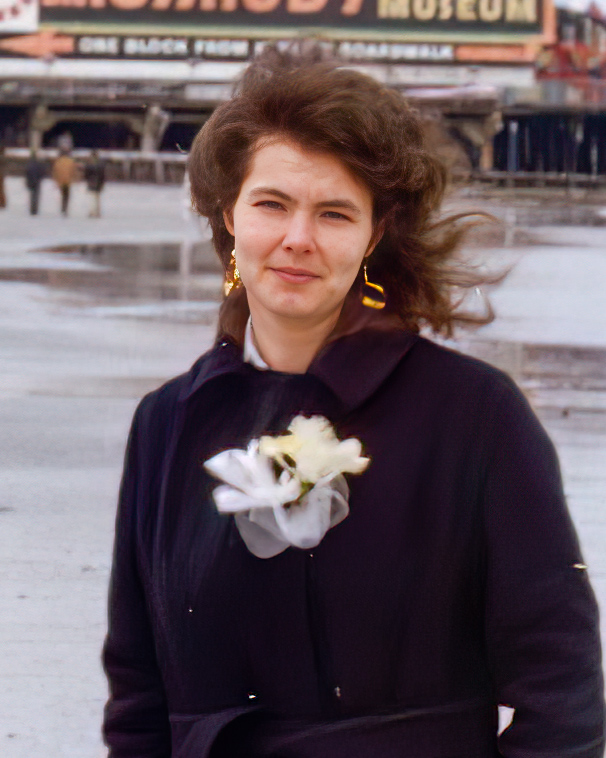
Here are portions of the original and “fixed” versions of the image. |
|
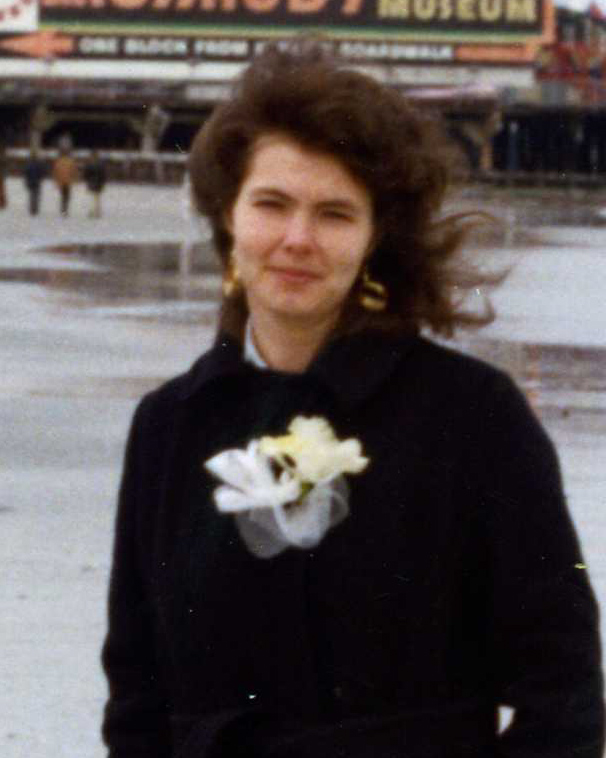 original image – click to enlarge |
 |
|
Clearly you can see that Topaz AI has done a remarkable job in removing the cause of the bad focus in original image. Next is a second image that suffered from focus blur caused by my rush to capture the bighorn sheep before it got away. The original was taken in May 2022 using a digital camera: Below are portions of the original and improved images of the bighorn sheep. |
|
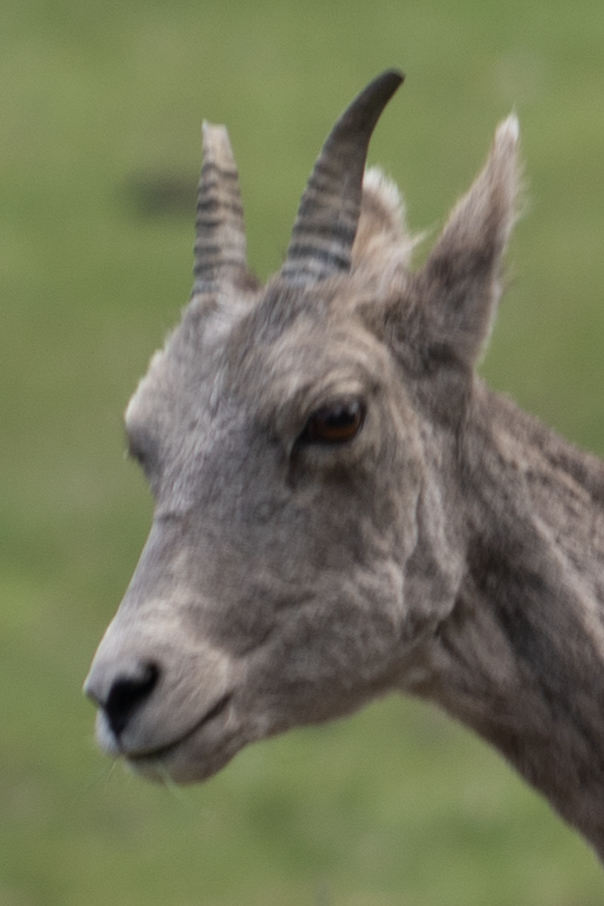 |
 |
|
Without any changes to the Topaz AI settings this software has produced an amazing image. It has saved another one of my photos from the “throwaway” pile. |
|
For those of you who may be interested in this software, you can get a free trial version for either Mac or Windows personal computers. Visit Topaz Labs and look for the Photo AI package.
Panorama Photos
17th September 2022
Taking In A Wide View
I enjoy taking panorama photographs. When I look at one it’s as if I can scan the horizon from left to right or from right to left and experience an entirety of what’s in front of me. A panorama is wonderful way to capture landscapes and scenic subjects.
I have a couple of cameras that are able to automatically take panoramas. My cellphone camera also has this feature. The amount of detail that is recorded in a panorama is quite amazing. Keep in mind that the enlarged panoramas displayed here have been reduced in overall size to fit on your screen – about 1600 pixels wide. Most of these original panoramas are more than 10,000 pixels wide!
Below are a few panoramas that I’ve taken over the years.
Click on any of the images to view the enlarged panorama.
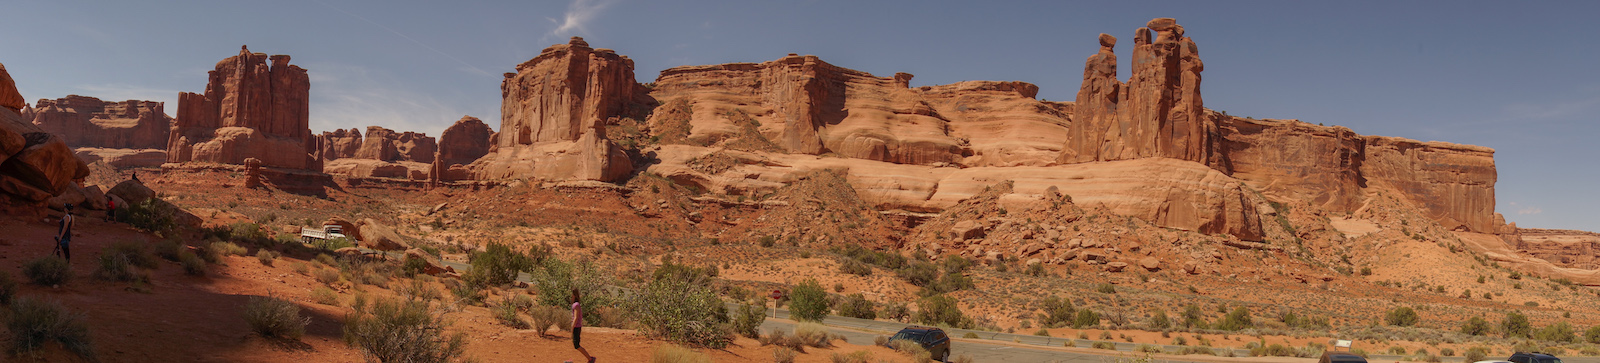
Arches National Park, Utah 2013 Sony NEX-7 camera

Badlands National Park, South Dakota 2016 Sony ILCE-6000 camera

Cannon Beach, Oregon 2013 Sony NEX-7 camera
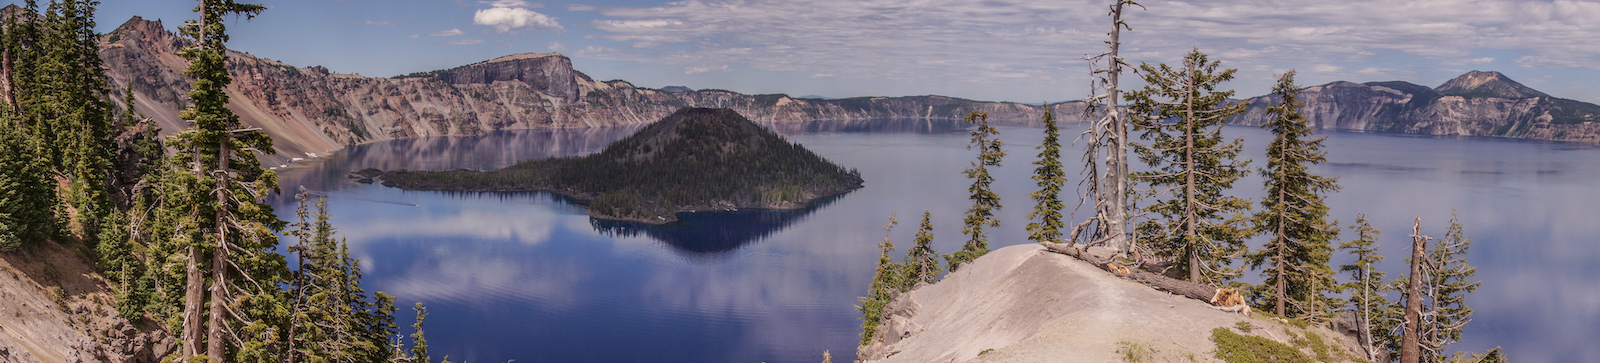
Crater Lake, Oregon 2013 Sony NEX-7 camera
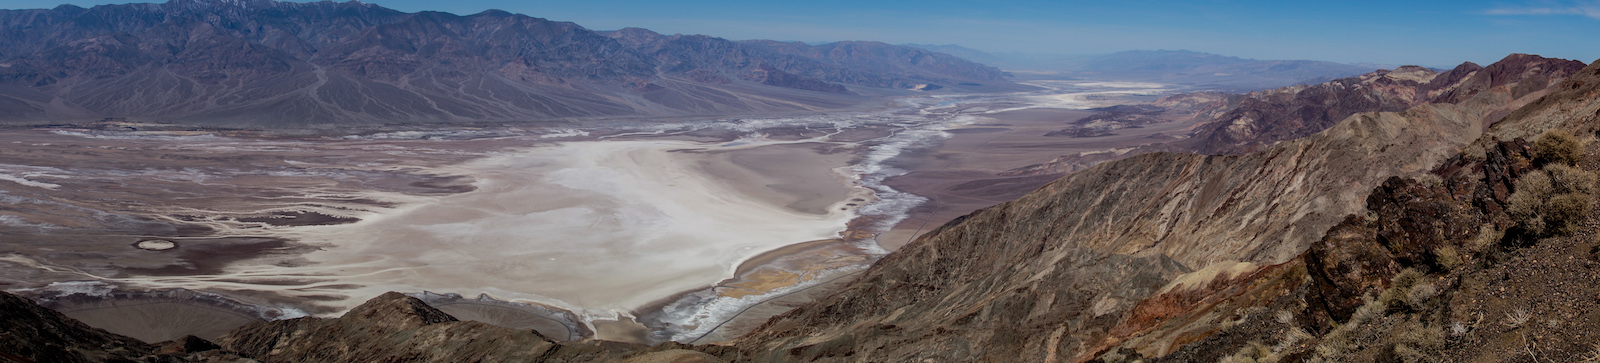
Dantes View in Death Valley National Park, California 2013 Sony NEX-7 camera

Grand Canyon National Park, Arizona 2020 iPhone 11 Pro Max cellphone

Gerald Ford International Airport in Grand Rapids, Michigan

Jenny Lake in Grand Teton National Park, Wyoming 2008

Lake McDonald in Glacier National Park, Montana 2021 iPhone 11 Pro Max cellphone

Mono Lake, California 2016 Sony ILCE-6000 camera

Monument Valley, Utah 2019 Sony ILCE-6000 camera
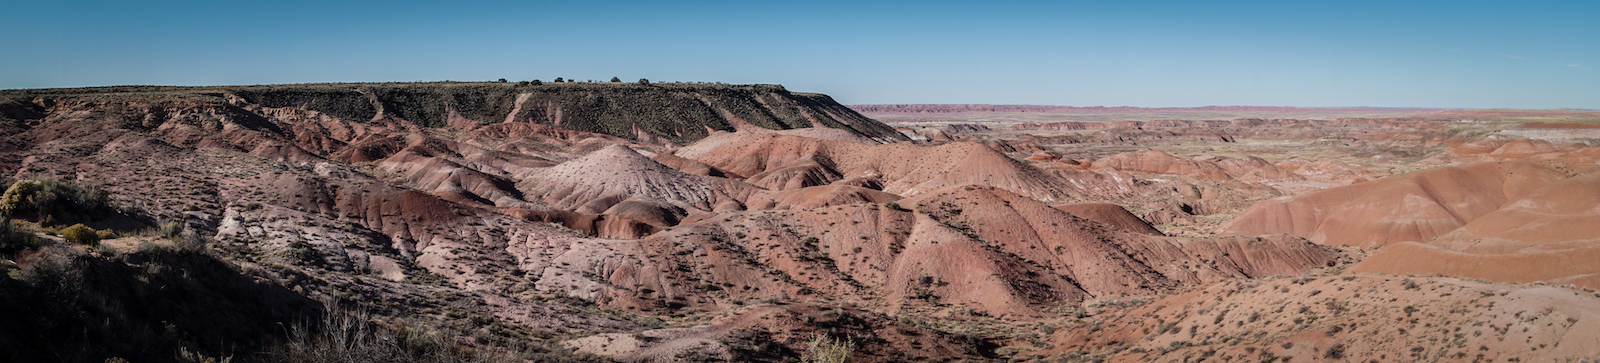
Painted Desert in Petrified Forest National Park, Arizona 2016 Sony ILCE-6000 camera

St Louis Waterfront in St Louis, Missouri 2013 Sony NEX-7 camera
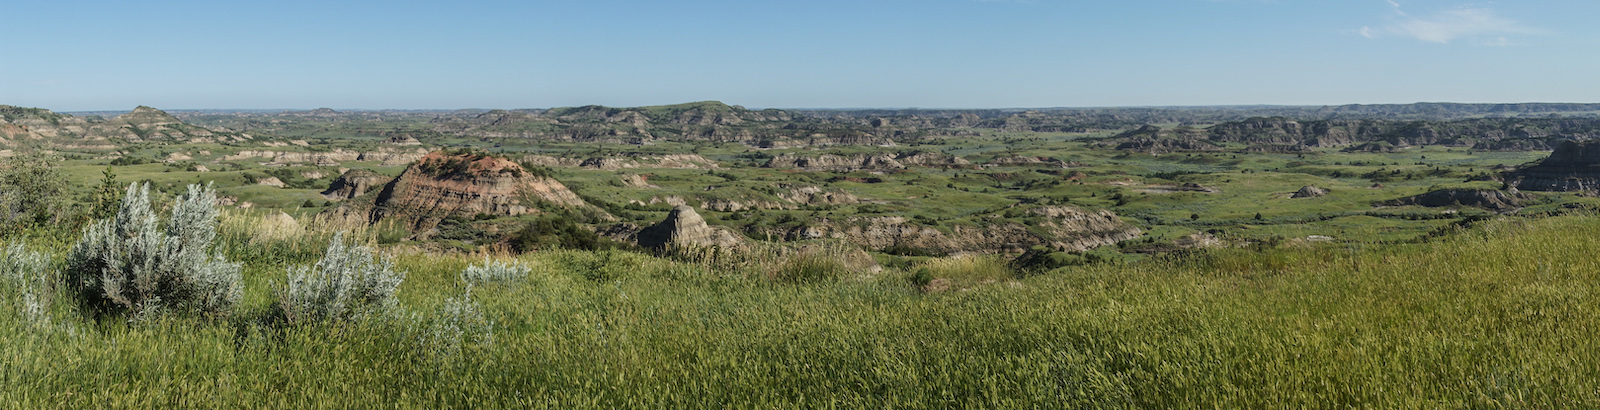
Theodore Roosevelt National Park, North Dakota 2013 Sony NEX-7 camera

Trillium Lake and Mt. Hood, Oregon 2017 Sony ILCE-6000 camera
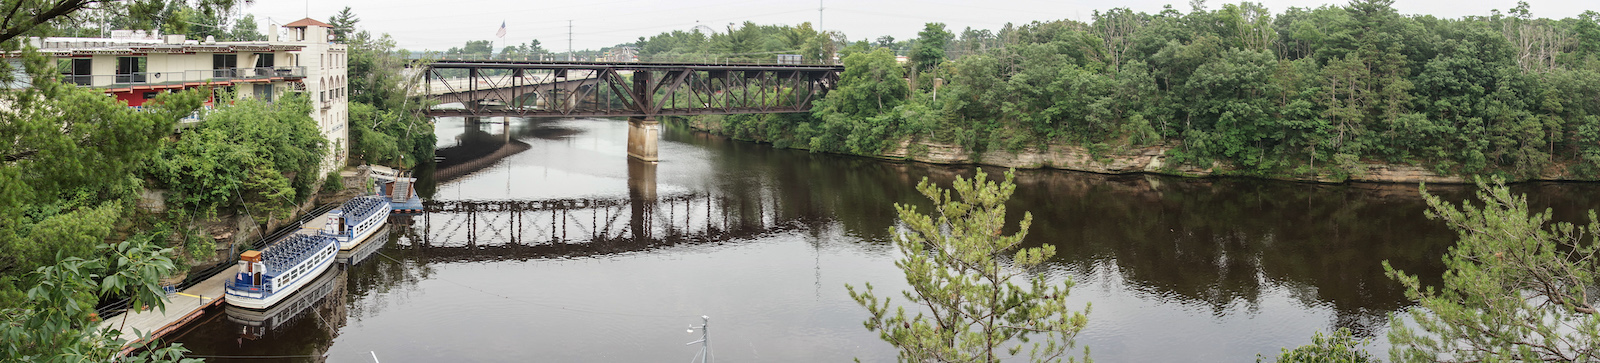
Wisconsin Dells, Wisconsin 2013 Sony NEX-7 camera

Rim of Grand Canyon of the Yellowstone in Yellowstone National Park, Wyoming 2017 Sony ILCE-6000 camera
If your camera or cellphone can capture a panorama have you tried it yet? The high quality of the images will amaze you.
Written by: Arnie Lee
Stay Focused Guides
01st January 2021
We’ve published books since 1978. However in 2012 we ceased our publishing activities to concentrate on picture-taking. Still, you may be interested in any of our previously published books about photography including these seven “Stay Focused Guides” for popular DSLR cameras.
Now we’re giving them away free to anyone who would like a copy. They are older but many of the techniques apply to most all DSLR or even the newer mirrorless cameras.
Although each title pertains to a specific model camera, most of the techniques apply to any advanced camera regardless of the make. So if you have a different model, download a PDF copy and follow along. I’m confident that you’ll pick up a few tips along the way.
And while you’re at it, why not Subscribe to our Newsletter! – to your right? We need only your name and email address.
Without further ado, here are the links for your free PDF copy of our Stay Focused Guides. Click on one of the links below to view a PDF version of a book. Then save the PDF to your desktop.
SFG for Canon XS in PDF format
SFG for Canon XSi in PDF format
SFG for Canon T2i in PDF format
SFG for Nikon D40 in PDF format
SFG for Nikon D60 in PDF format
SFG for Nikon D3000 in PDF format
SFG for Nikon D5000 in PDF format
We also have several other books that you may be interested in also available FREE:
28 Tips for Better Photographs in PDF format
National Parks – a tour in PDF format