|
Aviation Photography
learn from my many years of practice
|
| Over the years, I’ve shot many planes – with a camera. In fact, I’ve been interested in aviation for a long time. I began taking pictures of all things aviation at a young age and recall the excitement of visiting the airport to pick up relatives. I would race to the rooftop viewing area to catch a glimpse of the planes like these: |
|
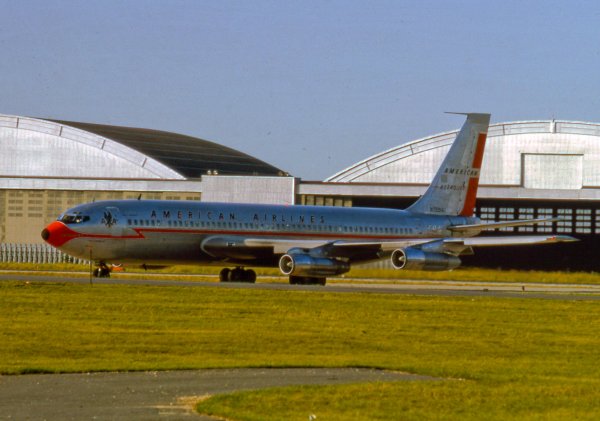
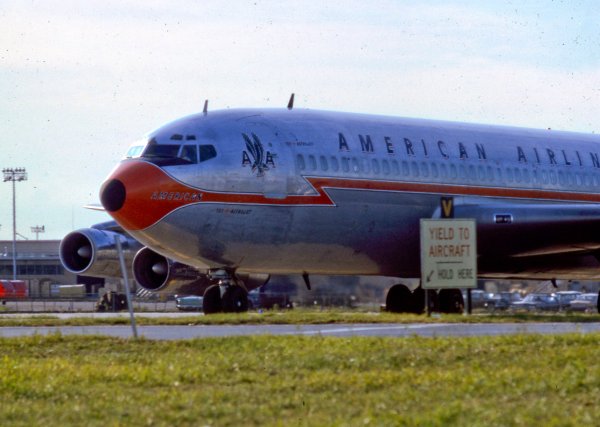
Here’s America’s first jet airliner, the Boeing 707 Astrojet.
|
Taken in 1963 at Idewild Airport in New York. The airport is now known as John F Kennedy.
|
|
Let’s skip forward 30 years to the mid-1990s when our company has already become involved with flight simulation. I find myself immersed in the emerging new world of digital photography and am now ready to marry two of my long time interests: photography and aviation. With digital, the equipment and processing techniques are radically different from conventional film photography. But the basics of photography haven’t changed much. Therefore I’m in a position to benefit from my prior photographic know-how.
The remainder of this article are a collection of tips that I hope you can use.
TIP: you don’t have to buy an expensive digital camera to take quality aviation photos. Below, I’ve listed the camera used for each photo. But you’ll see from the wide range of equipment I’ve used, that the camera’s maximum resolution isn’t all that important unless you are going to make large, printed enlargements. You’ll see that for web pages, resolutions that starting at 1.4 MP and increasing to 10+ MP are all quite satisfactory.
The vast array of digital cameras make taking aviation photos very forgiving …. and very inexpensive – verging on free. And with instant development that’s faster than a Polaroid, the built-in color LCD gives you immediate feedback so you can try again when you need to reshoot. You can hardly miss using a digital camera with silicon film and a computer as your darkroom.
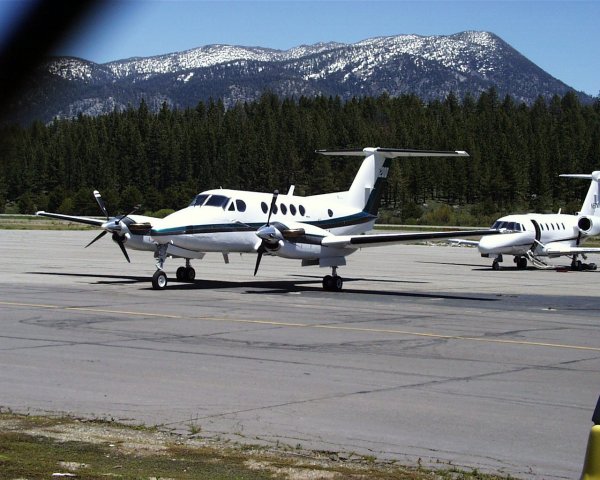
The first digital camera that I used was a single lens reflex (SLR) called the Olympus C-1400L. With a resolution of 1.4 MP and 3x zoom lens, it produced very acceptable images. To take the photo of the Beech B200 below, I was standing behind a chain link fence. You can clearly see the vignetting of the image (shadow) at the upper left corner due to the fence. TIP: avoid fences Click the thumbnail below of the Beech B200 to see an enlargement. You’ll see that the photo is quite sharp and has a lot of detail. So you can see that 1.4 MP is quite adequate for photos that are destined for web pages.
|
|
|
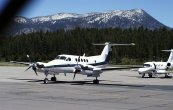
Beech B200 at Lake Tahoe (KTVL) taken with C-1400L in 1998.
1280 X 1024 pixels (1.4MP)
|
|
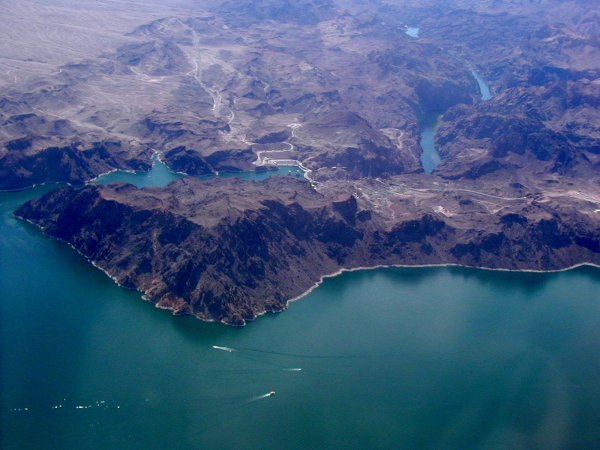
| A few years later, I graduated to the Olympus C-2000 with 2.1 MP resolution, also with a 3X zoom lens. The picture of Lake Mead was taken on approach into Las Vegas. TIP: sit by the window From my window seat, I was able to capture the rugged shoreline of the Colorado River / Lake Mead and the Hoover Dam. The resolution here is fine enough to capture the boats skimming across the water. Minimize the glare by keeping the lens close to the window surface. If the sunshine is falling on your window, you may not be able to take quality shots since the glare may be excessive. When you’re ready to take a picture out of the windows, sometimes the direction of sunshine is a matter of luck. |
Olympus C-2000 |
Lake Mead shortly before landing
in Las Vegas (KLAS) taken with C-2000 in 2000.
1600 x 1200 (2MP)
|
|
Aircraft normally make left-hand traffic – left hand turns on the approach to landing. So before the flight from Paris to Nice, I requested a window on the left side of the plane. This would allow me to see the approach to the airport over the blue Mediteranean. Had I been sitting on the right-hand side, I would be looking at a lot of sky as the pilot made left-hand turns! TIP: choose a window seat on the left side of the aircraft
Olympus C-2000 |
Flying downwind leg for landing in
Nice Cote D’Azur (LFMN) taken with C-2000 in 2000.
1600 x 1200 (2MP)
|
|
| Many photos of aircraft are taken through the window of an airport terminal. While this is often the most practical way to get your snapshots, shooting through the glass introduces an extra layer which can degrade the final image. TIP: when possible, get out from behind the glass Many airports have rooftop viewing areas which not only are glass free but get you closer to the the action. On the roof, you may have views of the tarmac that are totally inaccessible from the terminal below. |

Pentax Optio SV
|

Shot from the rooftop viewing area atAmsterdam Schiphol (EHAM) taken with
Pentax Optio SV in 2003. 2592 x 1944 (5MP)
|
|
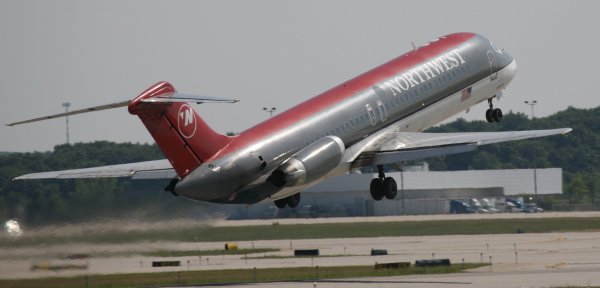
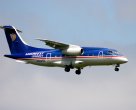
| Many of the most impressive aviation photos are of planes that are either taking off or landing. TIP: take shots of takeoffs and landings For takeoffs, wait until the nose wheel is lifting off the runway. For landings, wait until the main wheels are just making contact with the runway. With a little practice you’ll hit it just right. |
|
Canon Digital Rebel |

Shot from the Sunset Blvd viewing area at
McCarran International (KLAS) taken with
Canon Digital Rebel in 2005. 3072 x 2048 (6MP)
|
|
| One common complaint is that photos taken with digital cameras often lack contrast. TIP: boost contrast with software This problem is often solved after-the-fact after you’ve transferred your images to the computer. Many photo editing programs offer the “auto levels” feature which enhances the contrast, adjusts the white balance and make the overall photo snappier and more pleasing. |
|
Olympus 720SW |

Kalamazoo (KAZO) taken with Olympus 720SW in 2006. 2304 x 3072 (7MP)
|
 Same shot enhanced with Photoshop Elements (auto levels) to make it more “snappy” Same shot enhanced with Photoshop Elements (auto levels) to make it more “snappy”
|
|
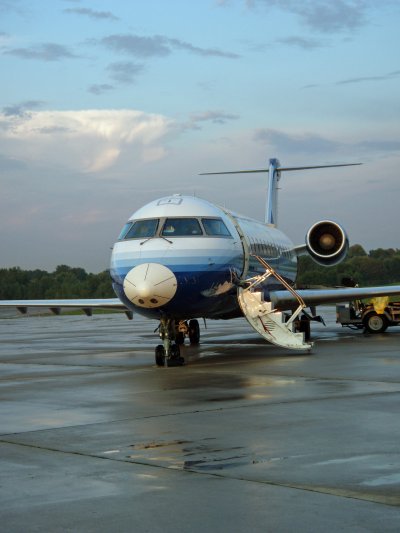
| When shooting with lower cost digital cameras, there is often a delay between the time you take the first shot and the camera is ready for the next. If the delay is lengthy, you may miss an important photo. More capable cameras are able to capture multiple shots rapidly. TIP: be patient and don’t hurry the shot Very often, you’ll get the best shot by waiting patiently until the plane passes at the closest point to the camera. Below, you can see that by waiting for only a short time I was able to capture the right hand shot with much more detail. |
|
Canon 20D |
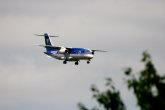 
Shot a few seconds apart at Grand Rapids (KGRR) taken with Canon 20D in 2005. 3504 x 2366 (8MP) |
|
| For action shots, you’ll need to use a high shutter speed. TIP: use a shutter speed high enough to stop the action A shutter speed of 1/300 or shorter is usually able to stop the action. Most digital SLR cameras have a sports mode which can be used to photograph flying aircraft. With other digital cameras you can set the shutter speed manually. The fast-moving A-10 below was shot using the sports mode. |
|
Canon 20D |
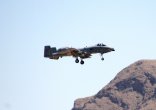
A-10 landing at Nellis AFB (KLSV) taken with Canon 20D in 2006. 3504 x 2366 (8MP)
|
|
| Get the lighting right. For maximum detail, you’ll want to make sure that the sunlight is shining over your shoulder as you shoot. TIP: keep the sun shining over your shoulder Backlighting (light coming from behind the subject) makes for great silhouettes and shots of the sun, but it usually hides or obscures the detail. For best results, keep the light behind the camera. |
|
Canon 5D |

DC-9 departing Grand Rapids (KGRR) taken with Canon 5D. 4368 x 2912 (12MP)
|
|
| Now is a good time to take the camera out of its case and head on down to the airport. I’ve found the best way to gain proficiency is to take shot after shot after shot. Afterwards, review the captured images to see your results and adjust your techniques accordingly. After all, digital film is free.
For other examples, visit our Photo Gallery that has hundreds of other aviation related photos.
To view another fantastic site with very impressive photos taken by talented photographer Ralph Duenas and other members, visit Jet Wash Images
|
|
Quick Definitions
MP – megapixel (million of pixels) – measurement of camera resolution (e.g. 3504 pixels x 2366 pixels = 8,290,464 pixels = 8 megapixels)
SLR – single lens reflex – a type of camera that allows you to view the subject directly through the lens
LCD – liquid crystal display – a small viewing screen that displays the subject, the captured image (or both) |
|
| Author: Arnie Lee Unless otherwise noted, photos are from the author’s personal collection. |