Online Magazine
Recent Posts
- Safeguard your Cellphone Photos
- Black & White to Color – Instantly
- Wearing Many Hats
- Video Roundup
- Rescuing Your Blurry Pictures
- Showing Their Age
- What is Your Angle?
- Panorama Photos
- Humorous Photos
- Close Ups
- Fisheye Pictures
- Photo Antiquities
- Printing Big
- Appreciating Scale
- Celebrity Sightings
Tags
More Places to Go
- Free "How-To" Books “How To” books for popular cameras 0
- Vist Us on Facebook keep in touch with us on Facebook 2
Archives
- July 2023 (1)
- March 2023 (2)
- February 2023 (1)
- December 2022 (1)
- October 2022 (1)
- September 2022 (8)
- August 2022 (9)
- July 2022 (1)
- June 2022 (1)
- June 2021 (1)
- May 2021 (1)
- March 2021 (5)
- February 2021 (4)
- January 2021 (2)
- April 2019 (1)
- March 2019 (1)
- February 2019 (1)
- October 2018 (2)
- April 2018 (1)
- March 2018 (4)
- February 2018 (1)
- November 2017 (1)
- August 2017 (1)
- June 2017 (1)
- April 2017 (1)
- March 2017 (5)
- February 2017 (2)
- January 2017 (1)
- October 2016 (1)
- September 2016 (1)
- August 2016 (1)
- July 2016 (1)
- May 2016 (1)
- April 2016 (1)
- March 2016 (2)
- February 2016 (1)
- January 2016 (2)
- December 2015 (1)
- November 2015 (1)
- October 2015 (3)
- April 2015 (1)
- March 2015 (5)
- February 2015 (1)
- January 2015 (4)
- December 2014 (2)
- November 2014 (5)
- October 2014 (2)
- September 2014 (1)
- August 2014 (2)
- July 2014 (1)
- May 2014 (1)
- April 2014 (5)
- March 2014 (5)
- December 2013 (2)
- November 2013 (18)
- October 2013 (1)
- September 2013 (1)
- August 2013 (1)
- July 2013 (1)
- June 2013 (3)
- May 2013 (1)
- April 2013 (2)
- March 2013 (1)
- February 2013 (1)
- January 2013 (1)
- December 2012 (1)
- November 2012 (2)
- October 2012 (2)
- September 2012 (5)
- August 2012 (2)
- July 2012 (1)
- June 2012 (1)
- May 2012 (1)
- April 2012 (4)
- March 2012 (1)
- February 2012 (1)
- January 2012 (3)
- December 2011 (1)
- November 2011 (3)
- October 2011 (1)
- September 2011 (2)
- August 2011 (2)
- June 2011 (3)
- May 2011 (4)
- April 2011 (8)
- March 2011 (8)
- February 2011 (10)
- January 2011 (6)
- December 2010 (11)
- November 2010 (14)
- October 2010 (6)
- September 2010 (12)
- August 2010 (2)
- July 2010 (4)
- June 2010 (3)
- May 2010 (1)
- April 2010 (1)
- March 2010 (2)
- February 2010 (1)
- January 2010 (1)
- December 2009 (1)
- November 2009 (2)
- October 2009 (2)
- September 2009 (1)
- August 2009 (3)
- July 2009 (2)
- June 2009 (1)
- May 2009 (2)
- April 2009 (1)
- March 2009 (2)
- February 2009 (1)
- January 2009 (3)
Affordable 3D Printer by New Matter
07th November 2017
I’ve been a tech junkie for a very long time. It seems that whenever new technology appears, I’m fairly quick to try it out.
Several years ago, I bought a MakerBot 3D printer. Early adopters know that purchasing new technology is usually expensive – this model had a price tag just north of $2000. Using it, I’ve learned the mechanics of how these amazing devices turn long rolls of plastic filament (PLA) into very detailed solid models. The prize is a collection of plastic models that adorn my office and the house. To be honest, I haven’t had a need for additional 3D models, so the MakerBot has been sitting unused for the past few months.
At this past January’s Consumer Electronics Show I ran across a couple of new 3D printers. And while the technology is no longer new, the prices of several of the printers are now within the grasp of many more consumers. My interest in a second 3D printer was motivated by my curiosity about the quality of the finished models compared to the more expensive MakerBot from a couple of years ago.
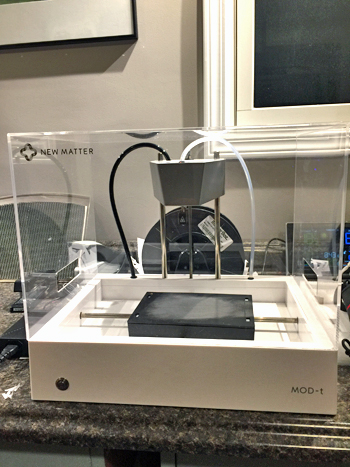
New Matter is a relatively new manufacturer that makes the MOD-t 3D printer. I purchased one directly from New Matter bundled with additional filament and accessories for $350 – a huge price difference vs. the MakerBot from a few years ago.
|
|
|
 |
 |
The MODt is small in size and can easily fit on a desktop. When operating, the continuous movement of the base plate mechanism creates a a noticeable noise. The clear plastic cover keeps the noise level down. | 3D models are created by emitting melted plastic filament (PLA) from the heated extruder. The PLA is supplied in long rolls of different colors. A 150-meter length roll of PLA costs about $20. |
|
|
|
 |
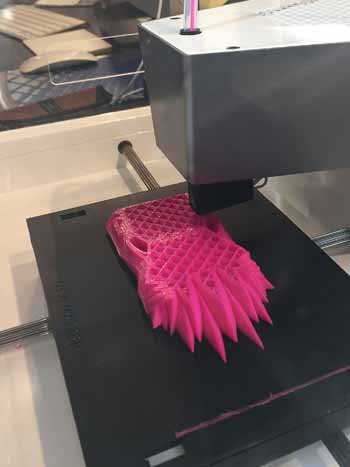 |
Here’s the MODt at work as it lays down a few thin layers of melted PLA. | A few minutes later, several more layers have been added revealing more of the model. |
|
|
|
 |
 |
This is the completed 3D model. You can see that the completed project shows a tremendous amount of detail. | The patterns for models are available free from many online 3D libraries. This model was available from the New Matter 3D library. |
|
|
|
 |
 |
This model was printed as two separate parts. Afterward, the base and the launcher were combined to turn it into a working catapult. | This white model was also printed as two separate parts – the bottom circular plate and the tall intricate vase. Complex models may take a few hours to complete. |
|
|
|
I’m impressed with the quality of the finished 3D models, especially at the rock-bottom $$300 price. For more information, please visit New Matter.
Drone Time – the Mavic Pro
08th August 2017
Remote Photography Made Easy
At this year’s Wedding & Portrait Photography International (WPPI) trade show I made it a point to watch several live demos of drones. Why, you may ask, are there drones on exhibit at a conference dealing with photography? Well, judging from their impressive video capabilities, drones are frequently used to record weddings. Although it’s been a while since I ended my stint as a wedding photographer, I’m still quite taken by the possibilities and usefulness of drone photography.
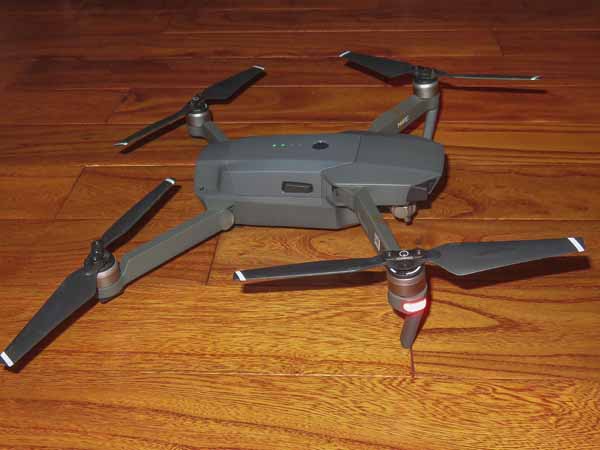
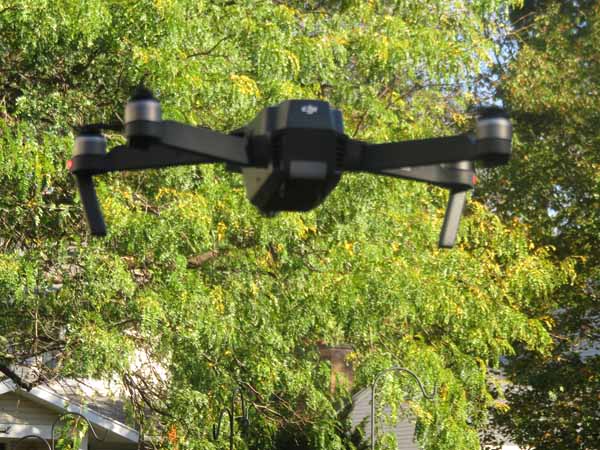
After talking to a few of the drone sales representatives at WPPI, I purchased the Mavic Pro. This compact unit has many impressive features – foldable rotors, interchangeable battery, gimbal mounted 4K video camera, micro SD card to record images, remote controller with multiple flight modes, live streaming to your smart phone.
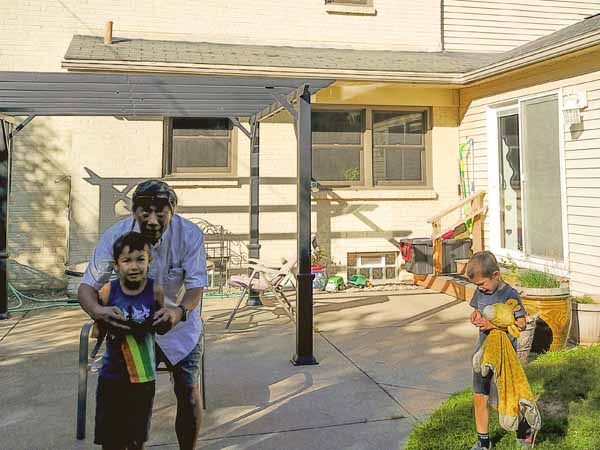
Following, I’ll give you a quick look at some of the above-mentioned features that I make this a worthwhile investment for my flying pleasure – and the pleasure of a few of my grandkids.
|
|
|
 |
 |
| When not in use, you can fold the rotor arms. This makes it very easy to carry the Mavic from place to place. On board sensors guide its flight path away from obstacles such as trees or buildings. | The Mavic’s battery is rechargeable. Each charge provides about 25 minutes of flight time. Since the battery is also interchangeable, you can carry a spare to extended your flight outings. |
|
|
|
 |
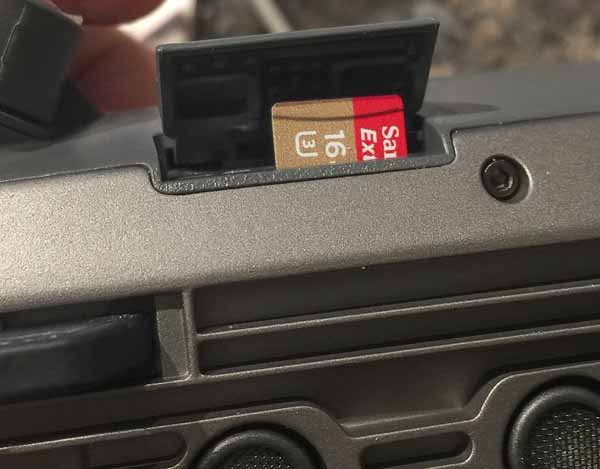 |
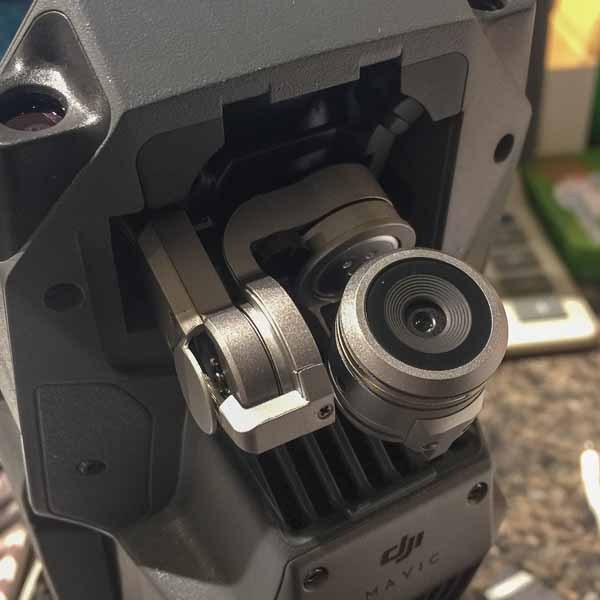
| The built-in video camera provides very good quality images owing to the 3-axis gimbal that steadies the movies. | Video images are stored on an interchangeable micro-SD card. You can also stream live video to an attached smart-phone. |
|
|
|
 |
 |
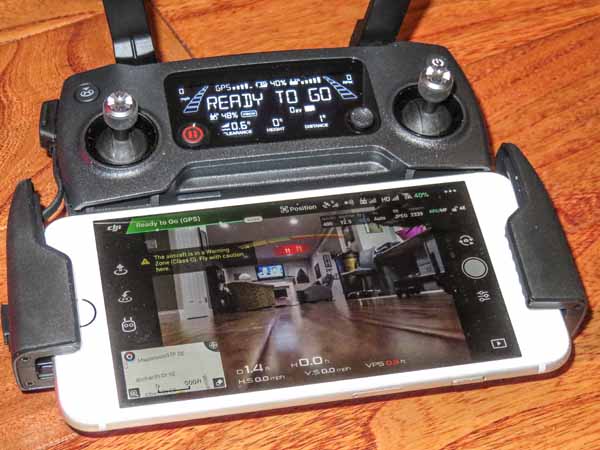
| You can connect your smart-phone to the remote controller. Use the controller to start and stop video recording, point the camera in a different direction or take still photos. The smart-phone screen displays the live camera imagery. Additionally, the DJI app lets you change drone settings and view vital information and statistics. | Users can command the drone to follow and record a specific person or object from up to 4 miles away. Wave at the Mavic to snap a still photo of you on the ground. Or plot a course for the Mavic to fly using multiple waypoints. The controller is very capable. |
|
|
|
 |
 |
| Newbies can fly the Mavic using several foolproof ways to avoid crashing. Here’s my grandson taking his first flying lesson using Beginner Mode. | You can see that this still photo taken remotely by my grandson demonstrates the high quality of the Mavic’s on-board camera. |
|
|
|
|
|
|
|
|
|
The Mavic Pro sells for about $1000. For more information about the Mavic Pro please visit DJI.
Those Boxes of Old Photos
10th June 2017
Scanning Made Easy with the Epson FF-640
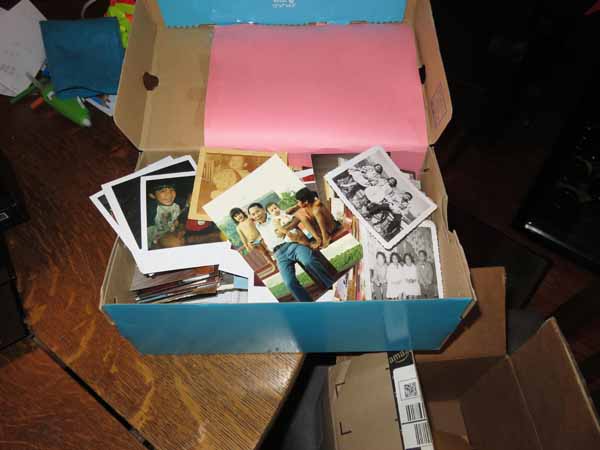
If you’re old enough to drink (alcohol that is), then you may remember the shoebox in the closet stuffed with family photos. They sit there collecting dust until someone brings up a past event that has you digging through hundreds of prints looking for the time that Uncle John took you fishing and you caught your first keeper.
|
|
|
 |
 |
|
|
|
Our family has been taking and collecting photographs since the 1920s. As the unofficial designated keeper of the archives, I’ve been slowly scanning these photos with the goal of organizing, documenting and distributing them to the many relatives and friends among our (very large) extended family.
|
|
|
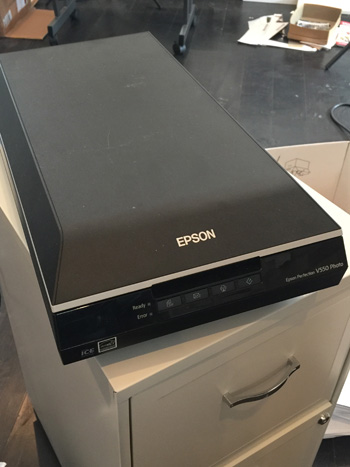
| About the year 2000 I acquired my first flat bed scanner similar to this one.
Although a flat bed produces good quality digital images, it is slow and laborious to operate. Each photo is carefully placed on the glass top, the cover is closed and then the computer is instructed to start the scan. Owing to my lack of patience, I can scan only a couple of dozen prints using the flat bed at one sitting. Afterwards, I have to take a break. At this pace, it will be a long time to complete my archiving obligation. NOTE: The flat bed scanner to the right is a newer advanced model that can produce very high resolution digitized images from your photos. It can also produce digitized images from film negatives (do you remember film?) and transparencies (slides). For the many shoeboxes full of old photos that I have to organize, I’ve decided that speed is more important than high resolution. At this year’s WPPI Conference and Expo, I found a solution that is now helping me make progress dealing with the thousands of prints that have been collecting dust in the closet – the Epson FF-640 FastFoto scanner. |
 |
|
|
|
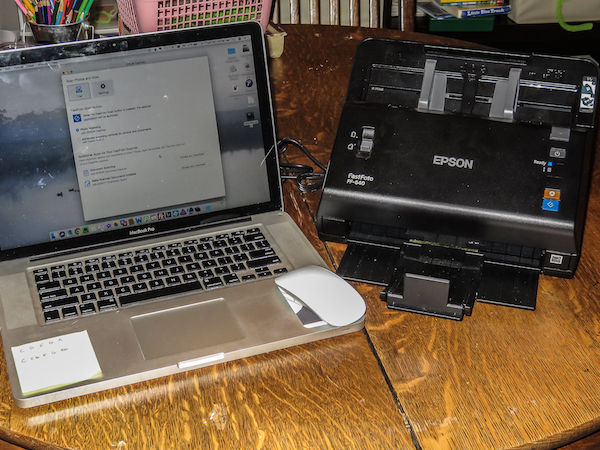 |
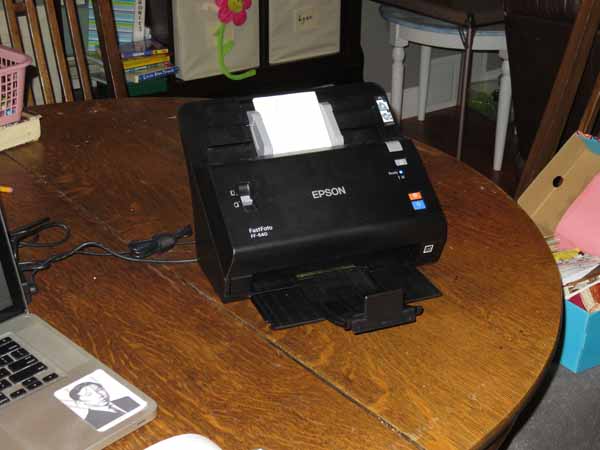
The FF-640 scanner connects to your computer with a USB-cable. The computer here is a MacBook but the scanner is compatible with Windows PCs as well.
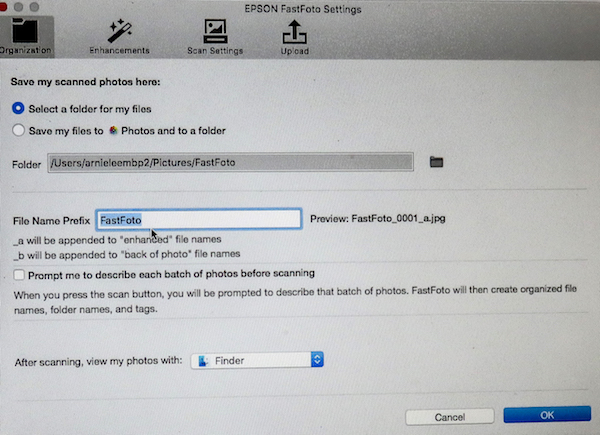
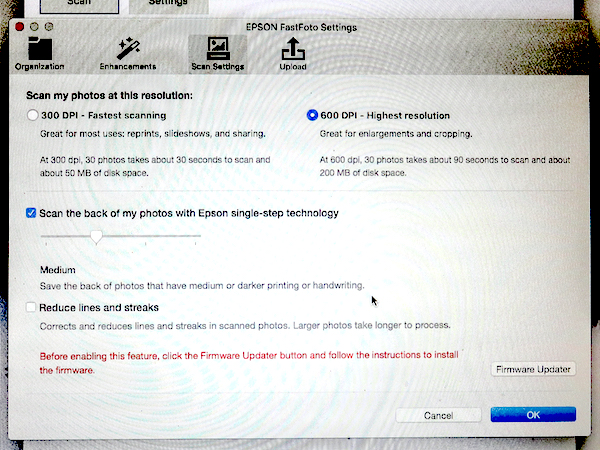
Photos are stacked into the feeder face down. The guides on the feeder are adjustable and accommodate up to twenty or so photos of the same width. The Epson software lets you specify the level of resolution – either the lower 300 dpi or the higher 600 dpi. While you can save hard disk space by using the 300dpi setting, I’ve always scanned at the 600 dpi setting since I’m not concerned about conserving hard disk space. You can also select a folder for storing the scanned images. |
|
|
|
 |
 |
|
|
|
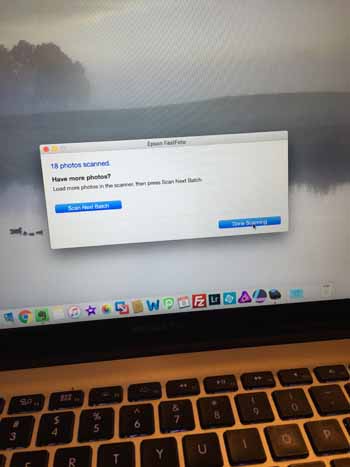 You can start scanning your stack of photos by clicking on the FastFoto software start button. Alternatively you can press the blue button on the FF-640. This is another nice feature since you can take as much time to load subsequent groups of photos into the scanner without having to reset the software. |
 When you’ve completed scanning one or more stacks of photos, the FastFoto software displays the digital images on screen. The software lets you enhance the brightness and contrast, remove red eye and restore faded colors of the original photo if you’d like to save editing time afterwards. |
|
|
|
 |
 |
 |
|
|
||
 This is an old photo from the shoebox. The original was quite faded. |
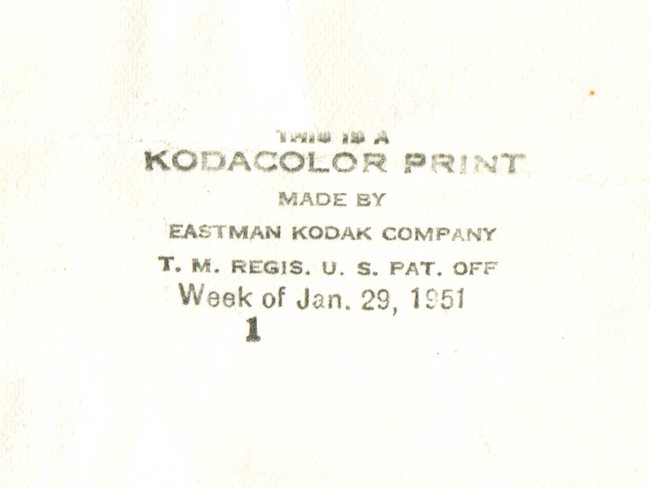 Thanks to the ingenuity of this scanner I can digitally record the imprint on the back of the original. The photo was processed in 1951! |
|
|
|
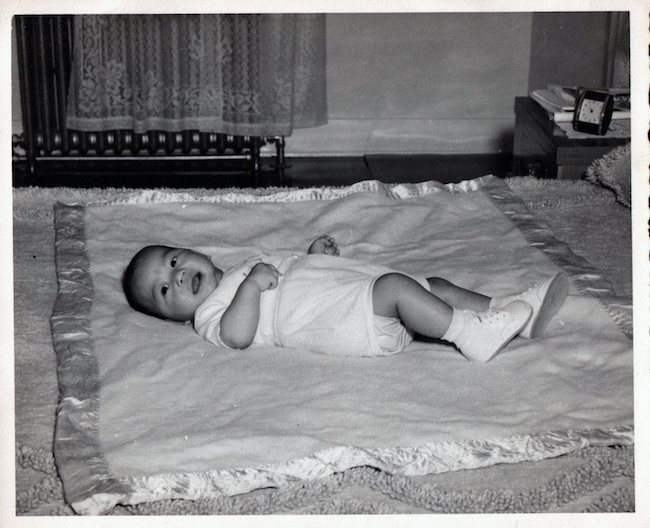 Here is another old vintage b&w photo. |
 Conveniently annotated from 1950. |
|
|
|
Below is a short video of the FF-640 in action. I can scan four or five dozen photographs with the FF-640 in about ten minutes. It’s an amazing time saver. |
|
The FF-640 sells for about $650 – a considerable investment. However, I’m thoroughly happy with this scanner. It has saved me countless hours of time on my quest to archive the thousands (tens of thousands) of family photographs.
For more information, please visit Epson.
« Older Posts — Newer Posts »