Online Magazine
Recent Posts
- Safeguard your Cellphone Photos
- Black & White to Color – Instantly
- Wearing Many Hats
- Video Roundup
- Rescuing Your Blurry Pictures
- Showing Their Age
- What is Your Angle?
- Panorama Photos
- Humorous Photos
- Close Ups
- Fisheye Pictures
- Photo Antiquities
- Printing Big
- Appreciating Scale
- Celebrity Sightings
Tags
More Places to Go
- Free "How-To" Books “How To” books for popular cameras 0
- Vist Us on Facebook keep in touch with us on Facebook 2
Archives
- July 2023 (1)
- March 2023 (2)
- February 2023 (1)
- December 2022 (1)
- October 2022 (1)
- September 2022 (8)
- August 2022 (9)
- July 2022 (1)
- June 2022 (1)
- June 2021 (1)
- May 2021 (1)
- March 2021 (5)
- February 2021 (4)
- January 2021 (2)
- April 2019 (1)
- March 2019 (1)
- February 2019 (1)
- October 2018 (2)
- April 2018 (1)
- March 2018 (4)
- February 2018 (1)
- November 2017 (1)
- August 2017 (1)
- June 2017 (1)
- April 2017 (1)
- March 2017 (5)
- February 2017 (2)
- January 2017 (1)
- October 2016 (1)
- September 2016 (1)
- August 2016 (1)
- July 2016 (1)
- May 2016 (1)
- April 2016 (1)
- March 2016 (2)
- February 2016 (1)
- January 2016 (2)
- December 2015 (1)
- November 2015 (1)
- October 2015 (3)
- April 2015 (1)
- March 2015 (5)
- February 2015 (1)
- January 2015 (4)
- December 2014 (2)
- November 2014 (5)
- October 2014 (2)
- September 2014 (1)
- August 2014 (2)
- July 2014 (1)
- May 2014 (1)
- April 2014 (5)
- March 2014 (5)
- December 2013 (2)
- November 2013 (18)
- October 2013 (1)
- September 2013 (1)
- August 2013 (1)
- July 2013 (1)
- June 2013 (3)
- May 2013 (1)
- April 2013 (2)
- March 2013 (1)
- February 2013 (1)
- January 2013 (1)
- December 2012 (1)
- November 2012 (2)
- October 2012 (2)
- September 2012 (5)
- August 2012 (2)
- July 2012 (1)
- June 2012 (1)
- May 2012 (1)
- April 2012 (4)
- March 2012 (1)
- February 2012 (1)
- January 2012 (3)
- December 2011 (1)
- November 2011 (3)
- October 2011 (1)
- September 2011 (2)
- August 2011 (2)
- June 2011 (3)
- May 2011 (4)
- April 2011 (8)
- March 2011 (8)
- February 2011 (10)
- January 2011 (6)
- December 2010 (11)
- November 2010 (14)
- October 2010 (6)
- September 2010 (12)
- August 2010 (2)
- July 2010 (4)
- June 2010 (3)
- May 2010 (1)
- April 2010 (1)
- March 2010 (2)
- February 2010 (1)
- January 2010 (1)
- December 2009 (1)
- November 2009 (2)
- October 2009 (2)
- September 2009 (1)
- August 2009 (3)
- July 2009 (2)
- June 2009 (1)
- May 2009 (2)
- April 2009 (1)
- March 2009 (2)
- February 2009 (1)
- January 2009 (3)
PhotoPlus Expo – Hufa Holder
14th November 2013
Stop Lens Cap Loss
Honestly, I’m not a big fan of lens caps. In the field, I don’t want to remove the cap, put it in a pocket for safe keeping and then be get prepared to shoot. Nor do I want to dig it out of my pocket and put it back onto the lens.
Instead I’ve made it a habit of buying a good quality UV filter for each of my lenses. The filter is to protects the lens front surface from dirt, grime and scratches. I feel a lot more comfortable cleaning the surface of the filter repeatedly rather than the surface of the lens itself. To be fair, this is my preferred way of shooting and I know that not everyone subscribes to this way of working.
|
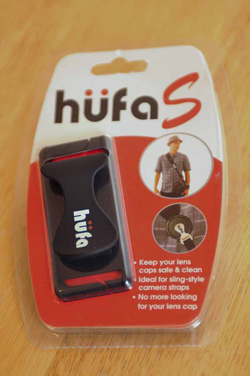
So how did we get into this round-about discussion about lens caps? At the PhotoPlus Expo last month as part of my reporting I received a Press Kit from show management. Inside were a few sample accessories courtesy of the exhibitors. One was these gifts was the Hufa S, a lens cap holder. Last week I took a few minutes to look at this product. |
 |
|
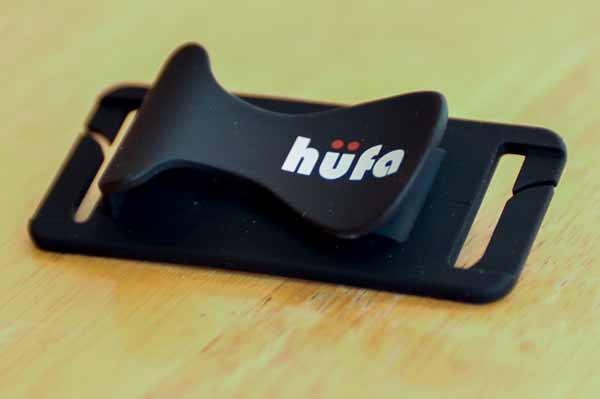
This small and clever accessory is made of hard plastic that’s fully covered with a soft rubberized material. The Hufa easily attaches to your camera strap without having to disassemble the entire setup. Instead the strap slips through the slots and is ready to use in seconds. WHen you remove your cap from the lens, you simply slip it beneath the large clip. The clip places enough pressure to hold the cap regardless of its size. |
 |
|
Here you can see how the Hufa S attaches to the camera strap. You can adjust the position of the Hufa S further up or down along the strap so that it won’t interfere with your handling of the camera. |
 |
There are actually two models: the Hufa and the Hufa S. The Hufa attaches to wide camera straps that are often found on camera bags. The “S” model shown here is for the narrower camera straps. Each model is available in three different colors: black, red and white. They are affordably priced at $10 each.
If you’re interested in buying one, please visit Hufa Holder.
Written by: Arnie Lee
Making your Photos Move
03rd July 2013
A case against Stop Action
The usual “rule” for photography is to choose a shutter speed fast enough to eliminate the jitter or bluriness when the subject moves.
But sometimes ignoring the rule leads to more interesting photographs.
Here’s a few examples.
|
|
|||
| This little girl is practicing to become a major league baseball player. She’s winding up, ready to let ‘er rip. By using a slower shutter speed, can’t you feel the breeze as she whips the ball towards the batter? Here the shutter speed was 1/50th second. Had I used a faster shutter speed, her left arm would have been frozen. |
 |
Here she’s enjoying the outdoor swingset. By itself, the photo shows no movement. But seeing her at the apogee (highest point) of the swing, doesn’t it conjure the feeling of motion? Recall that at the top of her swing, the velocity is zero – enabling you to use a relatively slow shutter speed to “capture” the motion. |  |
|
|
|||
| Again we see a subject on a swingset but this time upside down. The relatively slow shutter speed of 1/100th second stops the action at the top of her swing.
In this case, the pose with her legs flailing about helps to introduce movement. And see how her hair is flying thereby adding to the feeling of action in the image. |
 |
A final example is this photo that lets me see the speed of the hoop and just about hear the air whirling around.
For this photo, I patiently waited for a moment when the young girl’s face was in a relatively fixed position while at the same time her arms were wildly gyrating within the hoop. Then CLICK. |
 |
|
|
|||
Use your camera’s shutter speed priority mode. Try setting the shutter speed to 1/100th of a second or slower – e.g. 1/25 or 1/50. If you use an even slower shutter speed, you may end up with blurry photos since you may not be able to hold the camera steady enough without introducing camera shake.
With just a little practice you can make your photos move.
Written by Arnie Lee
A Long Lens Story
12th June 2013
Avoiding the $8,500 shock
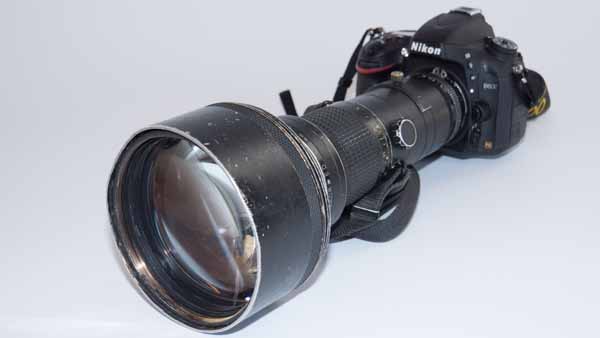
Those of us who like to hunt wildlife with a camera know that you can never have enough mm of lens. But sticker shock kicks in when you look at the prices for a fast super-telephoto lens. Last year I made it a high priority to seek out an alternative way to acquire one of these highly sought after gems and ended up with a prized lens at a bargain basement price.
My lucky catch doesn’t have the features of late model glass, but neither does it doesn’t carry an $8,500 price tag. Instead of the a brand spanking new 400mm f/2.8 with auto focusing and vibration reduction I picked up a used 400mm f/3.5 manual focus lens. As you’ll see, although it lacks the convenience of the high price spread, it performs very well for my type of shooting. And at a price of about $600, it is a steal. If you’re a lover of long lenses that isn’t willing to take a mortgage out to buy one, follow along to see if the used lens approach can satisfy your equipment wants.
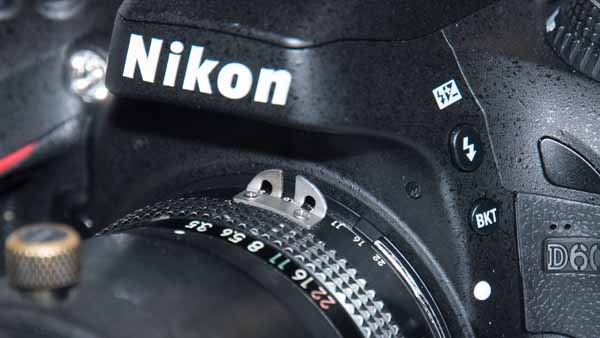
| To be exact, my “find” is a Nikkor ED IF AI-S 400mm f/3.5 lens. There are no marks or scratches on any of the lens surfaces. The lens body shows heavy wear and a few scratches to the paint. It has a tripod collar, a built-in lens hood and accepts affordable 39mm drop-in filters or expensive very 122mm external filters.
Mechanically, this lens has high quality optics; manual internal focusing (lens barrel does not extend or retract as it is focused) and automatic indexing so that the camera can determine the aperture setting. |
 |
|
|
|
 |
 |
|
|
|
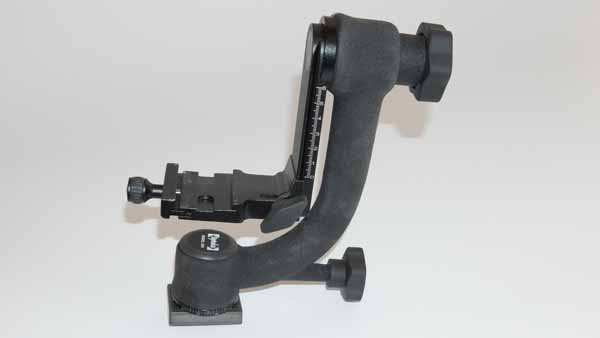
| This monster of a lens weighs more than 6 pounds. You won’t want to handhold this camera and lens combo for very long.
While it is possible to mount this combo directly onto a tripod, a more practical solution is to use a gimbal mount. Here’s one that I use. |
 |
|
|
|
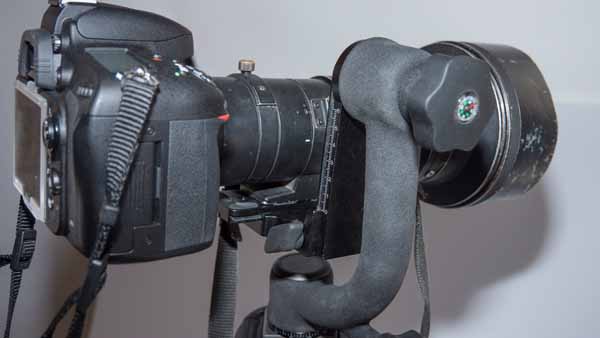
| Using the tripod collar on the lens, the combo is screwed onto the gimbal. The gimbal itself is mounted and balanced onto the tripod.
With the arrangement, you can now frictionlessly tilt, swivel and pan the camera and lens combo to take aim of your subject. |
 |
|
|
|
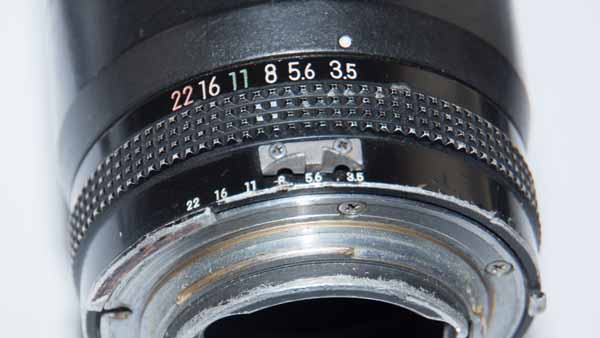
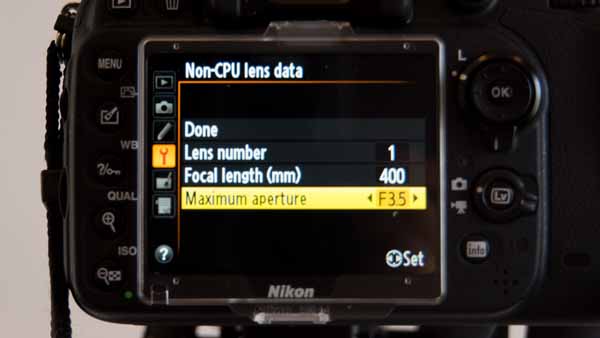
| There’s one final step to complete before we can use this older lens with a newer camera body.
Newer Nikkor lenses owe their intelligence to a tiny CPU which controls the exposure settings. Since this lens does not have a CPU, you must “register” this lens to the camera by setting its maximum (widest) aperture. The Tools menu has an item for doing this. |
 |
|
|
|
| Having registered the lens, there are two options for setting the exposure: ‘M” manual, where you set both the shutter speed and aperture or “A” aperture priority, where you set the aperture and the camera sets the appropriate shutter speed.
In either case, you rotate the aperture ring on the lens to the desired lens opening. In “M” mode, you also dial in the camera shutter speed. In “A” mode, the camera automatically sets the shutter speed. You’re all set to take aim, carefully focus and fire away. Here’s a few of my first shots with the lens. |
 |
|
|
|
 |
 |
|
|
|
 |
 |
|
|
|
 |
|
|
|
|
At first I was a little hesitant about buying an older lens without the autofocus and autoexposure features that I’ve come to expect from newer lenses. After all, this lens comes from the early 1980s; isn’t it obsolete? Now that I’ve had some positive experience, I realize that quality equipment lasts for many years.
I feel that I hit the jackpot with this lens at a great price. Now I’m hoping to find some time to capture many more birds in the future.
Written by Arnie Lee
NOTE: While this article featured Nikon equipment, I’m hoping to look for similar money-saving angles for my Canon equipment.