Online Magazine
Recent Posts
- Safeguard your Cellphone Photos
- Black & White to Color – Instantly
- Wearing Many Hats
- Video Roundup
- Rescuing Your Blurry Pictures
- Showing Their Age
- What is Your Angle?
- Panorama Photos
- Humorous Photos
- Close Ups
- Fisheye Pictures
- Photo Antiquities
- Printing Big
- Appreciating Scale
- Celebrity Sightings
Tags
More Places to Go
- Free "How-To" Books “How To” books for popular cameras 0
- Vist Us on Facebook keep in touch with us on Facebook 2
Archives
- July 2023 (1)
- March 2023 (2)
- February 2023 (1)
- December 2022 (1)
- October 2022 (1)
- September 2022 (8)
- August 2022 (9)
- July 2022 (1)
- June 2022 (1)
- June 2021 (1)
- May 2021 (1)
- March 2021 (5)
- February 2021 (4)
- January 2021 (2)
- April 2019 (1)
- March 2019 (1)
- February 2019 (1)
- October 2018 (2)
- April 2018 (1)
- March 2018 (4)
- February 2018 (1)
- November 2017 (1)
- August 2017 (1)
- June 2017 (1)
- April 2017 (1)
- March 2017 (5)
- February 2017 (2)
- January 2017 (1)
- October 2016 (1)
- September 2016 (1)
- August 2016 (1)
- July 2016 (1)
- May 2016 (1)
- April 2016 (1)
- March 2016 (2)
- February 2016 (1)
- January 2016 (2)
- December 2015 (1)
- November 2015 (1)
- October 2015 (3)
- April 2015 (1)
- March 2015 (5)
- February 2015 (1)
- January 2015 (4)
- December 2014 (2)
- November 2014 (5)
- October 2014 (2)
- September 2014 (1)
- August 2014 (2)
- July 2014 (1)
- May 2014 (1)
- April 2014 (5)
- March 2014 (5)
- December 2013 (2)
- November 2013 (18)
- October 2013 (1)
- September 2013 (1)
- August 2013 (1)
- July 2013 (1)
- June 2013 (3)
- May 2013 (1)
- April 2013 (2)
- March 2013 (1)
- February 2013 (1)
- January 2013 (1)
- December 2012 (1)
- November 2012 (2)
- October 2012 (2)
- September 2012 (5)
- August 2012 (2)
- July 2012 (1)
- June 2012 (1)
- May 2012 (1)
- April 2012 (4)
- March 2012 (1)
- February 2012 (1)
- January 2012 (3)
- December 2011 (1)
- November 2011 (3)
- October 2011 (1)
- September 2011 (2)
- August 2011 (2)
- June 2011 (3)
- May 2011 (4)
- April 2011 (8)
- March 2011 (8)
- February 2011 (10)
- January 2011 (6)
- December 2010 (11)
- November 2010 (14)
- October 2010 (6)
- September 2010 (12)
- August 2010 (2)
- July 2010 (4)
- June 2010 (3)
- May 2010 (1)
- April 2010 (1)
- March 2010 (2)
- February 2010 (1)
- January 2010 (1)
- December 2009 (1)
- November 2009 (2)
- October 2009 (2)
- September 2009 (1)
- August 2009 (3)
- July 2009 (2)
- June 2009 (1)
- May 2009 (2)
- April 2009 (1)
- March 2009 (2)
- February 2009 (1)
- January 2009 (3)
The “Panorama Machine”
29th December 2010
Panoramas Made Easy
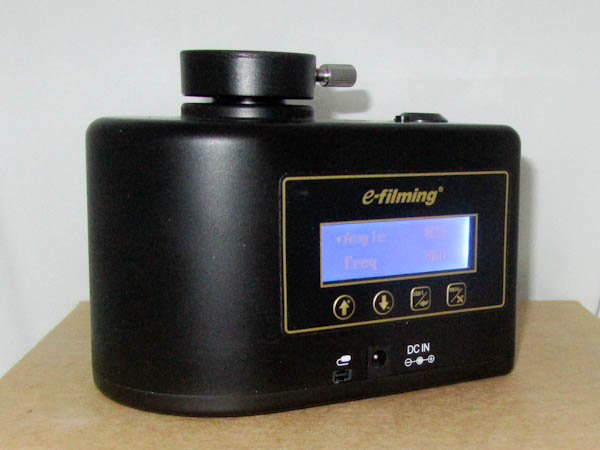
Last week Fedex dropped off a small package with another high tech gadget. The shiny box contained a panorama base – a device for easily capturing photographic panoramas.
Let’s back up to last October when I met Howard Chen at the PhotoPlus Expo in New York. An attractive photo in front of his booth caught my attention. He proceeded to show me how the e-Filming PS-30B Digital Drive Panorama Base automates the making of panorama photographs with popular DSLR cameras: mount the camera on the base, press a few buttons on the control panel and press the start button. A few seconds later and you’ve captured a set of high resolution images ready to be combined (stitched together).
| In addition to the drive unit, the package contains a vertical bar mount, a remote controller and control cables. A cable connects the device to the remote control socket on your DSLR camera. The six included control cables are usable with most of the popular DSLR cameras.
I spent a few minutes installing the Cool Stitch software from the included CD-ROM and printing the 16-page user’s manual. The manual describes the five options available from the LCD control panel: shoot, time, speed, function and language. However in practice, I found that I needed to change only the shoot option. There’s also a short article “How to Shoot Photos for Great Looking Panoramas” that appears when you run the Cool Stitch software. I recommend that you print this document and carefully follow the several helpful tips. |
 |
I’m guessing that all of you have had the jaw-dropping experience of viewing various panorama photographs. For those of you who may not be familiar in how they are created, let me take a few minutes to explain the process.
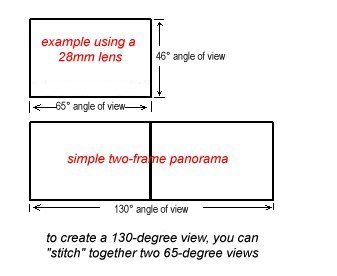
| When you shoot a still photo, the size of the view is pre-determined by the focal length of the camera’s lens*. For example, a 50mm lens has a 39-degree horizontal angle of view and 27-degree vertical angle of view.
To include more of a scene, you can use a wider angle lens. A 28mm lens has a wider 65-degree horizontal angle of view and a wider 46-degree vertical angle of view. If your pocketbook doesn’t allow you to buy a wider angle lens than this, then to include an even wider view, you can shoot two photographs. Between shots, you carefully move the camera sideways to include more of the scene. Afterwards, you assemble the two separate photographs side-by-side to provide a 130-degree angle of view. This is a simple two-frame panorama. * based on a standard 35mm film format. |
 |
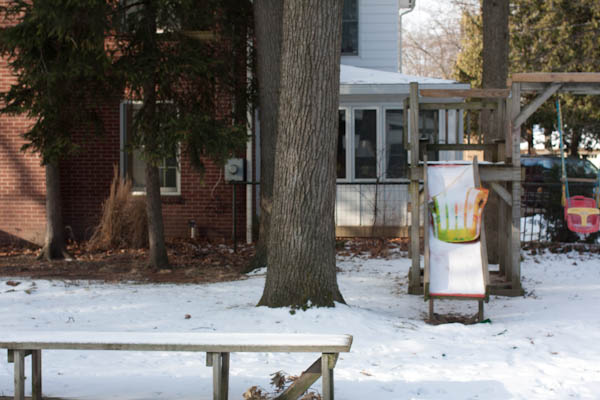 Left-side frame of two-frame panorama. |
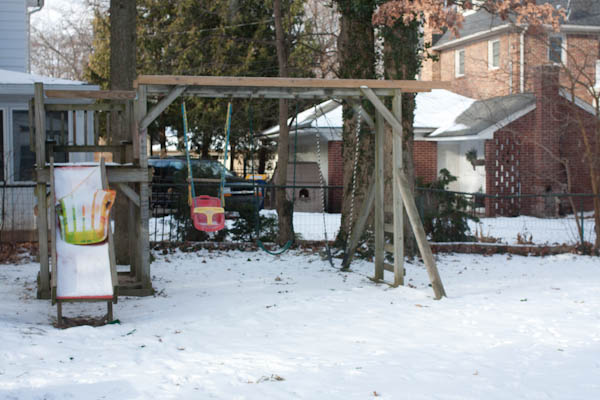 Right-side frame of two-frame panorama. |
| When taking separate frames in a panorama, it’s very important to keep the camera perfectly horizontal so that all of the frames are aligned. If the camera is not perfectly horizontal, the frames will not line up properly and parts of the image will be unusable for the full panorama. | |
 This is a simple panorama made by stitching together the two frames from above. Notice that the children’s slide appears on both of the individual frames. By overlapping a portion of the individual frames (in this case, the children’s slide), the software can more easily stitch the two separate images together. |
|
Most panoramas are assembled from more than two photographs. The challenge for the photographer is to carefully shoot the separate photographs so that they provide perfect horizontal alignment and sufficient image overlap.
The PS-30B panorama base automates these mechanical details. When mounted on the tripod, the motorized drive rotates the camera equipment an exacting number of degrees while maintaining the horizontal alignment.
| The front of the unit has an easy-to-use control panel.
From the control panel’s shoot option you set two subitems: angle and frequency. You set the angle based on the focal length of your lens, the orientation of the camera (vertical or horizontal), the type of sensor (full-frame or APS-C) and the amount of image overlap. Without going detail (see below for more info) I set the angle to 18°. For 125° view, I set freq to 9 shots [(8 frames x 18° = 124°) + 1 additional frame]. |
 |
| The best panoramas are made when the individual frames of a scene are captured with identical exposure. To maximize the image dimensions, the frames should align exactly – either exactly in the horizontal direction (for left to right scene) or the vertical direction (for up to down scene).
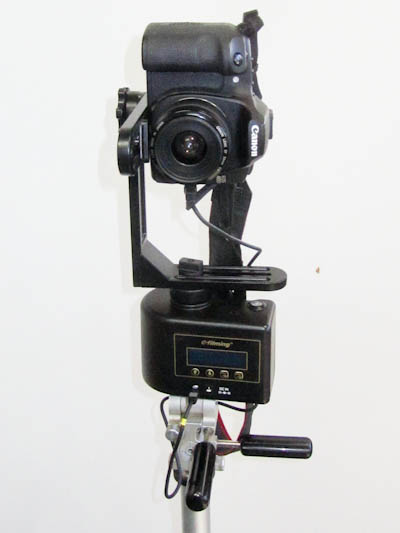
In this photo, you can see how I set up the PS-30B and camera equipment. The base is mounted directly to my heavy-duty tripod. Since I wanted to shoot with the camera in the vertical orientation to maximize the vertical resolution, I used the included bracket. The control cord connects the PS-30B with my camera’s remote release. I set the camera’s exposure manually to insure even exposure of all frames. |
 |
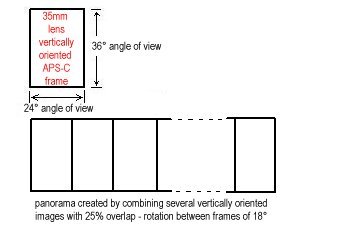
| For the following panorama, I am using a 35mm lens on an APS-C size camera and mounted vertically. From the table below, I determine the angle of view is 37° for full-frame camera. Divide by a factor of 1.5 for the APS-C size frame, gives us a 24° angle of view. To insure sufficient overlap we decrease the rotation by 25%, yielding an 18° rotation.
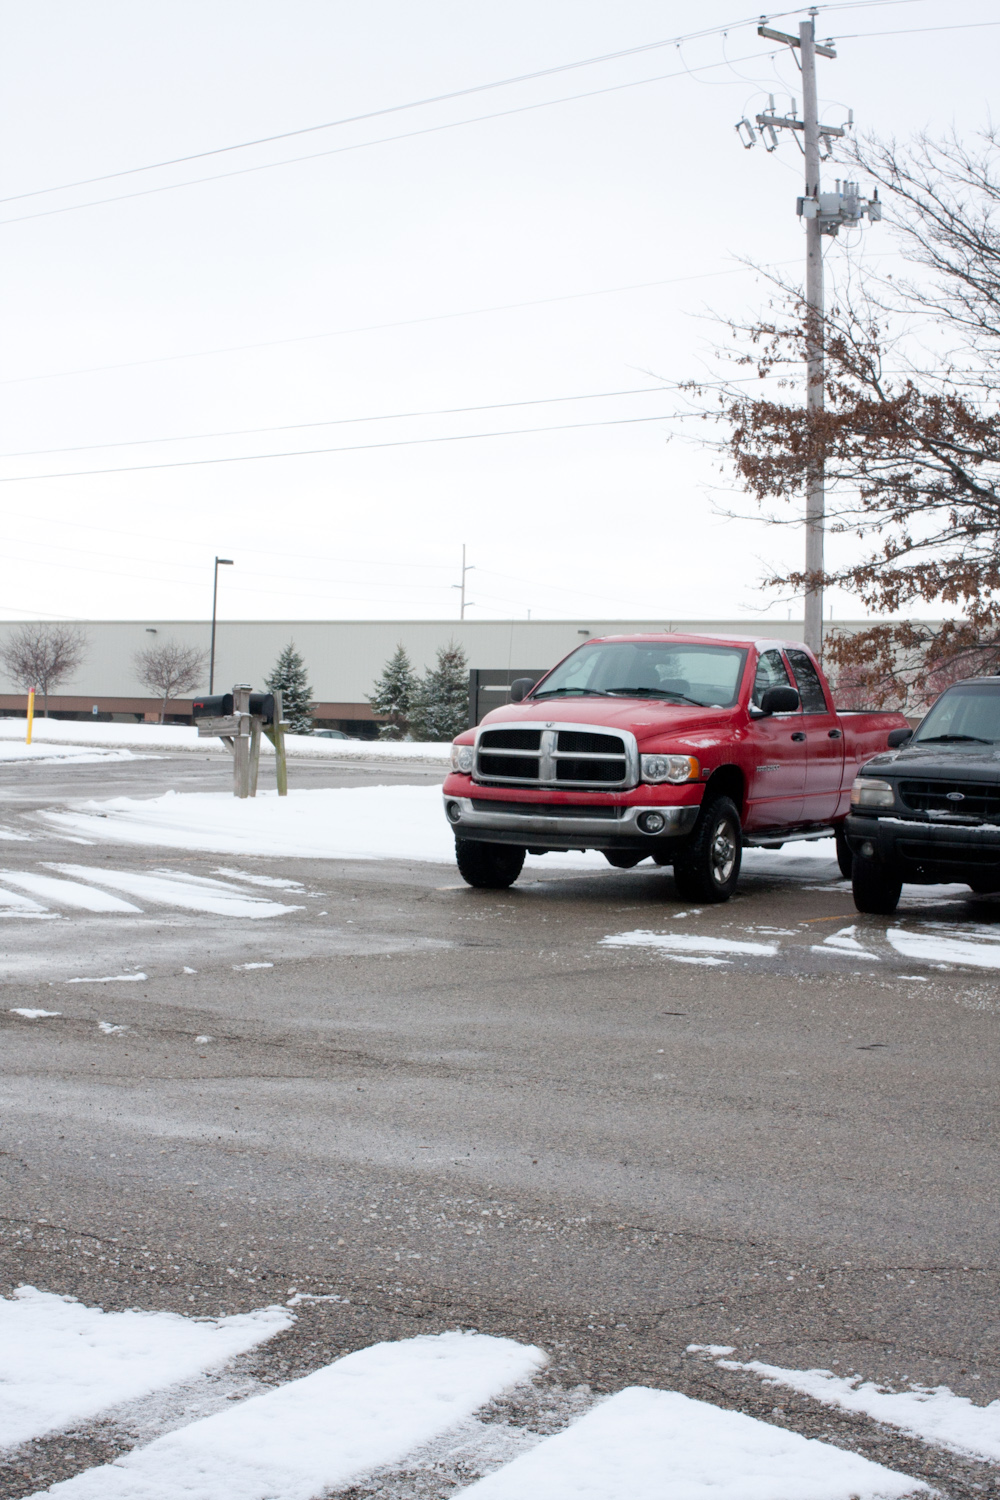
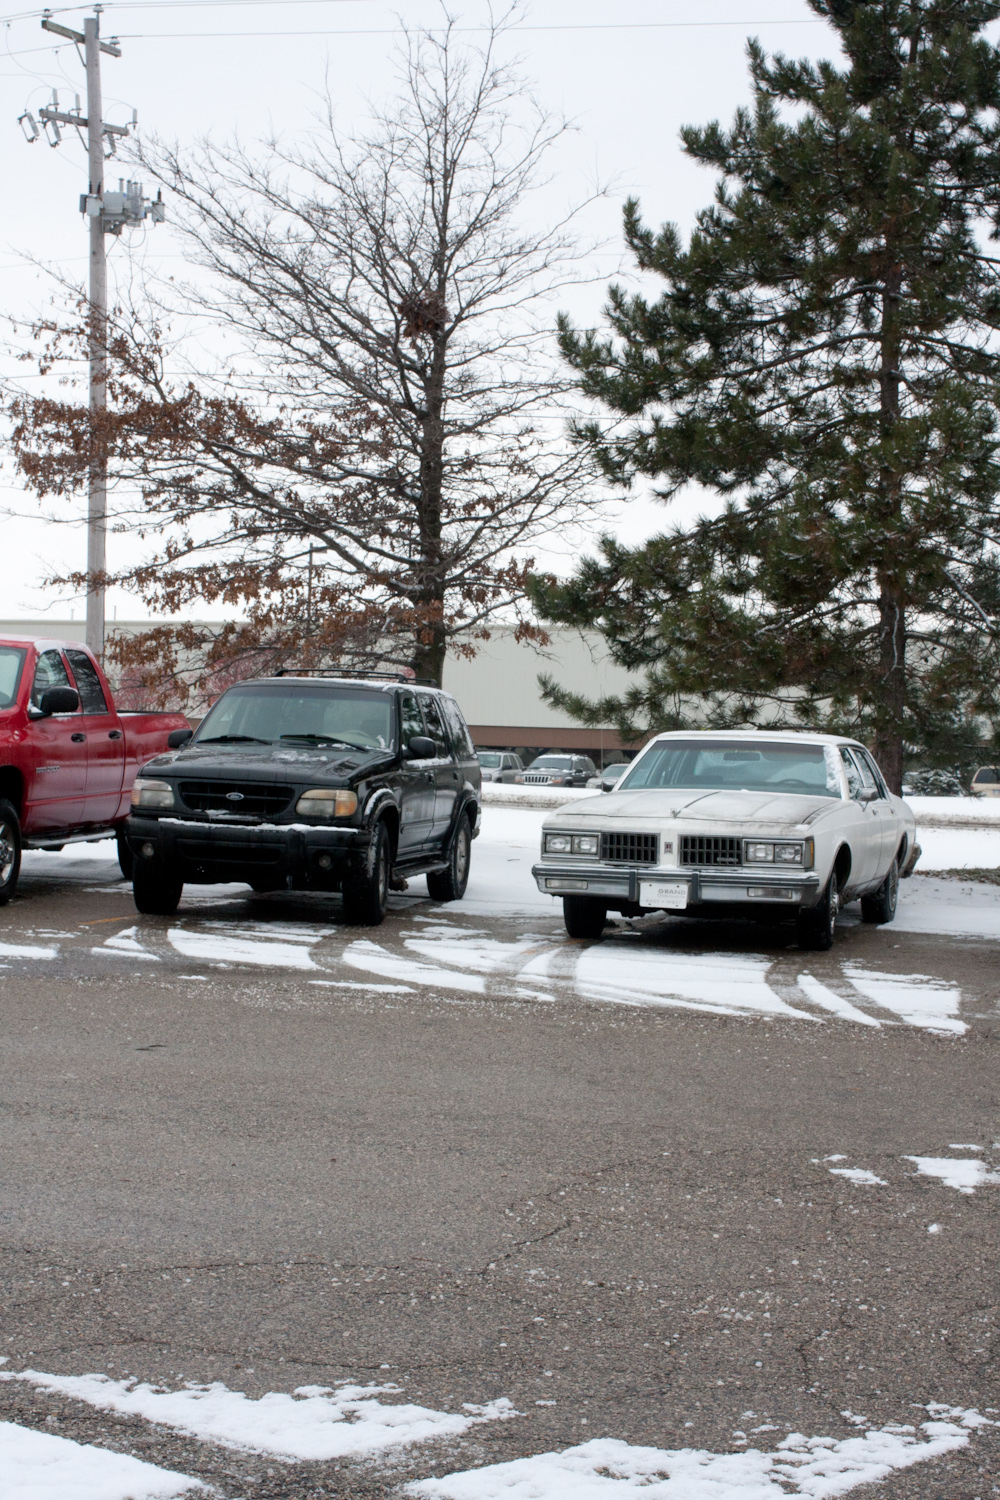
I press the remote start and the panorama base releases the shutter and then rotates 18-degrees, pauses and releases the shutter again. It repeats this seven additional times to capture the nine individual frames below: |
 |
 |
 |
 |
 |
|
 |
 |
 |
| Using the included Cool Stitch software, I assemble this panorama from the nine separate images. The software is a cinch to use when the exposures are similar and the images overlap sufficiently.
|

The size of the completed panorama 14148 by 3776 pixels with a huge 41MB size and has excellent sharpness. The original panorama is reduced in size here to fit in the article. For those of you who are curious to examine the quality and resolution of this panorama, click here to download the original.
Together, the camera, panorama base and bracket weigh about ten pounds. So to use the PS-30B, you’ll need a sturdy, heavy-duty tripod.
Over a week of use, the unit worked flawlessly, even in cold weather (20° F, -6° C). Since the first test above, I have assembled several more panoramas. Compared to the “old” way of shooting manually, I’ve found that the PS-30B helps me to produce excellent quality panoramas and with a lot less work and reshooting.
For more information about the PS-30B, please visit e-Filming. Because this is a specialty item, you may not find it at your local photography store. However it is available from the well-known photo supplier Adorama. The price is $599.
More technical details
The PS-30B control panel allows you to change several other parameters:
- time delay following rotation before the shutter is released
- time delay after the shutter is released before next rotation
- speed of rotation
- direction of rotation – clockwise or counterclockwise
Lenses and Angle of View
The table below shows the angle of view for some of the more common lens sizes. For example, when oriented horizontally, the angle of view for a 35mm lens is 54° and when oriented vertically, the angle of view is 37°. For APS-C size frame, simply divide the angle of view in the table by 1.5; horizontal is 36° and vertical is 24°. For a more comprehensive list, please see Wikipedia.
For the panorama above, I was using a 35mm lens mounted vertically. The table tells me that the angle of view is 37° on full frame or 24° on APS-C size frame camera. The test camera was an APS-C frame, so I chose 18° to provide a 25% overlap.
| focal length using full frame sensor | 18mm | 28mm | 35mm | 55mm | 135mm |
| vertical angle of view | 67° | 46° | 37° | 27° | 10° |
| horizontal angle of view | 90° | 65° | 54° | 39° | 15° |

another panorama created from 16 individual frames
Disclosure: Stay Focused has no connection with e-Filming and received no compensation for this review.
Review by Arnie Lee