Online Magazine
Recent Posts
- Safeguard your Cellphone Photos
- Black & White to Color – Instantly
- Wearing Many Hats
- Video Roundup
- Rescuing Your Blurry Pictures
- Showing Their Age
- What is Your Angle?
- Panorama Photos
- Humorous Photos
- Close Ups
- Fisheye Pictures
- Photo Antiquities
- Printing Big
- Appreciating Scale
- Celebrity Sightings
Tags
More Places to Go
- Free "How-To" Books “How To” books for popular cameras 0
- Vist Us on Facebook keep in touch with us on Facebook 2
Archives
- July 2023 (1)
- March 2023 (2)
- February 2023 (1)
- December 2022 (1)
- October 2022 (1)
- September 2022 (8)
- August 2022 (9)
- July 2022 (1)
- June 2022 (1)
- June 2021 (1)
- May 2021 (1)
- March 2021 (5)
- February 2021 (4)
- January 2021 (2)
- April 2019 (1)
- March 2019 (1)
- February 2019 (1)
- October 2018 (2)
- April 2018 (1)
- March 2018 (4)
- February 2018 (1)
- November 2017 (1)
- August 2017 (1)
- June 2017 (1)
- April 2017 (1)
- March 2017 (5)
- February 2017 (2)
- January 2017 (1)
- October 2016 (1)
- September 2016 (1)
- August 2016 (1)
- July 2016 (1)
- May 2016 (1)
- April 2016 (1)
- March 2016 (2)
- February 2016 (1)
- January 2016 (2)
- December 2015 (1)
- November 2015 (1)
- October 2015 (3)
- April 2015 (1)
- March 2015 (5)
- February 2015 (1)
- January 2015 (4)
- December 2014 (2)
- November 2014 (5)
- October 2014 (2)
- September 2014 (1)
- August 2014 (2)
- July 2014 (1)
- May 2014 (1)
- April 2014 (5)
- March 2014 (5)
- December 2013 (2)
- November 2013 (18)
- October 2013 (1)
- September 2013 (1)
- August 2013 (1)
- July 2013 (1)
- June 2013 (3)
- May 2013 (1)
- April 2013 (2)
- March 2013 (1)
- February 2013 (1)
- January 2013 (1)
- December 2012 (1)
- November 2012 (2)
- October 2012 (2)
- September 2012 (5)
- August 2012 (2)
- July 2012 (1)
- June 2012 (1)
- May 2012 (1)
- April 2012 (4)
- March 2012 (1)
- February 2012 (1)
- January 2012 (3)
- December 2011 (1)
- November 2011 (3)
- October 2011 (1)
- September 2011 (2)
- August 2011 (2)
- June 2011 (3)
- May 2011 (4)
- April 2011 (8)
- March 2011 (8)
- February 2011 (10)
- January 2011 (6)
- December 2010 (11)
- November 2010 (14)
- October 2010 (6)
- September 2010 (12)
- August 2010 (2)
- July 2010 (4)
- June 2010 (3)
- May 2010 (1)
- April 2010 (1)
- March 2010 (2)
- February 2010 (1)
- January 2010 (1)
- December 2009 (1)
- November 2009 (2)
- October 2009 (2)
- September 2009 (1)
- August 2009 (3)
- July 2009 (2)
- June 2009 (1)
- May 2009 (2)
- April 2009 (1)
- March 2009 (2)
- February 2009 (1)
- January 2009 (3)
A Magnetic Force or How I Waste Time
01st April 2011
Disassembling a Hard Drive
Caution – you are about to waste your time. Here is yet another way to divert your attention from the really important things that you should be doing instead of reading this article.
When photography depended on using film, it wasn’t important for the average picture taker to use a personal computer. Digital photography has changed this all and makes owning and using a personal computer almost a necessity.
Nowadays, many of us depend on a personal computer to help with our daily tasks and/or for our livelihood. I’d venture to say that many of you are on your third or forth or more generation personal computer – you’re no longer a novice computer user. As such, you’ve replaced a hard drive or two. And hopefully, you were prudent enough to have backed up your data!
Over the years, I have replaced many, many hard drives. For some reason, instead of depositing the dead drive in the trash, I toss it into a large carton and now have quite a large collection. Every once in a while, I pull a drive out and dissect it.
Why? Because I like to tinker and because I use a few of the internal component
If you want to follow along, I’ll show you how to extract some very powerful magnets and very shiny discs to keep as souvenirs.
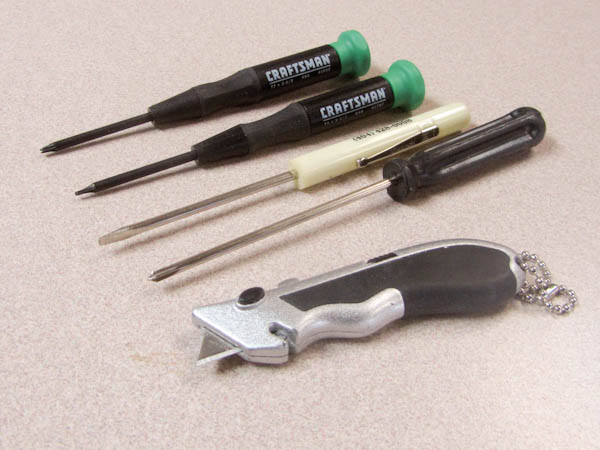
| The only “special” tools that I need are two mini-Torx drivers. I found them at Sears – a T5 and a T7 that cost about $3 each.
I have all of the other tools around the house – a couple of small screwdrivers and maybe a matte knife. |
 |
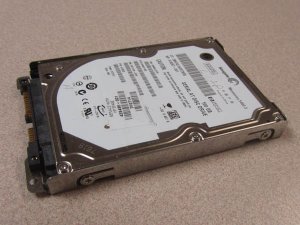
| Hard drives are basically two sizes: 3.5″ drives found in most desktop computers and 2.5″ drives found in notebook computers.
Dissecting a 3.5″ drive is relatively easy because the screws and components are larger to handle. This dead drive came from a notebook so the hardware is smaller. You’ll have to use more care in removing the hardware. |
 |
| To open the case, you’ll need to remove the screws holding the top cover in place.
This small hard drive is made by Seagate and has six tiny Torx screws. |
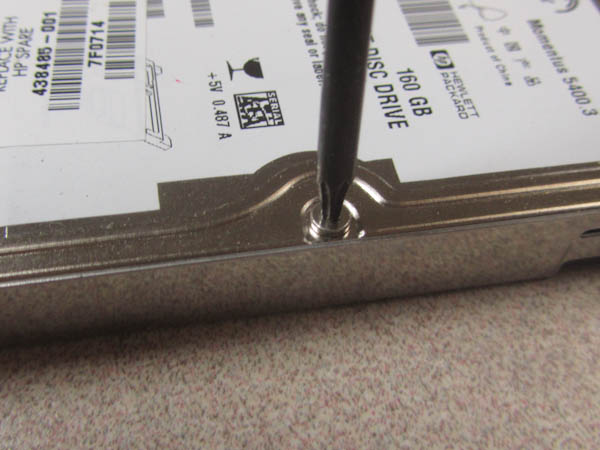 |
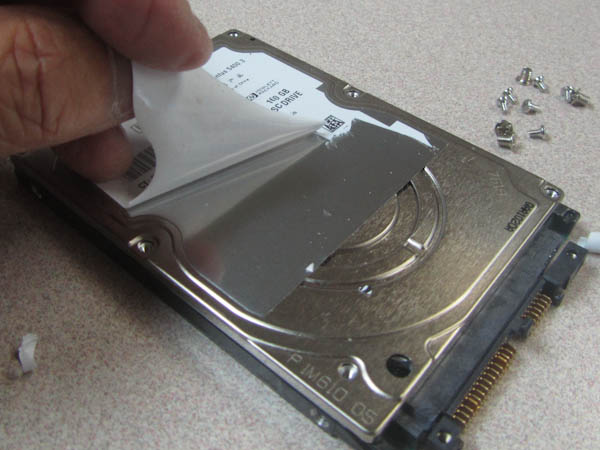
| Additionally, the white label is concealing a final Torx screw.
I used the matte knife to carefully peel back the label to reveal and remove the hidden Torx screw. |
 |
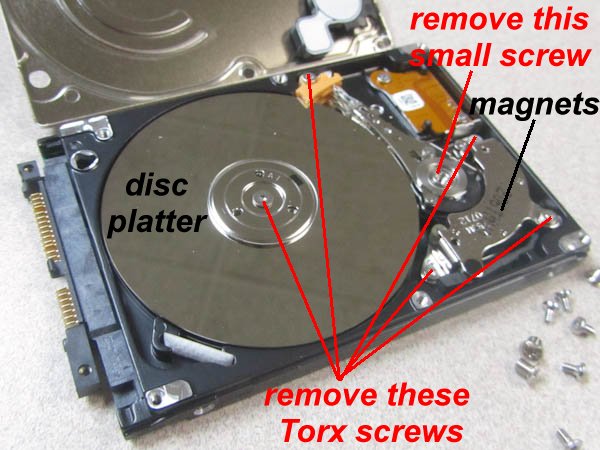
| When you remove the top cover, you’ll see the hard drive components similar to this photo.
The top platter is held in place by a single Torx screw in the center spindle and the bottom platter is held in place by a yellow spacer. A pair of magnets (top and bottom) are also held in place by several Torx screws. To remove the magnets, you may first have to remove the small read/write head that’s held in place with a small screw. |
 |
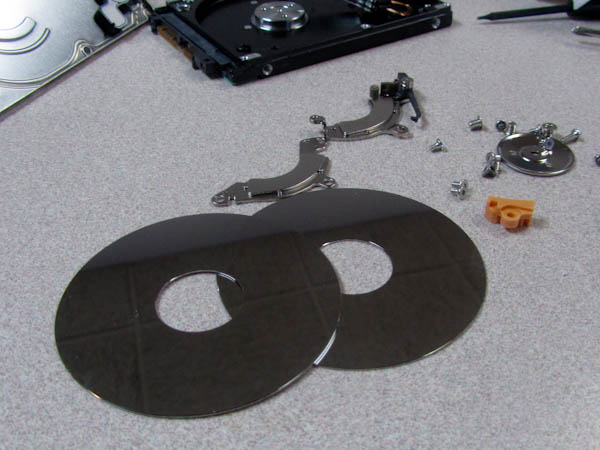
| Here’s my reward – platters and magnets.
You can make a very attractive wind chime from the two shiny, silver platters. The tiny magnets are very powerful and are great for holding photos onto the refrigerator. |
 |
As the Car Talk guys say: you’ve just wasted an entirely good 10 minutes reading this article.
Written by Arnie Lee
Well, I wasted the time while my coffee was brewing. So I’m off to have a cup now.
I have recovered a drive ONE time by swapping control boards from the same exact drives.
Comment by Dan — April 2, 2011 @ 8:11 am