Online Magazine
Recent Posts
- Safeguard your Cellphone Photos
- Black & White to Color – Instantly
- Wearing Many Hats
- Video Roundup
- Rescuing Your Blurry Pictures
- Showing Their Age
- What is Your Angle?
- Panorama Photos
- Humorous Photos
- Close Ups
- Fisheye Pictures
- Photo Antiquities
- Printing Big
- Appreciating Scale
- Celebrity Sightings
Tags
More Places to Go
- Free "How-To" Books “How To” books for popular cameras 0
- Vist Us on Facebook keep in touch with us on Facebook 2
Archives
- July 2023 (1)
- March 2023 (2)
- February 2023 (1)
- December 2022 (1)
- October 2022 (1)
- September 2022 (8)
- August 2022 (9)
- July 2022 (1)
- June 2022 (1)
- June 2021 (1)
- May 2021 (1)
- March 2021 (5)
- February 2021 (4)
- January 2021 (2)
- April 2019 (1)
- March 2019 (1)
- February 2019 (1)
- October 2018 (2)
- April 2018 (1)
- March 2018 (4)
- February 2018 (1)
- November 2017 (1)
- August 2017 (1)
- June 2017 (1)
- April 2017 (1)
- March 2017 (5)
- February 2017 (2)
- January 2017 (1)
- October 2016 (1)
- September 2016 (1)
- August 2016 (1)
- July 2016 (1)
- May 2016 (1)
- April 2016 (1)
- March 2016 (2)
- February 2016 (1)
- January 2016 (2)
- December 2015 (1)
- November 2015 (1)
- October 2015 (3)
- April 2015 (1)
- March 2015 (5)
- February 2015 (1)
- January 2015 (4)
- December 2014 (2)
- November 2014 (5)
- October 2014 (2)
- September 2014 (1)
- August 2014 (2)
- July 2014 (1)
- May 2014 (1)
- April 2014 (5)
- March 2014 (5)
- December 2013 (2)
- November 2013 (18)
- October 2013 (1)
- September 2013 (1)
- August 2013 (1)
- July 2013 (1)
- June 2013 (3)
- May 2013 (1)
- April 2013 (2)
- March 2013 (1)
- February 2013 (1)
- January 2013 (1)
- December 2012 (1)
- November 2012 (2)
- October 2012 (2)
- September 2012 (5)
- August 2012 (2)
- July 2012 (1)
- June 2012 (1)
- May 2012 (1)
- April 2012 (4)
- March 2012 (1)
- February 2012 (1)
- January 2012 (3)
- December 2011 (1)
- November 2011 (3)
- October 2011 (1)
- September 2011 (2)
- August 2011 (2)
- June 2011 (3)
- May 2011 (4)
- April 2011 (8)
- March 2011 (8)
- February 2011 (10)
- January 2011 (6)
- December 2010 (11)
- November 2010 (14)
- October 2010 (6)
- September 2010 (12)
- August 2010 (2)
- July 2010 (4)
- June 2010 (3)
- May 2010 (1)
- April 2010 (1)
- March 2010 (2)
- February 2010 (1)
- January 2010 (1)
- December 2009 (1)
- November 2009 (2)
- October 2009 (2)
- September 2009 (1)
- August 2009 (3)
- July 2009 (2)
- June 2009 (1)
- May 2009 (2)
- April 2009 (1)
- March 2009 (2)
- February 2009 (1)
- January 2009 (3)
Easy Panoramas
17th April 2011
Nothing Beats The Simplicity of In-Camera Panoramas
When you want to take it all in, a panorama is a fun way to recreate a memorable view.
Most panoramas are made by taking multiple photos and painstakingly stitching them together with specialized computer software.
Over the years I’ve put together many such panoramas. Since I’ve made so many, I know the routine by heart. I usually build a panorama from six to ten separate images.
First I set the camera shutter speed and aperture manually so that the lighting remains constant throughout all of the images. Since altering the focus point between shots makes it almost impossible to later stitch the photos together, I also set the focus to manual and choose a focus distance for the most important part of the scene. To make sure that the horizon remains level in all of the exposures, I use a tripod and bubble level. To keep track of the images in a set, I place my hand over the lens and shoot to indicate that the next photo is the start of a panorama. After each exposure, I rotate the tripod head so that the next exposure overlaps the previous one by about 30%.
(more…)
Easy Photo Gifts
07th April 2011
Do It Yourself Kits
I get a kick out of sharing my photos with others.
So when birthdays or holidays roll around I find myself looking for ways to turn some of my photos into gifts.
And like most of you, I’m also on the lookout for ways to save money.
For both of these projects, the sets were 50% off making each an inexpensive way to make custom photo gifts.
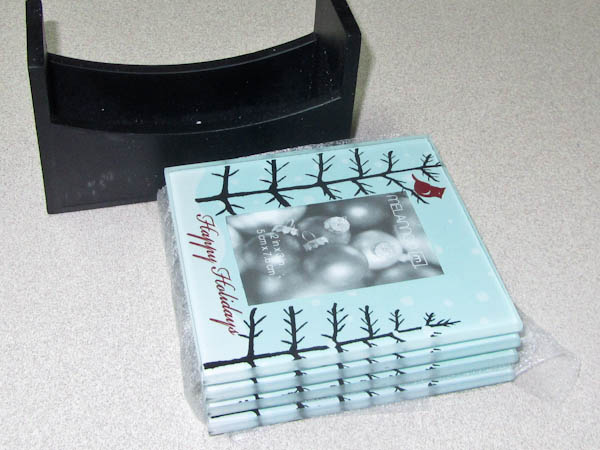
| For one project, I found a lovely coaster set.
While this one is meant for the Christmas Holidays, there sets available for other occasions as well. These attractive coasters are made of glass. |
 |
|
|
|
| Customizing the coaster set is simple.
Each coaster has a opening for a 2″ x 3″ photograph. |
 |
|
|
|
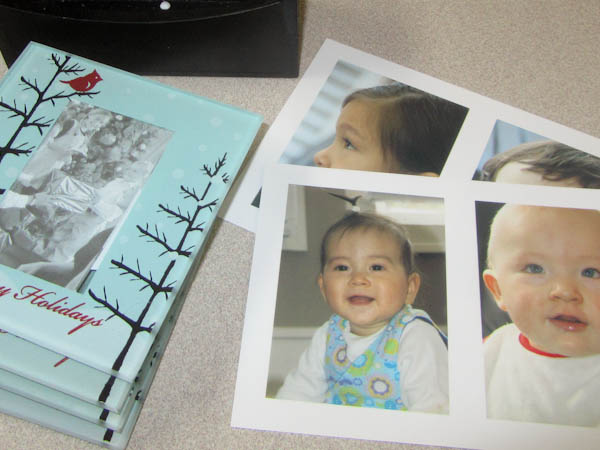
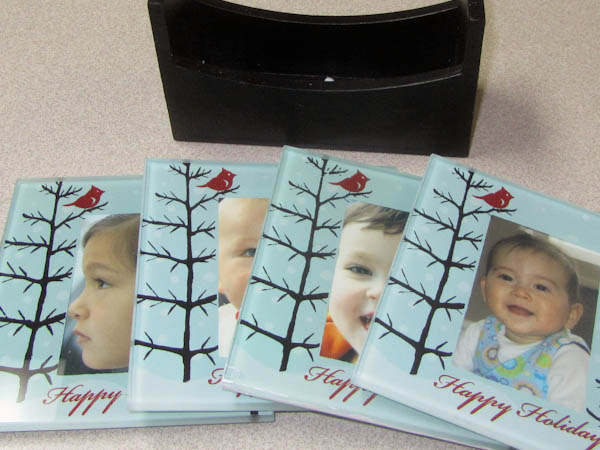
| Then it’s just a matter of trimming each photo and inserting it into the small photo mount on the back of the coaster.
Here are their happy faces ready to greet someone who needs a coaster for their drink. |
 |
|
|
|
| This set also includes a handy wooden holder that keeps the coasters organized when they’re not being used. |  |
|
This coaster kit is made by Melannco. This company makes many other photo-related products including frames and photo storage cases. The original price was $14.95 but I purchased it for only $7.50. |
|
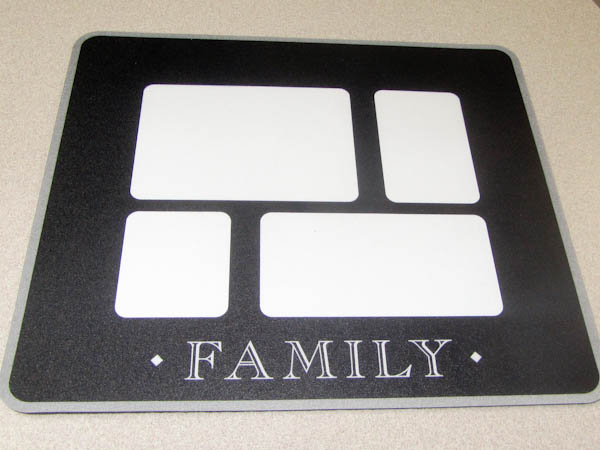
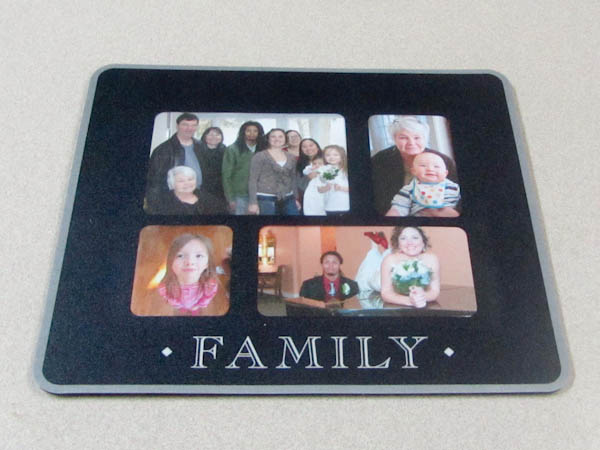
| Another popular photo gift item is a mousepad.
Here’s one that’s ready for you to customize. This mousepad has openings for four different size photographs. |
 |
|
|
|
| The sizes for each of these photos are indicated on the template (upper left corner) that is shipped with the package.
Again, I collected four photographs of family members that when printed could be sized to fit onto the template. |
 |
|
|
|
| Here I trimmed each of the photos and attached them to the template.
You can attach the photo with an adhesive, but I chose to use a small piece of scotch tape. |
 |
|
|
|
| When completed, the template slides into an opening on the back of the mousepad and beneath the clear, protective surface.
And that’s all you need to do to customize this gift. |
 |
|
This mousepad kit is also made by Melannco. The original price was $9.95 but I purchased it for only $5.00. |
|
Without a doubt, I’m happy with both the quality and cost of these photo gifts.
I purchased both of these kits at a local Kohls department store. I’ve seen similar kits made by other manufacturers for sale at Target, Michaels and Hobby Lobby. I’ve also seen them for sale online at Amazon.
To find out more about their products visit Melannco.
Please note that Stay Focused has no connection to Melannco.
Written by Arnie Lee
Extreme Sports Camera
06th April 2011
Review of the Eagle Eye
From the title, you might think that I participate in extreme sports. Hah, this is far-from-the-truth. Instead, the title is to let you know that there’s a camera that is rugged enough to be used by enthusiasts that do in fact participate in extreme sports.
Let’s move on. In a few days, I’ll be off to the Sierra Nevadas for some easy and leisurely Spring skiing.
In the past, I’ve always lugged a camera around to capture the action. This year, I’ve decided that I would try a different tact.
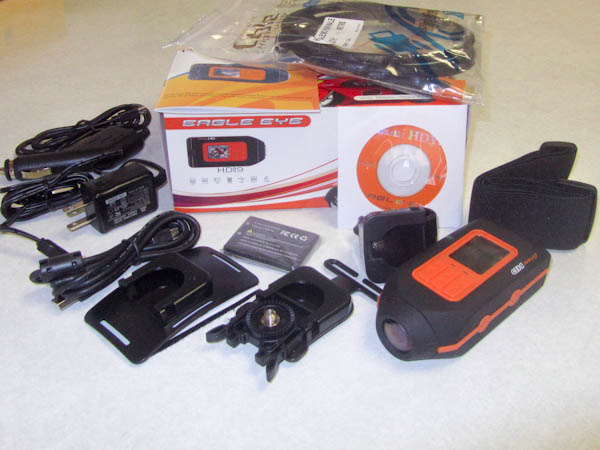
| My goal was to find a small camera that lets me easily record the action. I wanted one that lets me move around “hands-free” like a skier instead of a photographer. So I did a little online research and decided to pick up an Eagle Eye HD sports camera.
The Eagle Eye is a compact video/still camera that comes with a bundle of accessories. There’s both a 110 volt and an automobile adapter for recharging the battery in-camera; a second lithium battery; two adapters for mounting on different size straps; another adapter for mounting on handlebars; several adhesive cushions for mounting on a helmet; a USB cable and a mini-HDMI cable. |
 |
|
|
|
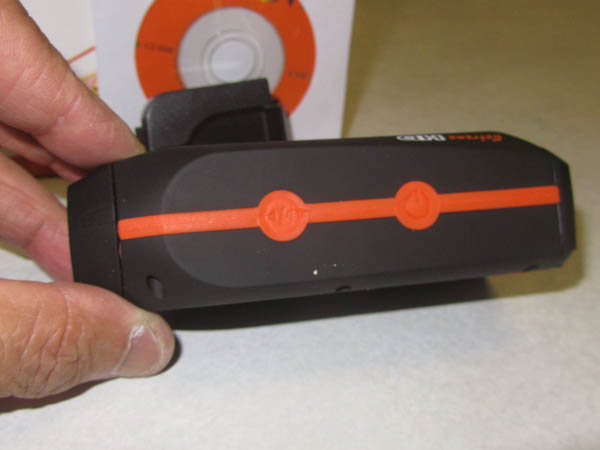
| The Eagle Eye doesn’t look like a conventional camera.
It’s shaped like an oversized mobile phone from ten years ago. The outside case is completely rubber coated, making it less likely to injury should it take a fall. On its face is a small 1-1/2″ LCD for and menu buttons for entering camera settings. The LCD is tiny but is a welcome feature since it lets you review your photos and videos in the field. |
 |
| The menu functions are similar to most point-and-shoot cameras: set video resolution; white balance; contrast; exposure compensation; power-saving features; format the SD card; internal clock.
|
|
| On top are two buttons that each have two functions.
Left: when held down for two seconds, powers the camera on/off the camera; otherwise is the shutter release for still photos. Right: when held down for two seconds, puts the camera into review mode; otherwise is the shutter release for videos. |
 |
|
|
|
| To make it less susceptible to water damage, the back cover is securely held is place with a tight fitting lock. You’ll have to use a bit of pressure to open the interior compartment.
Inside is the lithium ion battery and slot for a standard SD or SDHC card. There are also two connectors: one a USB cable and the other a mini HDMI cable. |
 |
|
|
|
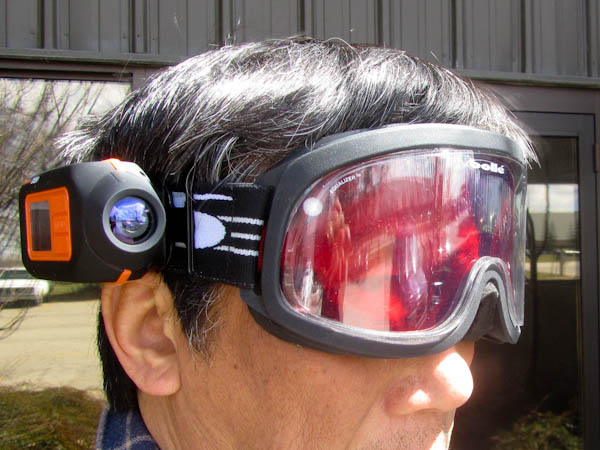
| Here, I’ve used one of the included mounts to attach the camera to my ski goggles.
Given that it weighs only 6 ounces or so, it is comfortable to wear and is not obtrusive. |
 |
|
|
|
| I took a few stills and videos to make sure that it was working.
Without further testing, I don’t think you’ll want to use this for taking those all-important wedding photos. Here’s a still taken indoors which I’d rate as just “acceptable”. |
 |
|
|
|
| However, I am more impressed with the test HD video video. The resolution is a full 1920 x 1080 pixels. The faces are totally in focus and the action smooth.
|
|
My experience with Eagle Eye HD so far is based on an hour or so of becoming familiar with its use.
I’ll complete the review of this camera after I return from my ski trip. I hope to have the results in ten days or so. As already mentioned, since I’m not an extreme sportsman, I may have my two expert-skiing sons help with the review.
Coincidentally, I purchased the Eagle Eye from Stuntcams.com. They are located in Grand Rapids only a few miles from our offices where Mike gave me the run-down on this camera. It sells for $249. Stuntcams.com also sells many other sports cameras.
Please note that Stay Focused has no connection to Stuntcams.com.
Written by Arnie Lee
« Older Posts — Newer Posts »