Online Magazine
Recent Posts
- Safeguard your Cellphone Photos
- Black & White to Color – Instantly
- Wearing Many Hats
- Video Roundup
- Rescuing Your Blurry Pictures
- Showing Their Age
- What is Your Angle?
- Panorama Photos
- Humorous Photos
- Close Ups
- Fisheye Pictures
- Photo Antiquities
- Printing Big
- Appreciating Scale
- Celebrity Sightings
Tags
More Places to Go
- Free "How-To" Books “How To” books for popular cameras 0
- Vist Us on Facebook keep in touch with us on Facebook 2
Archives
- July 2023 (1)
- March 2023 (2)
- February 2023 (1)
- December 2022 (1)
- October 2022 (1)
- September 2022 (8)
- August 2022 (9)
- July 2022 (1)
- June 2022 (1)
- June 2021 (1)
- May 2021 (1)
- March 2021 (5)
- February 2021 (4)
- January 2021 (2)
- April 2019 (1)
- March 2019 (1)
- February 2019 (1)
- October 2018 (2)
- April 2018 (1)
- March 2018 (4)
- February 2018 (1)
- November 2017 (1)
- August 2017 (1)
- June 2017 (1)
- April 2017 (1)
- March 2017 (5)
- February 2017 (2)
- January 2017 (1)
- October 2016 (1)
- September 2016 (1)
- August 2016 (1)
- July 2016 (1)
- May 2016 (1)
- April 2016 (1)
- March 2016 (2)
- February 2016 (1)
- January 2016 (2)
- December 2015 (1)
- November 2015 (1)
- October 2015 (3)
- April 2015 (1)
- March 2015 (5)
- February 2015 (1)
- January 2015 (4)
- December 2014 (2)
- November 2014 (5)
- October 2014 (2)
- September 2014 (1)
- August 2014 (2)
- July 2014 (1)
- May 2014 (1)
- April 2014 (5)
- March 2014 (5)
- December 2013 (2)
- November 2013 (18)
- October 2013 (1)
- September 2013 (1)
- August 2013 (1)
- July 2013 (1)
- June 2013 (3)
- May 2013 (1)
- April 2013 (2)
- March 2013 (1)
- February 2013 (1)
- January 2013 (1)
- December 2012 (1)
- November 2012 (2)
- October 2012 (2)
- September 2012 (5)
- August 2012 (2)
- July 2012 (1)
- June 2012 (1)
- May 2012 (1)
- April 2012 (4)
- March 2012 (1)
- February 2012 (1)
- January 2012 (3)
- December 2011 (1)
- November 2011 (3)
- October 2011 (1)
- September 2011 (2)
- August 2011 (2)
- June 2011 (3)
- May 2011 (4)
- April 2011 (8)
- March 2011 (8)
- February 2011 (10)
- January 2011 (6)
- December 2010 (11)
- November 2010 (14)
- October 2010 (6)
- September 2010 (12)
- August 2010 (2)
- July 2010 (4)
- June 2010 (3)
- May 2010 (1)
- April 2010 (1)
- March 2010 (2)
- February 2010 (1)
- January 2010 (1)
- December 2009 (1)
- November 2009 (2)
- October 2009 (2)
- September 2009 (1)
- August 2009 (3)
- July 2009 (2)
- June 2009 (1)
- May 2009 (2)
- April 2009 (1)
- March 2009 (2)
- February 2009 (1)
- January 2009 (3)
PhotoPlus Expo – Leica X2
13th November 2013
Retro at a High Price
For much of the mid-20th century, the Leica name was synonymous with finely designed 35mm film cameras and superb optics. But as the industry moved from film to digital, the company seemed to have lost it footing and missed the opportunity to maintain its technological and engineering edge.
Leica hasn’t given up.
|
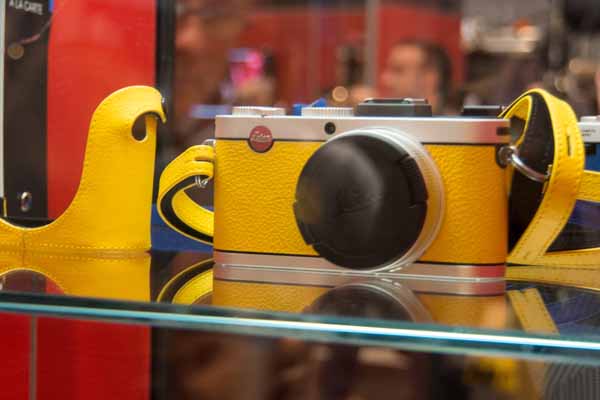
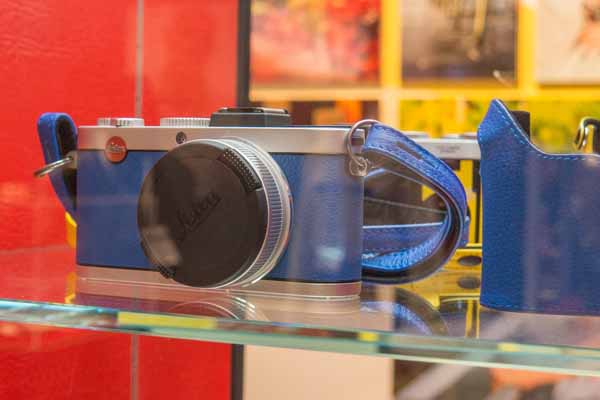
As I walked the aisles of PhotoPlus Expo, I couldn’t help but stop when I spotted these amazingly bright colors starring me in the face. This was the Leica’s booth and these are their X2 cameras. |
|
 |
 |
|
Surprisingly, the cameras are available in ten different leather trims. If nothing else, this fact alone makes the X2 a statement in style. Notice the matching straps and protective case. It sports a 16MP APS-C sensor, a fixed 24mm f/2.8 Leica designed lens, 2.7″ LCD in a very compact package. Leica likes to say this is the only digital camera made entirely in Germany, stressing its handmade workmanship. For more information, see Leica X2 |
|
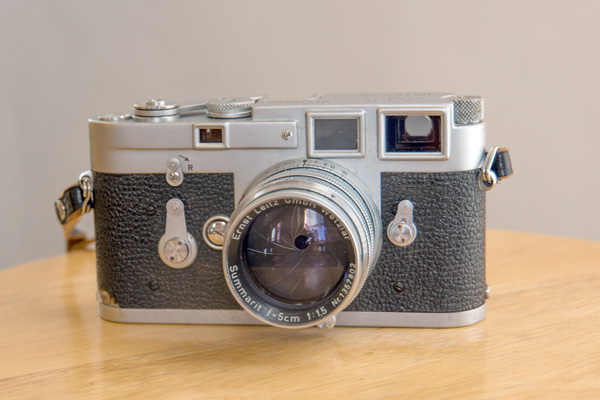 Above is my Leica M3 film camera from the 1950s |
|
You can see that the X2 inherits a lot of its looks from the M3. Leica is betting that the “retro” look of the X2 will prove to be an attractive selling feature. I found the X2 to be very eye-catching.
If you’re a believer in the Leica pedigree, you may want to take a deeper look at the X2. Reviews of the X2 are mixed. While the camera is well built, it doesn’t have features which separate it from the competitors’ offerings. And the X2 significantly pricier than the other brands.
The X2 sells for about $1995. Accessories include matching leather strap, protective case and an electronic viewfinder.
Written by: Arnie Lee
A Long Lens Story
12th June 2013
Avoiding the $8,500 shock
Those of us who like to hunt wildlife with a camera know that you can never have enough mm of lens. But sticker shock kicks in when you look at the prices for a fast super-telephoto lens. Last year I made it a high priority to seek out an alternative way to acquire one of these highly sought after gems and ended up with a prized lens at a bargain basement price.
My lucky catch doesn’t have the features of late model glass, but neither does it doesn’t carry an $8,500 price tag. Instead of the a brand spanking new 400mm f/2.8 with auto focusing and vibration reduction I picked up a used 400mm f/3.5 manual focus lens. As you’ll see, although it lacks the convenience of the high price spread, it performs very well for my type of shooting. And at a price of about $600, it is a steal. If you’re a lover of long lenses that isn’t willing to take a mortgage out to buy one, follow along to see if the used lens approach can satisfy your equipment wants.
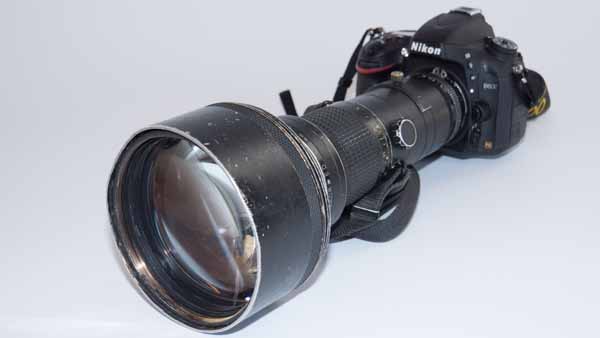
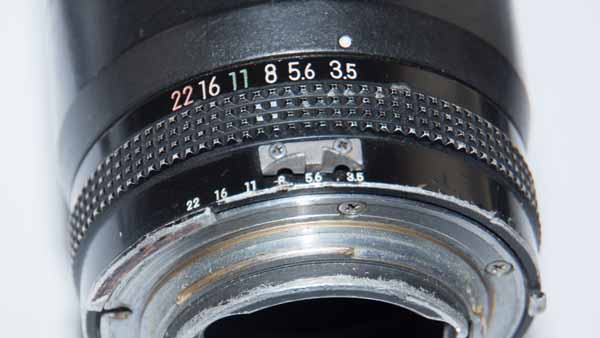
| To be exact, my “find” is a Nikkor ED IF AI-S 400mm f/3.5 lens. There are no marks or scratches on any of the lens surfaces. The lens body shows heavy wear and a few scratches to the paint. It has a tripod collar, a built-in lens hood and accepts affordable 39mm drop-in filters or expensive very 122mm external filters.
Mechanically, this lens has high quality optics; manual internal focusing (lens barrel does not extend or retract as it is focused) and automatic indexing so that the camera can determine the aperture setting. |
 |
|
|
|
 |
 |
|
|
|
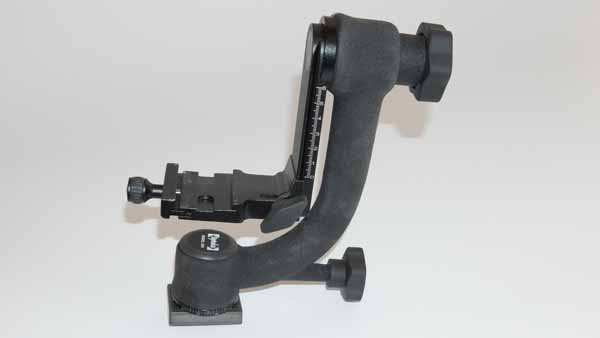
| This monster of a lens weighs more than 6 pounds. You won’t want to handhold this camera and lens combo for very long.
While it is possible to mount this combo directly onto a tripod, a more practical solution is to use a gimbal mount. Here’s one that I use. |
 |
|
|
|
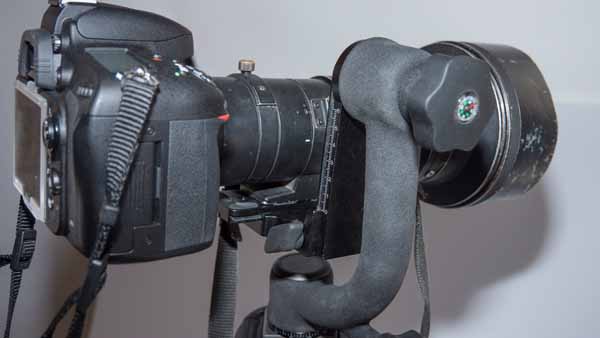
| Using the tripod collar on the lens, the combo is screwed onto the gimbal. The gimbal itself is mounted and balanced onto the tripod.
With the arrangement, you can now frictionlessly tilt, swivel and pan the camera and lens combo to take aim of your subject. |
 |
|
|
|
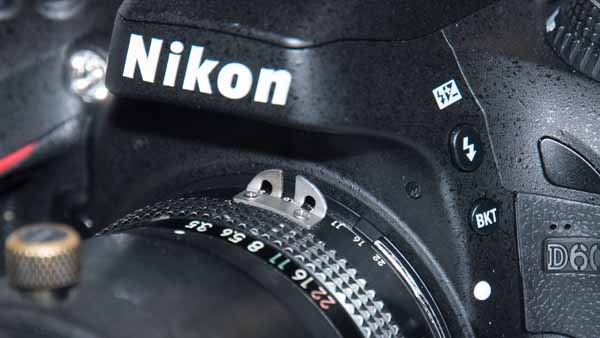
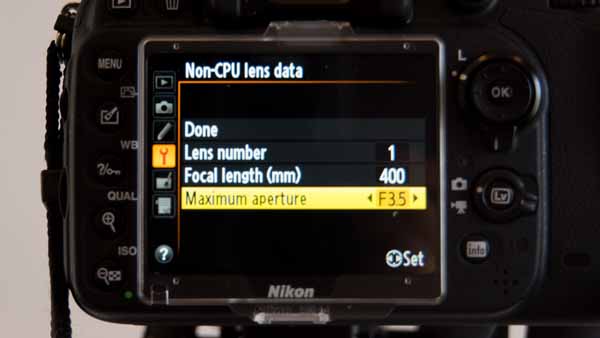
| There’s one final step to complete before we can use this older lens with a newer camera body.
Newer Nikkor lenses owe their intelligence to a tiny CPU which controls the exposure settings. Since this lens does not have a CPU, you must “register” this lens to the camera by setting its maximum (widest) aperture. The Tools menu has an item for doing this. |
 |
|
|
|
| Having registered the lens, there are two options for setting the exposure: ‘M” manual, where you set both the shutter speed and aperture or “A” aperture priority, where you set the aperture and the camera sets the appropriate shutter speed.
In either case, you rotate the aperture ring on the lens to the desired lens opening. In “M” mode, you also dial in the camera shutter speed. In “A” mode, the camera automatically sets the shutter speed. You’re all set to take aim, carefully focus and fire away. Here’s a few of my first shots with the lens. |
 |
|
|
|
 |
 |
|
|
|
 |
 |
|
|
|
 |
|
|
|
|
At first I was a little hesitant about buying an older lens without the autofocus and autoexposure features that I’ve come to expect from newer lenses. After all, this lens comes from the early 1980s; isn’t it obsolete? Now that I’ve had some positive experience, I realize that quality equipment lasts for many years.
I feel that I hit the jackpot with this lens at a great price. Now I’m hoping to find some time to capture many more birds in the future.
Written by Arnie Lee
NOTE: While this article featured Nikon equipment, I’m hoping to look for similar money-saving angles for my Canon equipment.
Going Wireless with the Canon 6D
20th January 2013
Earlier this month I visited several of the photo equipment manufacturers at the annual Consumer Electronics Show. Of course the two majors are Canon and Nikon. And while sales by other camera makers including Sony, Olympus, Pentax and Fuji trail by a large margin, new features continue to arrive rapidly among all new models by all manufacturers. This year, one feature that was common in many models is the addition of wireless functionality.
Since CES, I’ve acquired and tested two of the new DLSRs with wireless capabilities: the Canon 6D and the Nikon D600.
Here’s a quick report on how wireless works with the Canon 6D.
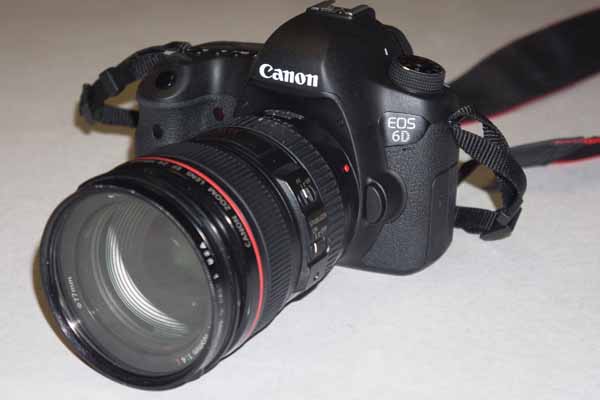
| The 6D is the newest DSLR from Canon. Its full-frame sensor has a resolution of 20MB with good low light performance. Its autofocus system uses 11 focus points. Compared to it’s bigger brother the 5D Mark III, it is smaller in size, lighter in weight and less expensive.
The two “new” built-in features are the GPS receiver and its wireless capability. Having GPS automatically adds location information (latitude, longitude and altitude) to the EXIF data of the images. My interest in the 6D was to see how its wireless capabilities worked. |
 |
|
|
|
| The Canon 6D can communicate wirelessly with several types of devices: another camera, a smartphone, a printer, a web service or a DLNA device.
For this review I’ll describe my experience connecting with a smartphone. For wireless, there’s a few preliminaries that have to be performed. The first is to give the 6D a wireless identifier. This step takes just a few minutes using the menus on the back of the camera. Here I’ve set it up with the identifier “Arnie 6D“. By completing this step, the 6D is now its own wireless station. |
 |
|
|
|
| The 6D can be used with either an Android or iPhone smartphone.
You’ll first have to install the free EOS Remote app for your particular smartphone. In my case, I installed the app onto my iPhone. Using the Settings menu on the iPhone, you connect to the camera with Wi-Fi. Look for the camera’s identifier – Arnie 6D. For security, you’ll have to enter the Encryption Key to establish the connection. |
 |
|
|
|
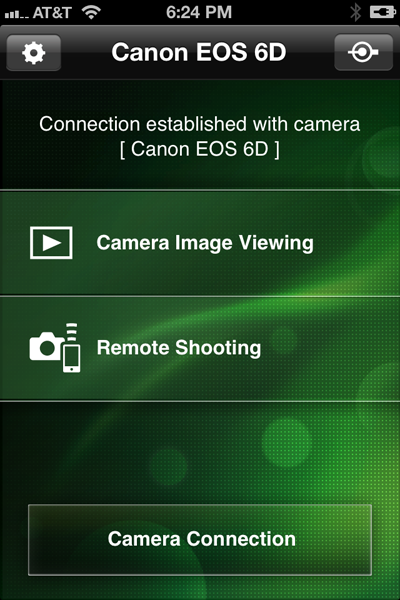
| After the camera and smartphone are connected, the EOS Remote app is ready to use.
It can perform two different functions. Firstly, you can view the images that have been captured with the 6D. Secondly, you can use the smartphone as a remote shutter release. |
 |
|
|
|
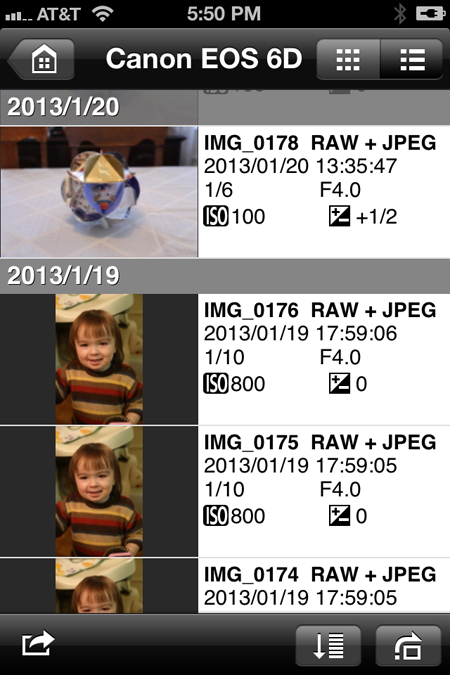
| Viewing Images from camera
Choosing Camera Image Viewing brings us to a screen on the smartphone that looks like this. By default the thumbnails are ordered by date but this can be changed to order them by rating (1 to 5 stars) or folder (if multiple folders are on the camera’s SD card). In addition to the thumbnail, the technical data each image is also presented. This is helpful if you plan to evaluate the images while still in the field with the purpose of adjusting the settings. |
 |
|
|
|
Tapping one of the thumbnails presents a larger version of the thumbnail. For each image you can:
|
 |
|
|
|
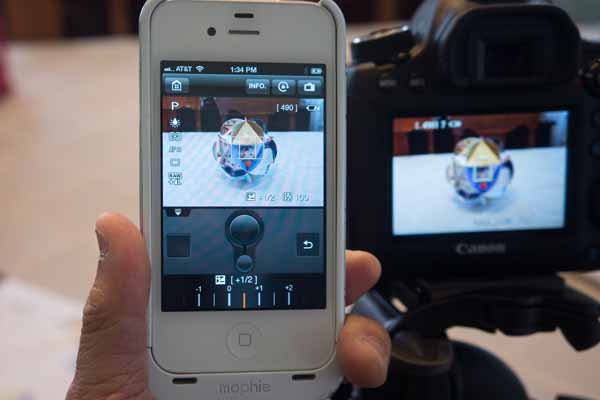
| Capturing Images using the smartphone
Your smartphone can be used as a remote shutter release with extra capabilities. Here I’ve set the camera on a tripod. Choosing Remote Shooting activates the 6D Liveview. The smartphone then presents the same view as the camera. By tapping on the different areas of the smartphone screen, I can change the autofocus. Depending on the 6D’s mode setting I can also change the ISO, shutter speed, aperture and exposure compensation using the smartphone. Another simple tap and the camera shutter is released. |
 |
|
|
|
| Here’s the image that I took remotely.
And of course, the just captured image is immediately available if I change back to EOS Remote’s Camera Image Viewing. |
 |
|
|
|
There’s nothing earth shattering with this wireless capability. Yes, you can easily transfer images from the 6D to your smartphone and send them via email to others. And yes, it allows for backup, however the images are reduced to a smaller 1920 x 1280 jpg size.
I’ll cover more soon in another article about the Canon 6D’s wireless capability with a computer.
Also in the works is an article about the Nikon D600’s wireless capability.
Written by Arnie Lee
« Older Posts — Newer Posts »