Online Magazine
Recent Posts
- Safeguard your Cellphone Photos
- Black & White to Color – Instantly
- Wearing Many Hats
- Video Roundup
- Rescuing Your Blurry Pictures
- Showing Their Age
- What is Your Angle?
- Panorama Photos
- Humorous Photos
- Close Ups
- Fisheye Pictures
- Photo Antiquities
- Printing Big
- Appreciating Scale
- Celebrity Sightings
Tags
More Places to Go
- Free "How-To" Books “How To” books for popular cameras 0
- Vist Us on Facebook keep in touch with us on Facebook 2
Archives
- July 2023 (1)
- March 2023 (2)
- February 2023 (1)
- December 2022 (1)
- October 2022 (1)
- September 2022 (8)
- August 2022 (9)
- July 2022 (1)
- June 2022 (1)
- June 2021 (1)
- May 2021 (1)
- March 2021 (5)
- February 2021 (4)
- January 2021 (2)
- April 2019 (1)
- March 2019 (1)
- February 2019 (1)
- October 2018 (2)
- April 2018 (1)
- March 2018 (4)
- February 2018 (1)
- November 2017 (1)
- August 2017 (1)
- June 2017 (1)
- April 2017 (1)
- March 2017 (5)
- February 2017 (2)
- January 2017 (1)
- October 2016 (1)
- September 2016 (1)
- August 2016 (1)
- July 2016 (1)
- May 2016 (1)
- April 2016 (1)
- March 2016 (2)
- February 2016 (1)
- January 2016 (2)
- December 2015 (1)
- November 2015 (1)
- October 2015 (3)
- April 2015 (1)
- March 2015 (5)
- February 2015 (1)
- January 2015 (4)
- December 2014 (2)
- November 2014 (5)
- October 2014 (2)
- September 2014 (1)
- August 2014 (2)
- July 2014 (1)
- May 2014 (1)
- April 2014 (5)
- March 2014 (5)
- December 2013 (2)
- November 2013 (18)
- October 2013 (1)
- September 2013 (1)
- August 2013 (1)
- July 2013 (1)
- June 2013 (3)
- May 2013 (1)
- April 2013 (2)
- March 2013 (1)
- February 2013 (1)
- January 2013 (1)
- December 2012 (1)
- November 2012 (2)
- October 2012 (2)
- September 2012 (5)
- August 2012 (2)
- July 2012 (1)
- June 2012 (1)
- May 2012 (1)
- April 2012 (4)
- March 2012 (1)
- February 2012 (1)
- January 2012 (3)
- December 2011 (1)
- November 2011 (3)
- October 2011 (1)
- September 2011 (2)
- August 2011 (2)
- June 2011 (3)
- May 2011 (4)
- April 2011 (8)
- March 2011 (8)
- February 2011 (10)
- January 2011 (6)
- December 2010 (11)
- November 2010 (14)
- October 2010 (6)
- September 2010 (12)
- August 2010 (2)
- July 2010 (4)
- June 2010 (3)
- May 2010 (1)
- April 2010 (1)
- March 2010 (2)
- February 2010 (1)
- January 2010 (1)
- December 2009 (1)
- November 2009 (2)
- October 2009 (2)
- September 2009 (1)
- August 2009 (3)
- July 2009 (2)
- June 2009 (1)
- May 2009 (2)
- April 2009 (1)
- March 2009 (2)
- February 2009 (1)
- January 2009 (3)
Safeguard your Cellphone Photos
01st July 2023
Have you Backed Up Your Photos?
Many of the photographs that you take are non-replaceable. Whether they are snapshots of family, birthday, anniversary, reunion or other events, most likely they are important possessions that you do not want to lose.
In the days before digital photography, many of us stuffed negatives, slides and snapshots in the proverbial shoebox for safekeeping. But with the advent of digital cameras photography became easier and less expensive resulting in a steep increase of the number of pictures and videos that we took. And of the number has literally exploded with the addition of our always handy cellphone camera.
The question is – are we taking the steps to backup and/or organize all of our photos and videos? Nowadays there are a myriad ways to store images. The one you choose is based on the amount of effort you have to expend to backup and organize your stash and the cost for storing them.
Here’s a few of the ways that I backup and organize my photos and videos. From here on in when I refer to images this is to be both photographs and videos.
Cellphones fall into either the Apple iOS category or the Android category. And since your cellphone doubles as cameras, it’s a good idea to backup the images regularly.
While I’m insistent on safeguarding the images on my cellphone, I’m also interested in doing so as easily and inexpensively as possible. So I’ve chosen several ways to do this that are simple and automated.
My cell is an iPhone so I don’t have a lot of experience with Android models. Android owners can use both the Google and Amazon services for backup up their images.
Apple Photos app
My iPhone can automatically upload all of my photos to the Apple cloud for safekeeping.
- Go to the Settings menu:
- Beneath your name choose Apple ID, iCloud+, Media & Purchases.
- Choose iCloud
- Choose Photos
- Next to Sync this iPhone turn the button on
Apple iCloud users are entitled to 5GB of storage with their account. This amount of storage is enough for about 2500 photos of average size. For larger photo collections, you can purchase 50GB additional storage for $.99 (99 cents) a month. I have 8,000 photos and 1,300 videos in my current collection. If you have a huge collection you can purchase 2TB of storage for $9.99 a month.
Google Photos app
I also have Google Photos app installed on my iPhone. Google Photos copies the photos on my iPhone to my Google Library in the cloud. I purchased 100 GB of storage which cost $1.99 per month. Currently I have more than 30,000 images but using only 36 GB of the allocated storage. There are other options to purchase additional storage on the Google cloud. For Android users the Google Photos app has an option to backup the photos on your cell phone to your Google Library in the cloud.
Google Photos has features to edit, add descriptions and comments, identify faces, organize images into albums and share images.
Google Photos users are entitled to 15GB of storage with their account. This amount of storage is enough for about 7500 photos of average size. For larger photo collections, you can purchase 100GB additional storage for $1.99 a month.
Amazon Photos app
The Amazon Photos app is also installed on my iPhone. Amazon Prime members receive unlimited free storage for photos and 5 GB for videos. You can use either their iOS (iPhone/iPad) or Android app to automatically backup your images. Non-Prime members can purchase 100 GB of storage on the Amazon cloud for $19.99 per year ($1.66/month). Currently, I have about 9,000 photos and 2000 videos stored on the Amazon’s cloud using 82 GB of storage.
Amazon Photos has features to edit, apply filters, add text and organize images into albums or groups and share images.
As you can see, I have safeguarded my cellphone photos in three different places. Maybe it’s “overkill” to have three different backups but the process is automatic. Since I have more images than the allotted free space for the various services I don’t mind the few dollars a month since it saves me the worry that I might otherwise loose an important event.
It’s easy and either free or inexpensive so please don’t forget to protect your photos and videos.
Written by: Arnie Lee
Seen at WPPI – My 2nd Brain 11
02nd March 2017
Lightweight, Convenient and Protective
|
|
|
| At this year’s Wedding and Portrait Photography International expo, I spent several hours talking to vendors of cameras, equipment, accessories and services. The people at the Think Tank booth, gifted me a small accessory for everyday use. | |
|
|
|
| This accessory goes by an unorthodox name: My 2nd Brain 11. I suppose the name suggests that all of your necessities can be easily kept in this single case.
The “11” refers to the size of a tablet or notebook that it can hold, in this instance an 11″ model of either. Load up the case with what you need, throw it over your shoulder and you’re ready to attack the world. |
 |
|
|
|
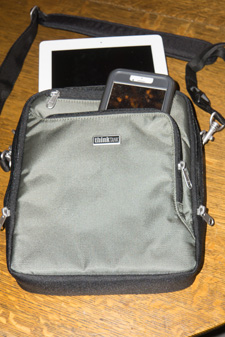 The inner pocket is well padded and provides protection for my iPad. The outer pocket is perfect for holding my cell phone. A non-zippered pocket on the reverse side conveniently holds standard letter-size papers. |
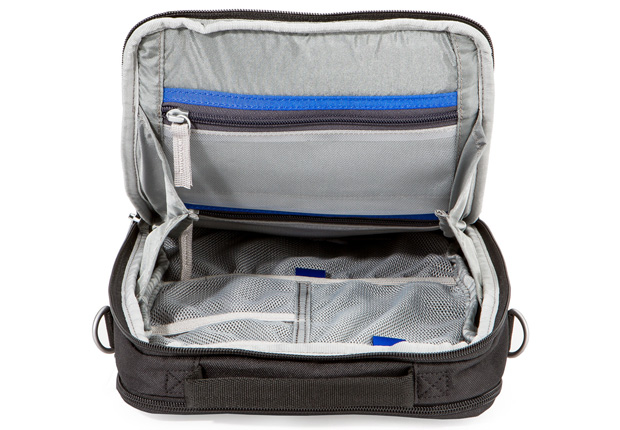 The case opens wide and has several elastic-mesh pockets for securely holding pens, business cards, notepads, more. The padded shoulder strap is fully adjustable. |
|
|
|
| My 2nd Brain 11 comes in black and green. The suggested price of My 2nd Brain 11 is $85.
Think Tank also has larger My 2nd Brain cases for 13″ and 15″ tablets or notebooks. For more information, please visit Think Tank. |
|
|
|
|
Written by: Arnie Lee
Going Wireless with the Canon 6D
20th January 2013
Earlier this month I visited several of the photo equipment manufacturers at the annual Consumer Electronics Show. Of course the two majors are Canon and Nikon. And while sales by other camera makers including Sony, Olympus, Pentax and Fuji trail by a large margin, new features continue to arrive rapidly among all new models by all manufacturers. This year, one feature that was common in many models is the addition of wireless functionality.
Since CES, I’ve acquired and tested two of the new DLSRs with wireless capabilities: the Canon 6D and the Nikon D600.
Here’s a quick report on how wireless works with the Canon 6D.
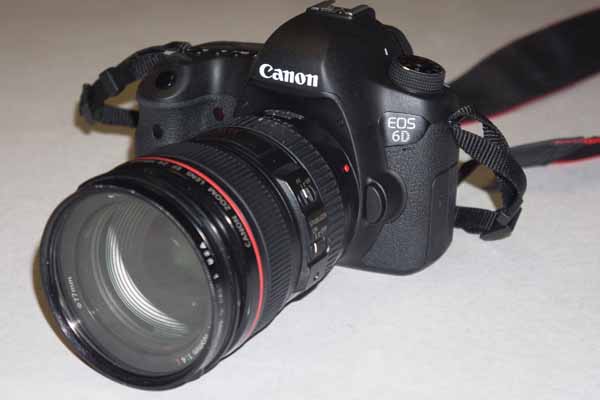
| The 6D is the newest DSLR from Canon. Its full-frame sensor has a resolution of 20MB with good low light performance. Its autofocus system uses 11 focus points. Compared to it’s bigger brother the 5D Mark III, it is smaller in size, lighter in weight and less expensive.
The two “new” built-in features are the GPS receiver and its wireless capability. Having GPS automatically adds location information (latitude, longitude and altitude) to the EXIF data of the images. My interest in the 6D was to see how its wireless capabilities worked. |
 |
|
|
|
| The Canon 6D can communicate wirelessly with several types of devices: another camera, a smartphone, a printer, a web service or a DLNA device.
For this review I’ll describe my experience connecting with a smartphone. For wireless, there’s a few preliminaries that have to be performed. The first is to give the 6D a wireless identifier. This step takes just a few minutes using the menus on the back of the camera. Here I’ve set it up with the identifier “Arnie 6D“. By completing this step, the 6D is now its own wireless station. |
 |
|
|
|
| The 6D can be used with either an Android or iPhone smartphone.
You’ll first have to install the free EOS Remote app for your particular smartphone. In my case, I installed the app onto my iPhone. Using the Settings menu on the iPhone, you connect to the camera with Wi-Fi. Look for the camera’s identifier – Arnie 6D. For security, you’ll have to enter the Encryption Key to establish the connection. |
 |
|
|
|
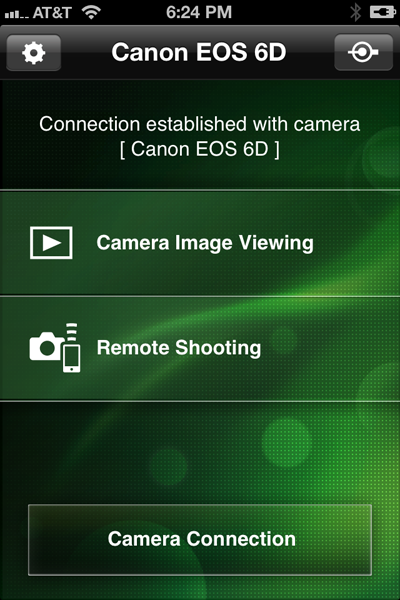
| After the camera and smartphone are connected, the EOS Remote app is ready to use.
It can perform two different functions. Firstly, you can view the images that have been captured with the 6D. Secondly, you can use the smartphone as a remote shutter release. |
 |
|
|
|
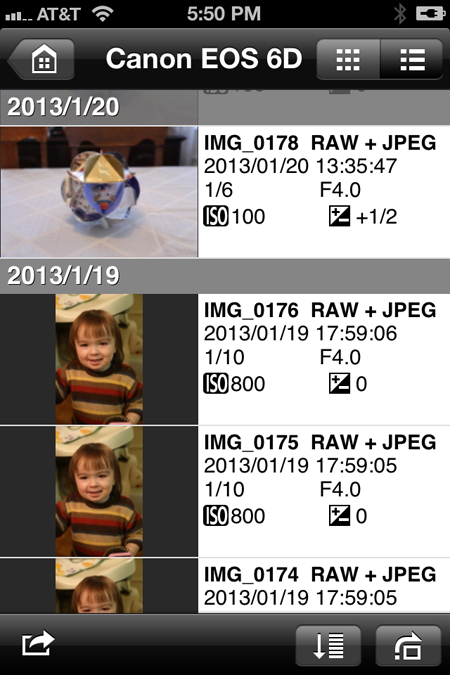
| Viewing Images from camera
Choosing Camera Image Viewing brings us to a screen on the smartphone that looks like this. By default the thumbnails are ordered by date but this can be changed to order them by rating (1 to 5 stars) or folder (if multiple folders are on the camera’s SD card). In addition to the thumbnail, the technical data each image is also presented. This is helpful if you plan to evaluate the images while still in the field with the purpose of adjusting the settings. |
 |
|
|
|
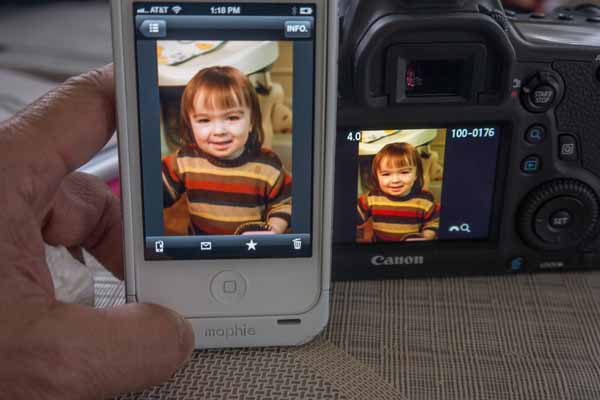
Tapping one of the thumbnails presents a larger version of the thumbnail. For each image you can:
|
 |
|
|
|
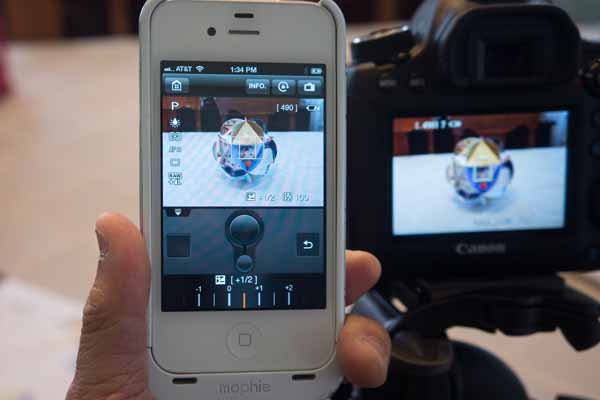
| Capturing Images using the smartphone
Your smartphone can be used as a remote shutter release with extra capabilities. Here I’ve set the camera on a tripod. Choosing Remote Shooting activates the 6D Liveview. The smartphone then presents the same view as the camera. By tapping on the different areas of the smartphone screen, I can change the autofocus. Depending on the 6D’s mode setting I can also change the ISO, shutter speed, aperture and exposure compensation using the smartphone. Another simple tap and the camera shutter is released. |
 |
|
|
|
| Here’s the image that I took remotely.
And of course, the just captured image is immediately available if I change back to EOS Remote’s Camera Image Viewing. |
 |
|
|
|
There’s nothing earth shattering with this wireless capability. Yes, you can easily transfer images from the 6D to your smartphone and send them via email to others. And yes, it allows for backup, however the images are reduced to a smaller 1920 x 1280 jpg size.
I’ll cover more soon in another article about the Canon 6D’s wireless capability with a computer.
Also in the works is an article about the Nikon D600’s wireless capability.
Written by Arnie Lee
Newer Posts »