Online Magazine
Recent Posts
- Safeguard your Cellphone Photos
- Black & White to Color – Instantly
- Wearing Many Hats
- Video Roundup
- Rescuing Your Blurry Pictures
- Showing Their Age
- What is Your Angle?
- Panorama Photos
- Humorous Photos
- Close Ups
- Fisheye Pictures
- Photo Antiquities
- Printing Big
- Appreciating Scale
- Celebrity Sightings
Tags
More Places to Go
- Free "How-To" Books “How To” books for popular cameras 0
- Vist Us on Facebook keep in touch with us on Facebook 2
Archives
- July 2023 (1)
- March 2023 (2)
- February 2023 (1)
- December 2022 (1)
- October 2022 (1)
- September 2022 (8)
- August 2022 (9)
- July 2022 (1)
- June 2022 (1)
- June 2021 (1)
- May 2021 (1)
- March 2021 (5)
- February 2021 (4)
- January 2021 (2)
- April 2019 (1)
- March 2019 (1)
- February 2019 (1)
- October 2018 (2)
- April 2018 (1)
- March 2018 (4)
- February 2018 (1)
- November 2017 (1)
- August 2017 (1)
- June 2017 (1)
- April 2017 (1)
- March 2017 (5)
- February 2017 (2)
- January 2017 (1)
- October 2016 (1)
- September 2016 (1)
- August 2016 (1)
- July 2016 (1)
- May 2016 (1)
- April 2016 (1)
- March 2016 (2)
- February 2016 (1)
- January 2016 (2)
- December 2015 (1)
- November 2015 (1)
- October 2015 (3)
- April 2015 (1)
- March 2015 (5)
- February 2015 (1)
- January 2015 (4)
- December 2014 (2)
- November 2014 (5)
- October 2014 (2)
- September 2014 (1)
- August 2014 (2)
- July 2014 (1)
- May 2014 (1)
- April 2014 (5)
- March 2014 (5)
- December 2013 (2)
- November 2013 (18)
- October 2013 (1)
- September 2013 (1)
- August 2013 (1)
- July 2013 (1)
- June 2013 (3)
- May 2013 (1)
- April 2013 (2)
- March 2013 (1)
- February 2013 (1)
- January 2013 (1)
- December 2012 (1)
- November 2012 (2)
- October 2012 (2)
- September 2012 (5)
- August 2012 (2)
- July 2012 (1)
- June 2012 (1)
- May 2012 (1)
- April 2012 (4)
- March 2012 (1)
- February 2012 (1)
- January 2012 (3)
- December 2011 (1)
- November 2011 (3)
- October 2011 (1)
- September 2011 (2)
- August 2011 (2)
- June 2011 (3)
- May 2011 (4)
- April 2011 (8)
- March 2011 (8)
- February 2011 (10)
- January 2011 (6)
- December 2010 (11)
- November 2010 (14)
- October 2010 (6)
- September 2010 (12)
- August 2010 (2)
- July 2010 (4)
- June 2010 (3)
- May 2010 (1)
- April 2010 (1)
- March 2010 (2)
- February 2010 (1)
- January 2010 (1)
- December 2009 (1)
- November 2009 (2)
- October 2009 (2)
- September 2009 (1)
- August 2009 (3)
- July 2009 (2)
- June 2009 (1)
- May 2009 (2)
- April 2009 (1)
- March 2009 (2)
- February 2009 (1)
- January 2009 (3)
Extreme Sports Camera
06th April 2011
Review of the Eagle Eye
From the title, you might think that I participate in extreme sports. Hah, this is far-from-the-truth. Instead, the title is to let you know that there’s a camera that is rugged enough to be used by enthusiasts that do in fact participate in extreme sports.
Let’s move on. In a few days, I’ll be off to the Sierra Nevadas for some easy and leisurely Spring skiing.
In the past, I’ve always lugged a camera around to capture the action. This year, I’ve decided that I would try a different tact.
| My goal was to find a small camera that lets me easily record the action. I wanted one that lets me move around “hands-free” like a skier instead of a photographer. So I did a little online research and decided to pick up an Eagle Eye HD sports camera.
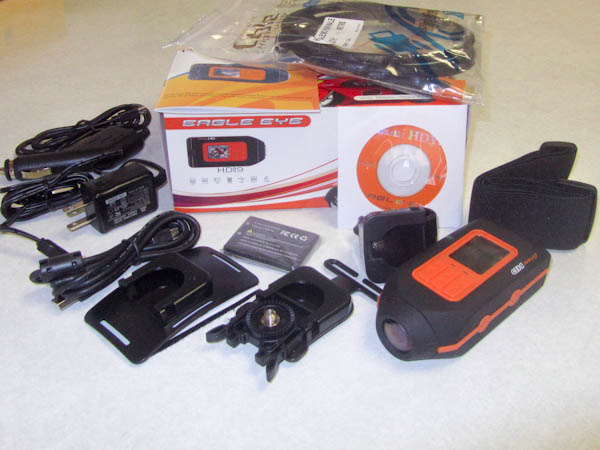
The Eagle Eye is a compact video/still camera that comes with a bundle of accessories. There’s both a 110 volt and an automobile adapter for recharging the battery in-camera; a second lithium battery; two adapters for mounting on different size straps; another adapter for mounting on handlebars; several adhesive cushions for mounting on a helmet; a USB cable and a mini-HDMI cable. |
 |
|
|
|
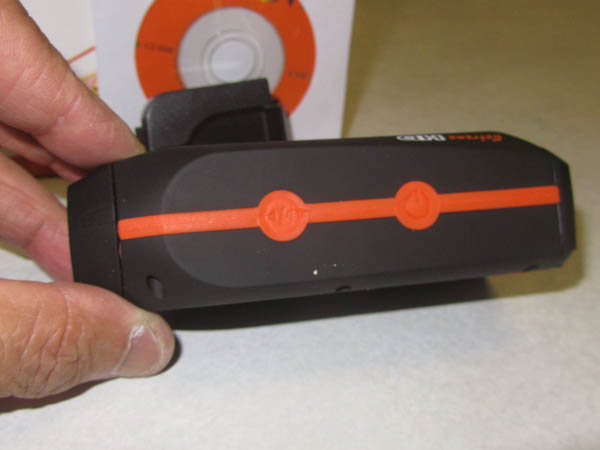
| The Eagle Eye doesn’t look like a conventional camera.
It’s shaped like an oversized mobile phone from ten years ago. The outside case is completely rubber coated, making it less likely to injury should it take a fall. On its face is a small 1-1/2″ LCD for and menu buttons for entering camera settings. The LCD is tiny but is a welcome feature since it lets you review your photos and videos in the field. |
 |
| The menu functions are similar to most point-and-shoot cameras: set video resolution; white balance; contrast; exposure compensation; power-saving features; format the SD card; internal clock.
|
|
| On top are two buttons that each have two functions.
Left: when held down for two seconds, powers the camera on/off the camera; otherwise is the shutter release for still photos. Right: when held down for two seconds, puts the camera into review mode; otherwise is the shutter release for videos. |
 |
|
|
|
| To make it less susceptible to water damage, the back cover is securely held is place with a tight fitting lock. You’ll have to use a bit of pressure to open the interior compartment.
Inside is the lithium ion battery and slot for a standard SD or SDHC card. There are also two connectors: one a USB cable and the other a mini HDMI cable. |
 |
|
|
|
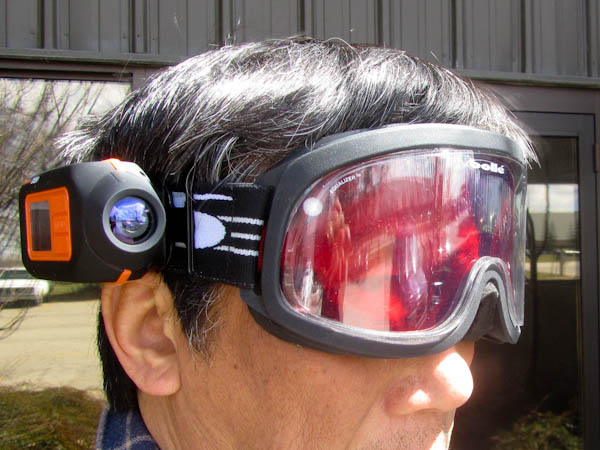
| Here, I’ve used one of the included mounts to attach the camera to my ski goggles.
Given that it weighs only 6 ounces or so, it is comfortable to wear and is not obtrusive. |
 |
|
|
|
| I took a few stills and videos to make sure that it was working.
Without further testing, I don’t think you’ll want to use this for taking those all-important wedding photos. Here’s a still taken indoors which I’d rate as just “acceptable”. |
 |
|
|
|
| However, I am more impressed with the test HD video video. The resolution is a full 1920 x 1080 pixels. The faces are totally in focus and the action smooth.
|
|
My experience with Eagle Eye HD so far is based on an hour or so of becoming familiar with its use.
I’ll complete the review of this camera after I return from my ski trip. I hope to have the results in ten days or so. As already mentioned, since I’m not an extreme sportsman, I may have my two expert-skiing sons help with the review.
Coincidentally, I purchased the Eagle Eye from Stuntcams.com. They are located in Grand Rapids only a few miles from our offices where Mike gave me the run-down on this camera. It sells for $249. Stuntcams.com also sells many other sports cameras.
Please note that Stay Focused has no connection to Stuntcams.com.
Written by Arnie Lee
LumiQuest Softbox III – review
27th March 2011
Add Soft Lighting to your off-camera flash
The modern day external flash unit is a vital accessory for indoor portraits, still life, food shots and more.
Light that originates from a small source such as an external flash unit is harsher than light that originates from a larger source. To “soften” the lighting especially for portraits, photographers often use “modifiers” to alter the lighting to something more pleasing. Most of the modifiers work by spreading the light out over a larger area.
LumiQuest has been a well-known maker of modifiers for many years. Among their bestsellers is the Softbox III. When I was attending the WPPI Expo, Heidi one of LumiQuest’s principals gave me a quick demonstration of this lightweight device. I was so impressed that I ordered one when I returned home.
The concentrated light from the flash bounces inside the reflector of the Softbox III and passes through the translucent material covering its face. Instead of harsh light originating from the small flash head, a softer light originates from a much larger reflector.
Follow along as I show you how I’ve used the Softbox III to improve the lighting on some of my recent portraits.
| When it’s disassembled, the Softbox III folds flat to a 8″ x 9″ size, making it convenient to take anywhere.
As folded, it easily fits in the outer pocket of my camera bag so is always available when I’m carrying my external flash. |
 |
Sony Alpha A55 – Review Part 3
16th March 2011
In this final Part 3, I’ll show you additional examples of some of the innovative and easy-to-use features that make the Sony Alpha A55 my recent favorite camera.
You can read about the “standard” features of the Sony Alpha A55 in Part 1 of my review. And in Part 2, I describe my experience using several of the A55’s unique features.
D-Range Optimization
| When shooting a scene that has high contrast, you may notice that the shadow areas are likely to lack detail and/or the highlight areas are overexposed.
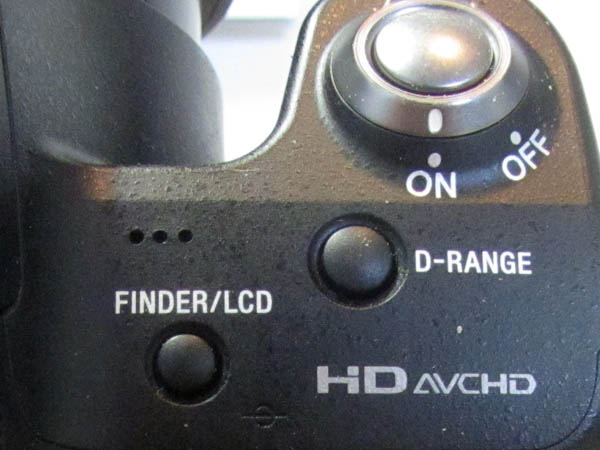
To counter this tricky lighting, the A55 offers D-Range Optimization that compresses tones to preserve detail in both shadows and highlights. This feature is not unique to the A55; Canon offers a similar feature which it calls Auto Lighting Optimizer and Nikon uses the moniker Active D-Lighting. However, the A55 offers five levels of D-Range optimization. To use it, press the dedicated D-Range button on the top of the camera to reveal the DRO menu item and toggle between Auto, Lv 1, Lv 2, LV3, Lv 4 and Lv 5. In the high contrast winter photos below, you can see that the D-Range reveals much more shadow detail at Lv 5. |
|
 |
 |
 |
 |
 |
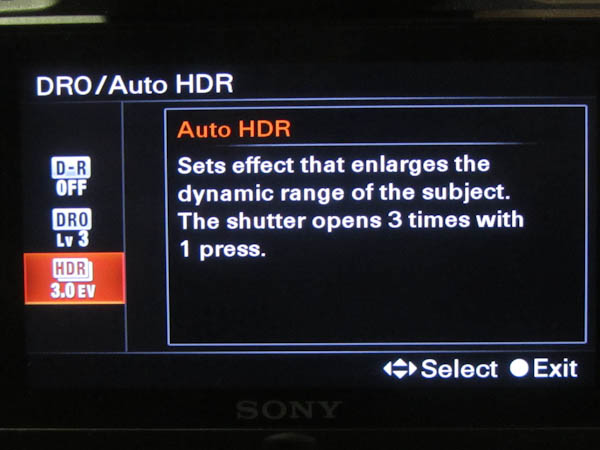
High Dynamic Range – in-camera
| The A55’s High Dynamic Range (HDR) feature has a similar goal as D-Range Optimization, namely to maintain detail in shadows and highlights. HDR photography attempts to reduce the contrast levels of a scene so that the scene can be displayed with maximum detail on a print or display device.
For the last few years, HDR has been popularized by using software to combine multiple images within the computer. The A55 is one of the first to offer it easily and automatically in-camera. |
|
| For HDR, the A55 take 3 successive photos with varying exposures (bracketed). To use it, press the dedicated D-Range button on the top of the camera to reveal the HDR item. Then toggle between Auto, 1.0 EV, 2.0 EV, 3.0 EV, 4.0 EV, 5.0 EV and 6.0 EV. For example, when set to 3.0 EV, three images are captured: one at the normal exposure, one at 3 stops overexposed (+3.0 EV) and one at 3 stops underexposed (-3.0 EV). The A55 then writes two images to the SDHC card: one at the normal exposure and a second that has been processed to combine the predominantly shadow detail from the +3.0 EV capture, the predominantly highlight detail from the -3.0 EV capture and the predominantly midtone detail from the normal exposure. |
 |
 |
 |
 |
 |
 |
 |
| Some users are surprised that the HDR images appear to have low contrast, but this is a by-product of having to reduce such a wide range of exposure values to level suitable for a display device or printing.
While it may not produce acceptable results in all situations, I’ve been happy with many of the A55’s HDR images that I’ve captured. Note that HDR is not available unless the A55 is set to capture JPG only images (not RAW). |
|
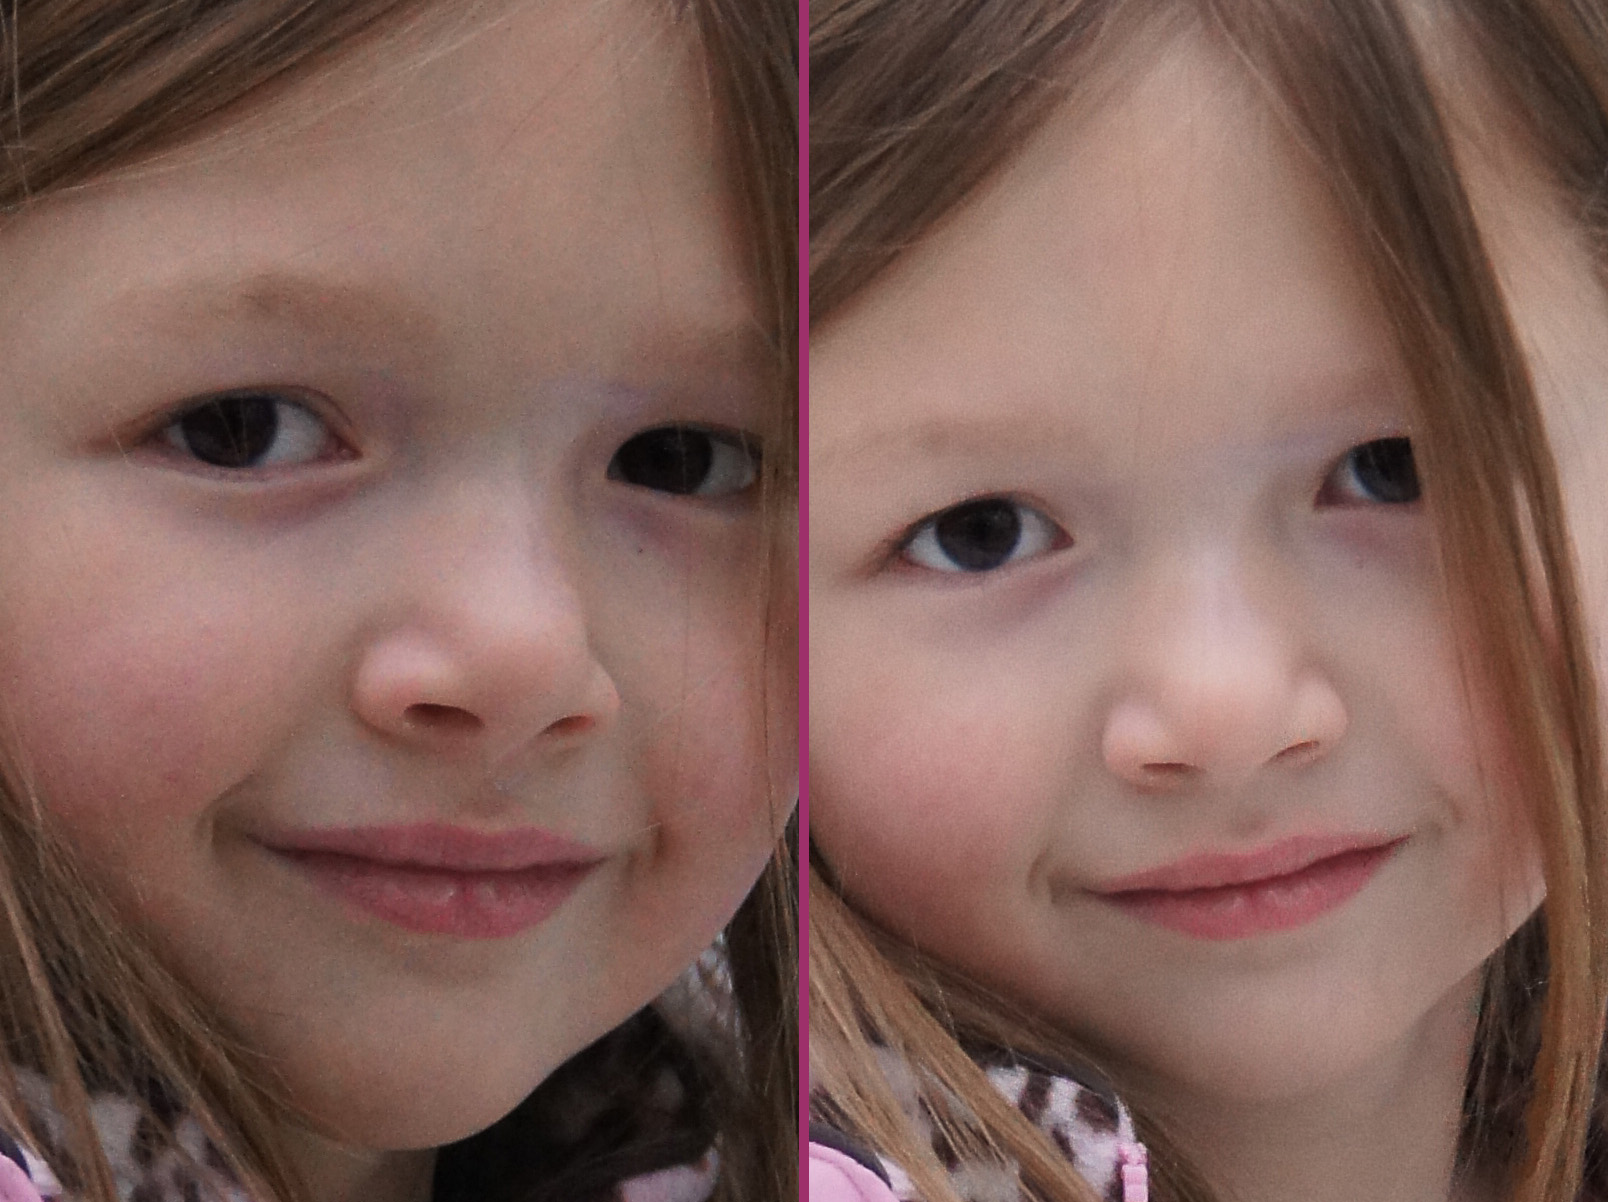
Multi Frame Noise Reduction – in-camera
| Multi frame noise reduction is the A55’s “stealth” feature. For some reason, it hasn’t been widely promoted by Sony. In fact, I didn’t know about multi frame noise reduction until one of the Sony reps explained its use to me at a recent trade show.
When set to use this feature, the A55 captures six successive images and merges them to produce a single image with lower noise. Once again, it’s simple to use. Press the ISO button and set the topmost item (labeled ISO) between Auto and 25600. Press the shutter release to capture the scene and a short time later after it is processed, the image is written to the SDHC card. |
 |

Right: image captured at ISO 3200 with multi frame noise reduction. Click to see an enlargement. |
to see a more detailed full size image |
| Briefly, the process works like this: the camera automatically takes 6 frames at the currently settings: shutter speed, aperture, and ISO. It combines them into a single JPEG image by carefully aligning the 6 frames during compositing while at the same time using proprietary techniques to reduce noise level equivalent to two ISO exposure levels.
Above, you can clearly see that the noise level of the rightmost image is significantly less than the leftmost image even though it was captured at a higher ISO setting. I experienced an equally reduced noise level in several other images that I shot in low lighting conditions. So I find multi frame noise reduction to be a very useful yet unexpected feature. Note that multi frame noise reduction is not available unless the A55 is set to capture JPG only images (not RAW). |
|
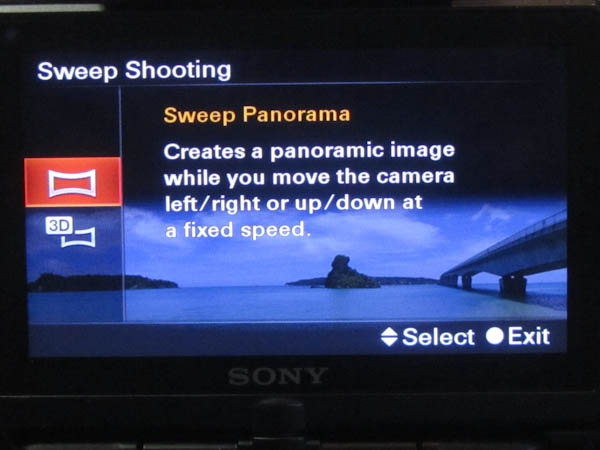
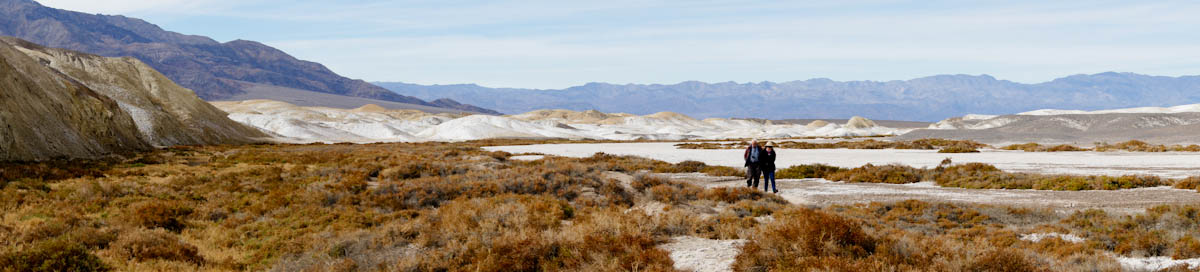
Sweep Panorama – in-camera
| While I’m a fan of panoramas, the task of setting up a tripod, adjusting the camera to capture a series of images, post-processing the individual images and finally pasting them together afterwards using stitching software often takes a few hours.
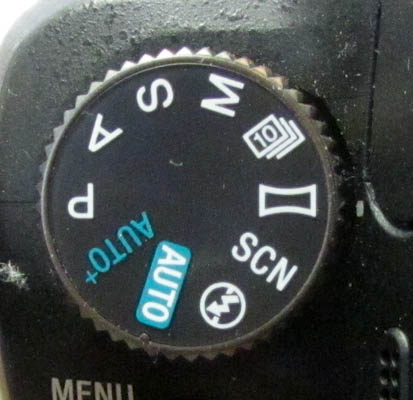
With the A55, you can create a panorama automatically. First, you set the mode dial for panoramas. From the shooting menu, you can select either 2D or 3D panoramas. For 2D panoramas, you choose a direction for panning: left to right, right to left, up to down or down to up direction and a format: standard or wide. For 3D panoramas, you choose a direction for panning: left to right or right to left and a format: 16:9, standard or wide. As its name suggests, to capture a scene you press and hold the shutter while slowly sweeping (panning) the camera in the chosen direction. After a specified number of images are captured, shooting ends and the A55 stitches together the separate images to create the panorama and writes a single one to the SDHC card. It’s as simple as that. You’ll want to take a few test shots to determine the speed at which you should sweep the camera. To guide you, the A55 displays helpful text messages in the viewfinder with shooting suggestions. |
||||
 |
 |
|||
| Below are a pair of panoramas that I captured – one with the camera held in the horizontal orientation and the other with the camera held in the vertical orientation. | ||||
 |
||||
 |
||||
| I also captured a few 3D panoramas. However, to display a 3D panorama, I had to have a 3D television and special eyewear. The 3D panoramas are very impressive.
The 3D panorama will appear as a 2D panorama if you do not use a 3D television nor special eyewear. I really enjoy the ease at which I can capture a landscape using the Sweep Panorama. |
||||
Earlier in the review, I mentioned that I’ve had extensive experience with a large variety of DSLRs. These range from low-priced entry to expensive professional level. I mention this so that you understand that my fondness for the Alpha A55 is not just “puppy love”.
When I first learned about the Alpha A55, I was amazed by the number of innovative features that Sony claimed to have packed into this new body. In the two months that I’ve used this camera, I remain impressed by the results that I’m seeing in the images and the ease with which I am able to capture them.
If the Alpha 55 is any indication of the kind of innovation that we might expect from Sony in coming months, I’ll be anxiously watching for more.
It looks like Sony has a winner. The Sony Alpha A55 is certainly a winner in my book.
Written by Arnie Lee
« Older Posts — Newer Posts »