Online Magazine
Recent Posts
- Safeguard your Cellphone Photos
- Black & White to Color – Instantly
- Wearing Many Hats
- Video Roundup
- Rescuing Your Blurry Pictures
- Showing Their Age
- What is Your Angle?
- Panorama Photos
- Humorous Photos
- Close Ups
- Fisheye Pictures
- Photo Antiquities
- Printing Big
- Appreciating Scale
- Celebrity Sightings
Tags
More Places to Go
- Free "How-To" Books “How To” books for popular cameras 0
- Vist Us on Facebook keep in touch with us on Facebook 2
Archives
- July 2023 (1)
- March 2023 (2)
- February 2023 (1)
- December 2022 (1)
- October 2022 (1)
- September 2022 (8)
- August 2022 (9)
- July 2022 (1)
- June 2022 (1)
- June 2021 (1)
- May 2021 (1)
- March 2021 (5)
- February 2021 (4)
- January 2021 (2)
- April 2019 (1)
- March 2019 (1)
- February 2019 (1)
- October 2018 (2)
- April 2018 (1)
- March 2018 (4)
- February 2018 (1)
- November 2017 (1)
- August 2017 (1)
- June 2017 (1)
- April 2017 (1)
- March 2017 (5)
- February 2017 (2)
- January 2017 (1)
- October 2016 (1)
- September 2016 (1)
- August 2016 (1)
- July 2016 (1)
- May 2016 (1)
- April 2016 (1)
- March 2016 (2)
- February 2016 (1)
- January 2016 (2)
- December 2015 (1)
- November 2015 (1)
- October 2015 (3)
- April 2015 (1)
- March 2015 (5)
- February 2015 (1)
- January 2015 (4)
- December 2014 (2)
- November 2014 (5)
- October 2014 (2)
- September 2014 (1)
- August 2014 (2)
- July 2014 (1)
- May 2014 (1)
- April 2014 (5)
- March 2014 (5)
- December 2013 (2)
- November 2013 (18)
- October 2013 (1)
- September 2013 (1)
- August 2013 (1)
- July 2013 (1)
- June 2013 (3)
- May 2013 (1)
- April 2013 (2)
- March 2013 (1)
- February 2013 (1)
- January 2013 (1)
- December 2012 (1)
- November 2012 (2)
- October 2012 (2)
- September 2012 (5)
- August 2012 (2)
- July 2012 (1)
- June 2012 (1)
- May 2012 (1)
- April 2012 (4)
- March 2012 (1)
- February 2012 (1)
- January 2012 (3)
- December 2011 (1)
- November 2011 (3)
- October 2011 (1)
- September 2011 (2)
- August 2011 (2)
- June 2011 (3)
- May 2011 (4)
- April 2011 (8)
- March 2011 (8)
- February 2011 (10)
- January 2011 (6)
- December 2010 (11)
- November 2010 (14)
- October 2010 (6)
- September 2010 (12)
- August 2010 (2)
- July 2010 (4)
- June 2010 (3)
- May 2010 (1)
- April 2010 (1)
- March 2010 (2)
- February 2010 (1)
- January 2010 (1)
- December 2009 (1)
- November 2009 (2)
- October 2009 (2)
- September 2009 (1)
- August 2009 (3)
- July 2009 (2)
- June 2009 (1)
- May 2009 (2)
- April 2009 (1)
- March 2009 (2)
- February 2009 (1)
- January 2009 (3)
PhotoPlus Expo 2014 – Masterpix
20th November 2014
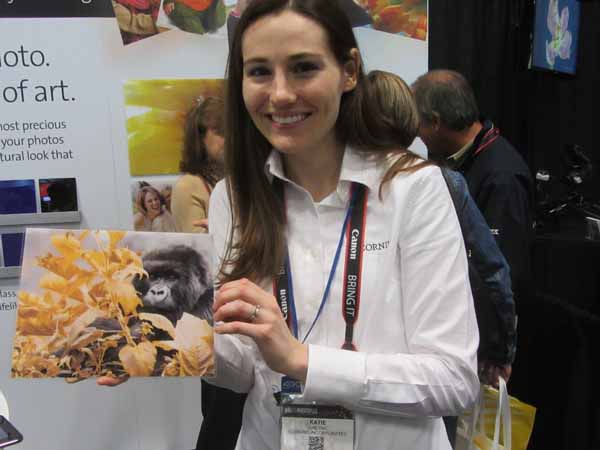
Corning’s Gorilla Glass Photos
As I was browsing the aisles, I came across a booth with a display of many brilliant photos. I learned that all of these photos were printed directly on glass.
|
Most people recognize the Corning brand. What they may not know is that Corning is the maker of Gorilla Glass. It’s the strong, scratch-resistant surface has made it the standard fare for an overwhelming number of mobile phones. Corning rep Katie Greene showed me this photo (of a gorilla, no less) and explained the multi-step process of turning an image into a Masterpix photo. |
 |
|
First a primer is printed on the back of the glass. Next the image is printed using a UV-based ink. Then a white ink is overprinted to provide the proper opacity. Finally, a thin protective film is applied to prevent scratches and hold the glass together. While these samples are displayed in stands, they can just as easily be mounted on a wall. |
 |
|
These Masterpix photos were displayed unframed. However they can also be put into conventional frames if desired. Price for an 5″x7″ Masterpix with tabletop stand is $35. The images can be either portrait or landscape. Delivery time is about a week. |
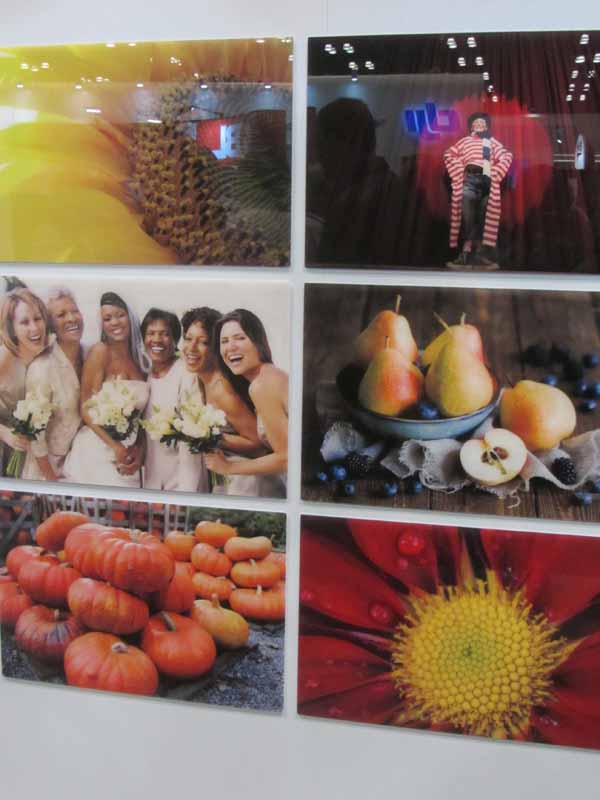 |
Currently you can order photos online, directly from Corning’s Masterpix website. They are available in these sizes: 5×7, 6×6, 8×10, 11×14, 16×16 and 16×24. The ordering process is simple, choose the size, upload your image and enter your delivery and payment information.
For details on these glass presentation frames, visit Corning’s Masterpix website for full details.
Written by: Arnie Lee
Am I Equipped Right?
30th September 2014
Like many other dedicated photographers, I’ve somehow accumulated a sizable stash of photo equipment over the years. I’ve also gained a lot of experience knowing what equipment I’ll need for a particular type of shooting.
My last two assignments were a combination of travel and outdoor shoots. My aging back and wobbly knees beg me to travel as lightly as possible for two reasons: a) to minimize the size and weight of the load that I carry and b) to reduce the amount of time I need to get ready for any given shot.
Since I don’t like carrying camera bags or backpacks, I rarely carry extra lenses. On hikes, it’s a chore for me to search for the right lens and change it on the fly, especially if wildlife is the subject matter. It’s far faster for me to slide the desired camera/lens setup on its shoulder strap up to my eye and be ready to shoot in a few seconds.
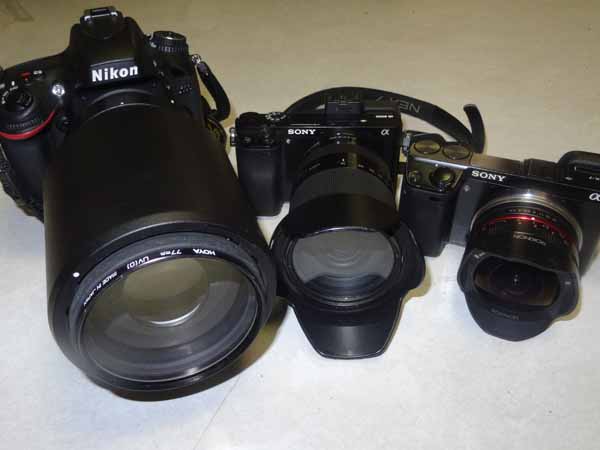
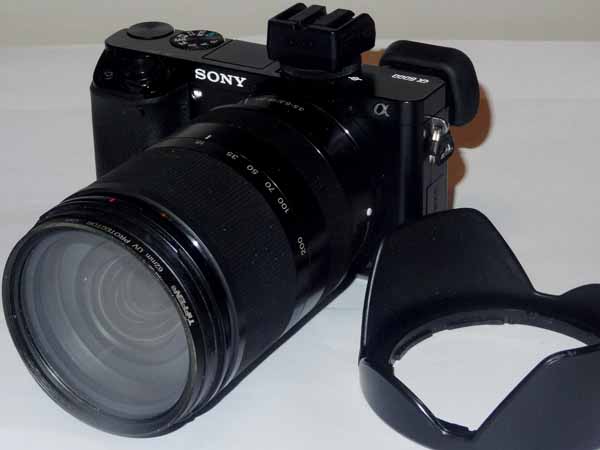
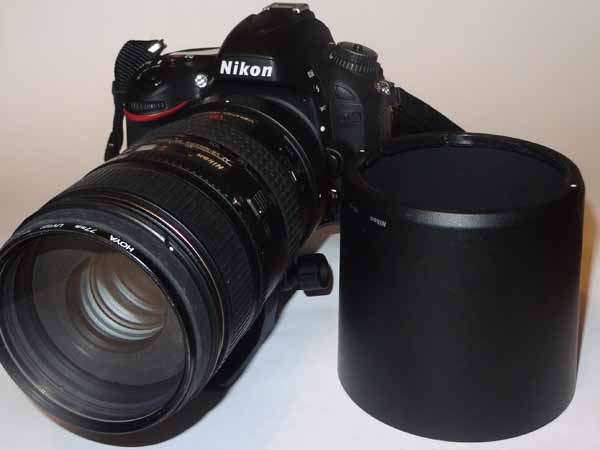
After these two recent assignments, I’ve zeroed in on a reasonable set of cameras and lenses to use when traveling long and far. I based my choice on the range of the lenses that I typically use: a very wide angle, a medium range telephoto zoom and a long range telephoto zoom.
For several years, I’ve come to rely on Sony’s NEX series of mirrorless cameras. Not only are they compact and lightweight, but they have several features that I appreciate such as the electronic viewfinder which instantly previews your exposure adjustments and a mode that captures in-camera panoramas. One drawback of these mirrorless cameras is that there isn’t a long telephoto lens available. For this I have to stick with a full-frame Nikon DSLR.
|
|
|
|
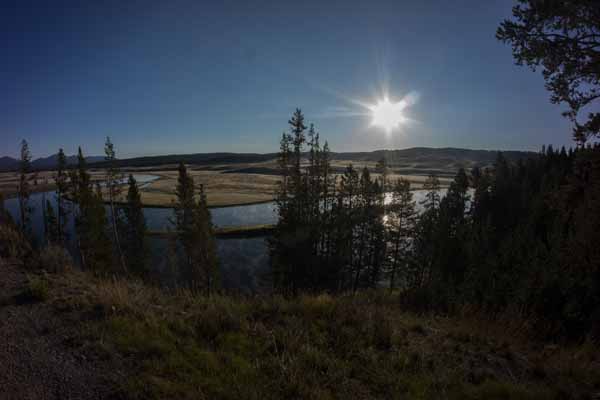
Here’s the short list that I’ve found works well for me: For very wideangle, I use a Sony NEX7 with a manual focus Rokinon 8mm fisheye. For the medium telephoto, I use a Sony A6000 with a Sony 18-200mm lens. For the long telelphoto, I use a Nikon D600 with a Nikon 80-400mm lens. As you can see, the Nikon DLSR setup is monstrous next to other two cameras. But lugging this heavyweight around is the price I have to pay for the lens’ long reach. |
 |
|
|
|
|
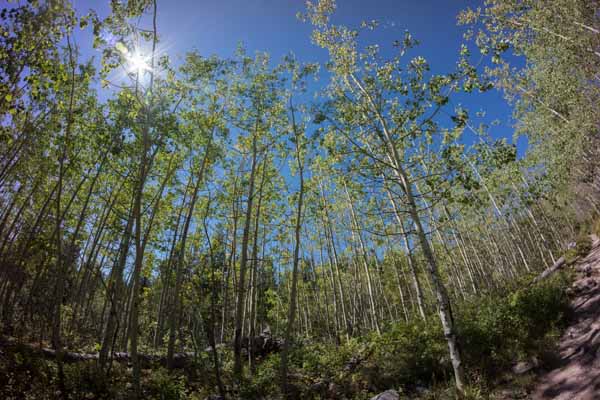
The NEX7 is a very a very capable camera. I like its large 24mp APC-C sensor, excellent electronic viewfinder and brightly lit tilting LCD. The 8mm Rokinon lens is about 1/4th as large as my expensive fisheye lens for Canon DLSRs. Using the Rokinon lens I have to manually focus and set the exposure so it’s less convenient than the Canon setup. But the savings in bulk is a major plus for me. Below are a few photos using this setup. The extra wide angle lets me record everything in front of me. I especially like how the fisheye exaggeratingly bends the horizon. |
 |
 |
 |
 |
 |
|
|
|
|
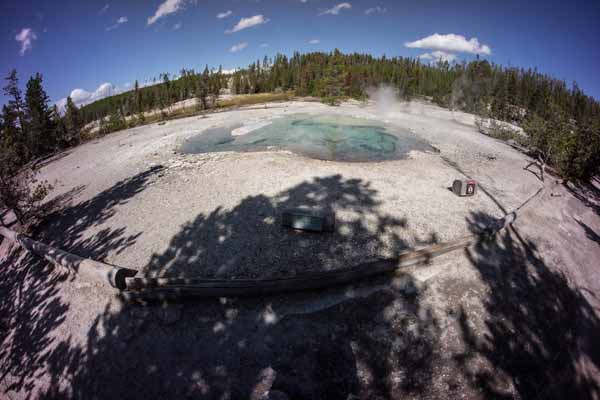
The A6000, Sony’s successor to the NEX7 is also mirrorless. Feature wise it is very similar to the NEX7 except that it has a superior autofocusing mechanism. This enables high speed captures at frames rates up to 11fps. When not traveling, the A6000/18-200mm setup is my everyday camera. With a large zoom range I have a wide angle to medium telephoto in a single lens. When traveling, it becomes my primary camera with the other two cameras reserved for special points of view. Below are a few examples that illustrate the versatility of the 18-200mm lenss. |
 |
 |
 |
 |
 |
|
|
|
|
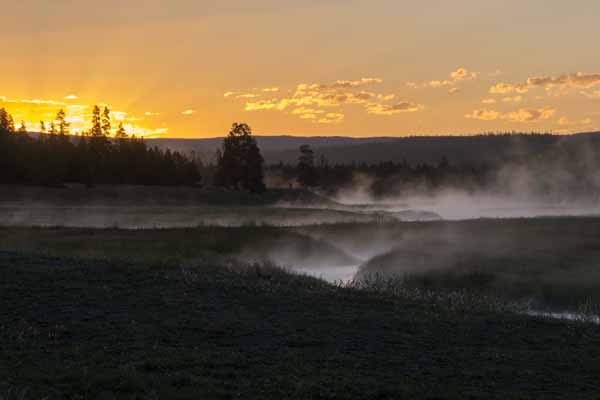
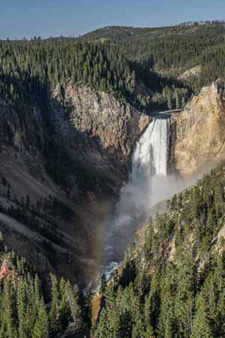
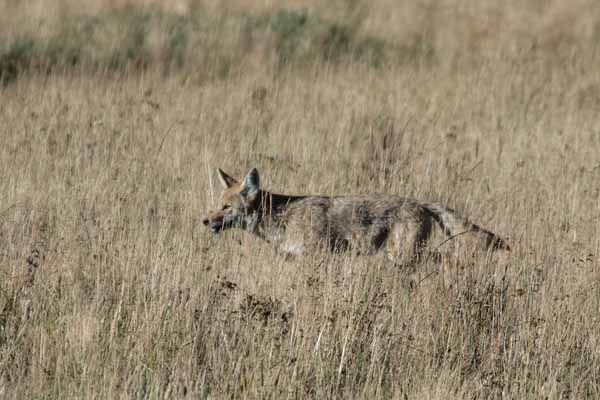
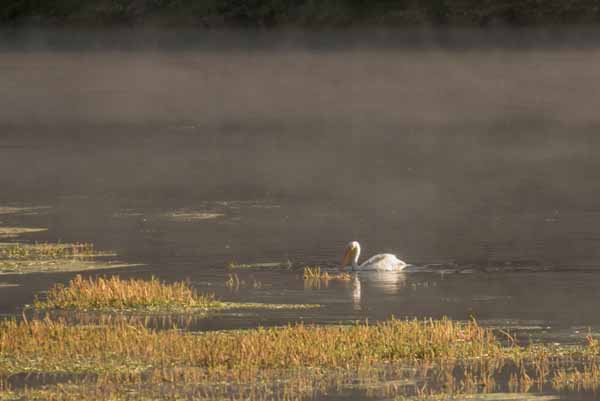
The Nikon D600 is a full-frame DLSR with a 24mp sensor. It weighs in at two pounds which is twice as much as the A6000. The Nikon 80-400mm zoom lens weighs just under three pounds making this setup a combined five pounds. Although this is hefty to carry, the lens lock (prevents the zoom from unintentionally sliding) keeps it secure while carrying it with a shoulder strap. This long telephoto comes off of my shoulder mostly for the long distance shots such as these below. |
 |
 |
 |
 |
 |
|
|
|
So there you have it, my equipment of choice for outdoor photography. Of course, not everyone has the same preferences or requirements in the field as myself so this set up may not work universally. But for me being properly equipped has proved to be an ideal way for me to work comfortably, quickly and efficiently.
Written by: Arnie Lee
A Simple Photo Gallery
25th May 2014
Showing Off Your Photographs
Digital gives us the opportunity to take hundreds and hundreds of photos for almost no cost at all. This is an amazing turnaround compared to the price of using film cameras that had a processing charge saddled to each roll of film that we shot.
So what are we doing with all of these “free” photos? Are they sitting on the SD memory card or cell phone? I’m sure that my friends and relatives are impressed as I flick through the tiny screen to show them my recent vacation shot – NOT!
Well, to be frank, my fingers are tired of flicking the screen. And my friends and relatives typically avoid asking to see pictures of my travels. So I decided to print – yes you heard it correctly – print some of the photos.
|
|
||
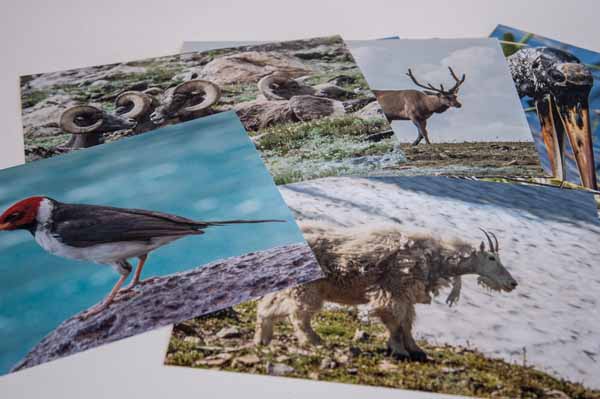 |
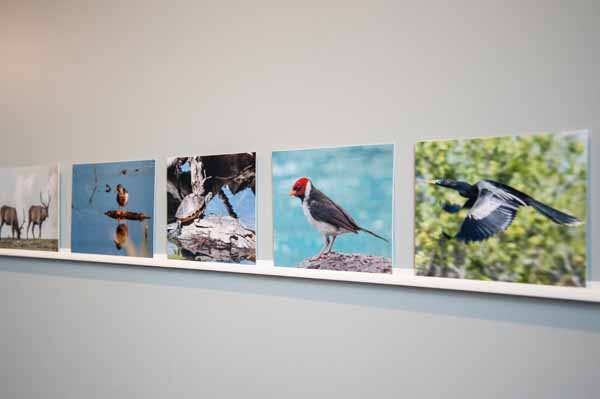
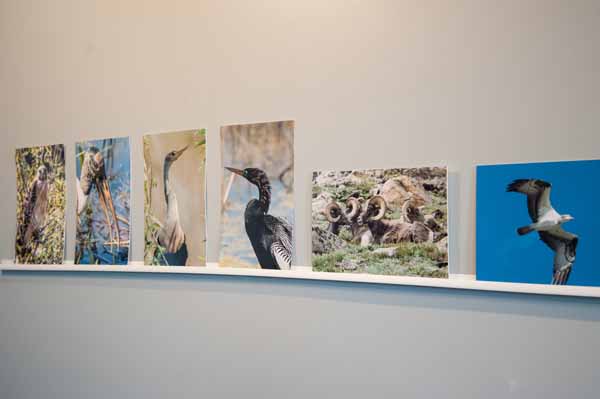
One afternoon I collected a set of my favorite nature shots and sent them to the photofinisher. A few days later received back a short stack of 8″ x 10″s and 8″ x 12″s Now the issue is how do I present them? I didn’t really want to arrange them in a conventional album that would sit on the top of a coffee table. No, I longed for a different way to display them. I decided that I’d show them off by making a small gallery in an unused room. The room is well suited for this purpose with a large, uncluttered wall painted white. |
|
|
|
||
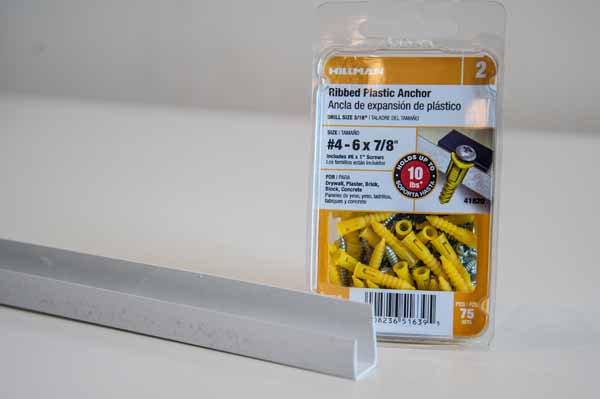
Rather than “hanging” the photos, I decided to make a very miniature shelf system. I bought a few 10-foot lengths of “J-TRIM” used to install vinyl house siding. These strips are lightweight and inexpensive. Use scissors to cut to desired length. |
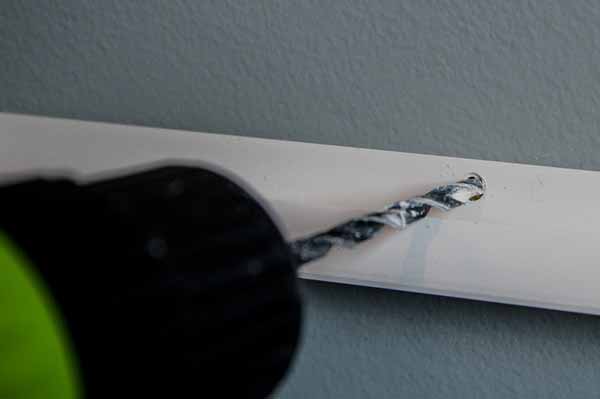
Use a tape measure to mount the J-TRIM level about 54″ above the floor. I used these ribbed plastic anchors (3/16″ size). Here I’m drilling a hole through the J-TRIM into the drywall. |
|
|
|
||
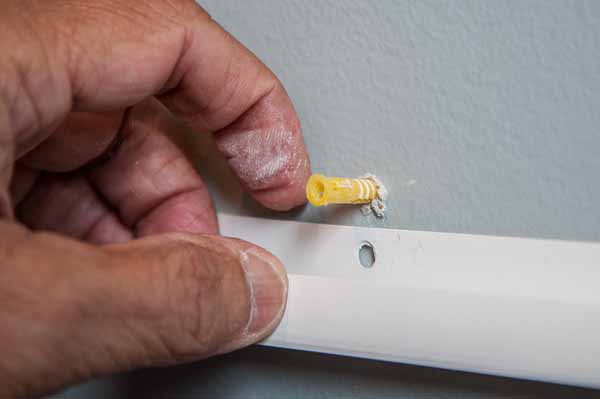
Next you push the plastic ribbed anchor into the drilled hole. |
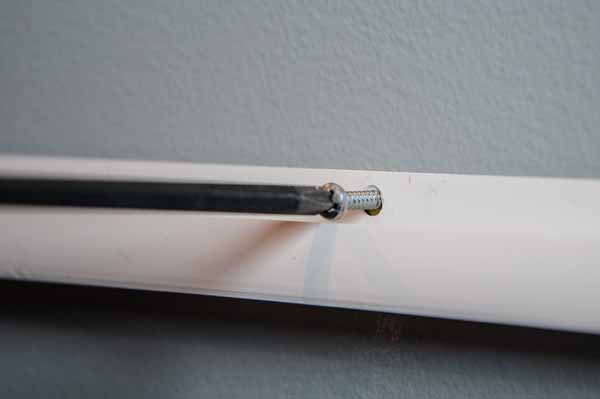
Then fasten the J-TRIM to the drywall with one of the screws. |
|
|
|
||
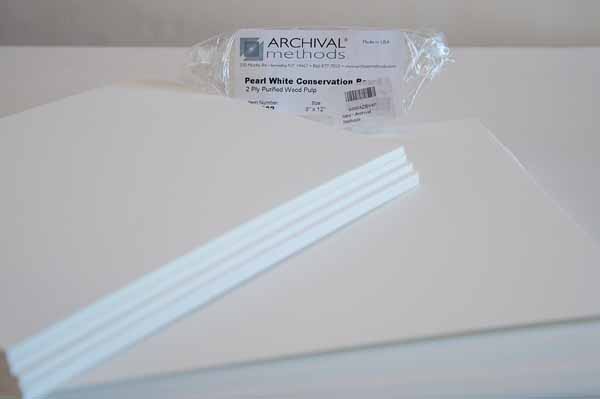
By themselves, the prints are too flimsy to stand on the miniature shelf. I purchased these sheets of mat board precut for the 8″x10″s and 8″x12″s. |

Using the 3M spray-on adhesive, I mounted the photos onto the mat board. |
|
|
|
||
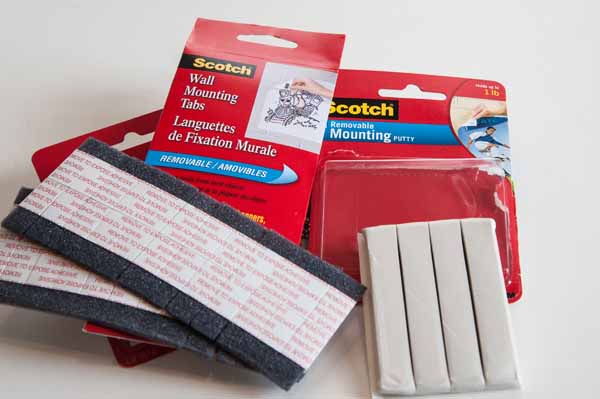
I found it necessary to use this Scotch “mounting putty” to keep the photos from falling from the miniature shelf. |
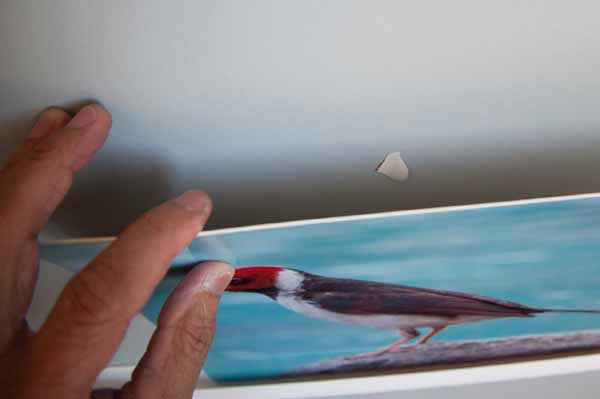
The putty is pasted between the photo mat board and the wall to keep the top of the photograph from falling. |
|
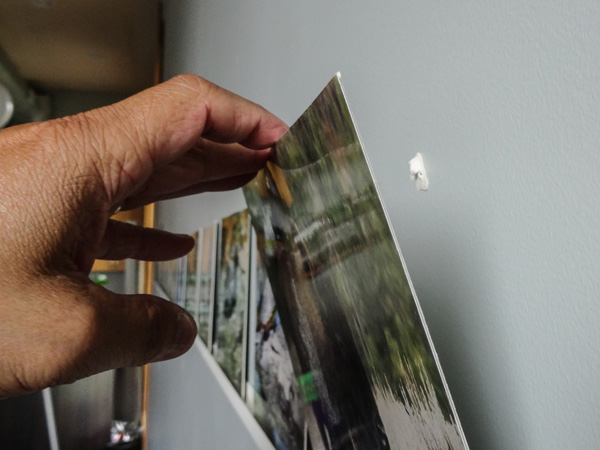
Here’s another view of the putty which hold the mat board agains the wall. |
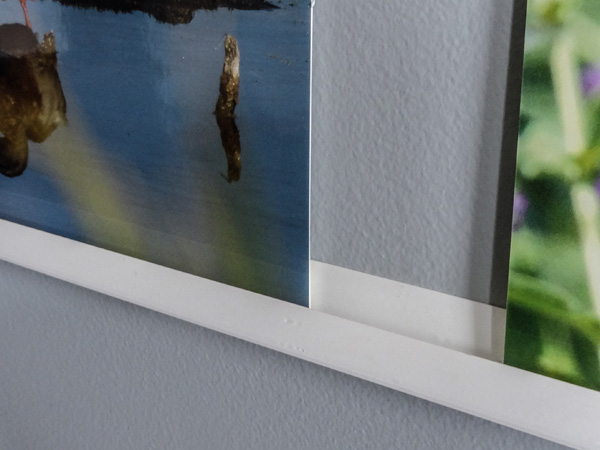
Here you can see the photo resting in the channel of the miniature shelf. |
|
|
|
||
 |
| |
|
When all is said and done, I have a small gallery of my latest travel photographs. As you might guess, when you’re tired of looking at this group of photographs, it’s very easy to change them. |
||
Material List:
2 pieces of J-Channel – 10′ Vinyl 1/2″ J_Trim @ $2.40 each (Home Depot)
1 pkg – plastic ribbed anchors #4 – 1″ @ $7.99
1 pkg – 8″ x 10″ or 8″ x 12″ mat board 25 sheets @ $12.50
1 can 3M General Purpose 45 spray mount @ $5.00
Written by: Arnie Lee