Online Magazine
Recent Posts
- Safeguard your Cellphone Photos
- Black & White to Color – Instantly
- Wearing Many Hats
- Video Roundup
- Rescuing Your Blurry Pictures
- Showing Their Age
- What is Your Angle?
- Panorama Photos
- Humorous Photos
- Close Ups
- Fisheye Pictures
- Photo Antiquities
- Printing Big
- Appreciating Scale
- Celebrity Sightings
Tags
More Places to Go
- Free "How-To" Books “How To” books for popular cameras 0
- Vist Us on Facebook keep in touch with us on Facebook 2
Archives
- July 2023 (1)
- March 2023 (2)
- February 2023 (1)
- December 2022 (1)
- October 2022 (1)
- September 2022 (8)
- August 2022 (9)
- July 2022 (1)
- June 2022 (1)
- June 2021 (1)
- May 2021 (1)
- March 2021 (5)
- February 2021 (4)
- January 2021 (2)
- April 2019 (1)
- March 2019 (1)
- February 2019 (1)
- October 2018 (2)
- April 2018 (1)
- March 2018 (4)
- February 2018 (1)
- November 2017 (1)
- August 2017 (1)
- June 2017 (1)
- April 2017 (1)
- March 2017 (5)
- February 2017 (2)
- January 2017 (1)
- October 2016 (1)
- September 2016 (1)
- August 2016 (1)
- July 2016 (1)
- May 2016 (1)
- April 2016 (1)
- March 2016 (2)
- February 2016 (1)
- January 2016 (2)
- December 2015 (1)
- November 2015 (1)
- October 2015 (3)
- April 2015 (1)
- March 2015 (5)
- February 2015 (1)
- January 2015 (4)
- December 2014 (2)
- November 2014 (5)
- October 2014 (2)
- September 2014 (1)
- August 2014 (2)
- July 2014 (1)
- May 2014 (1)
- April 2014 (5)
- March 2014 (5)
- December 2013 (2)
- November 2013 (18)
- October 2013 (1)
- September 2013 (1)
- August 2013 (1)
- July 2013 (1)
- June 2013 (3)
- May 2013 (1)
- April 2013 (2)
- March 2013 (1)
- February 2013 (1)
- January 2013 (1)
- December 2012 (1)
- November 2012 (2)
- October 2012 (2)
- September 2012 (5)
- August 2012 (2)
- July 2012 (1)
- June 2012 (1)
- May 2012 (1)
- April 2012 (4)
- March 2012 (1)
- February 2012 (1)
- January 2012 (3)
- December 2011 (1)
- November 2011 (3)
- October 2011 (1)
- September 2011 (2)
- August 2011 (2)
- June 2011 (3)
- May 2011 (4)
- April 2011 (8)
- March 2011 (8)
- February 2011 (10)
- January 2011 (6)
- December 2010 (11)
- November 2010 (14)
- October 2010 (6)
- September 2010 (12)
- August 2010 (2)
- July 2010 (4)
- June 2010 (3)
- May 2010 (1)
- April 2010 (1)
- March 2010 (2)
- February 2010 (1)
- January 2010 (1)
- December 2009 (1)
- November 2009 (2)
- October 2009 (2)
- September 2009 (1)
- August 2009 (3)
- July 2009 (2)
- June 2009 (1)
- May 2009 (2)
- April 2009 (1)
- March 2009 (2)
- February 2009 (1)
- January 2009 (3)
Safeguard your Cellphone Photos
01st July 2023
Have you Backed Up Your Photos?
Many of the photographs that you take are non-replaceable. Whether they are snapshots of family, birthday, anniversary, reunion or other events, most likely they are important possessions that you do not want to lose.
In the days before digital photography, many of us stuffed negatives, slides and snapshots in the proverbial shoebox for safekeeping. But with the advent of digital cameras photography became easier and less expensive resulting in a steep increase of the number of pictures and videos that we took. And of the number has literally exploded with the addition of our always handy cellphone camera.
The question is – are we taking the steps to backup and/or organize all of our photos and videos? Nowadays there are a myriad ways to store images. The one you choose is based on the amount of effort you have to expend to backup and organize your stash and the cost for storing them.
Here’s a few of the ways that I backup and organize my photos and videos. From here on in when I refer to images this is to be both photographs and videos.
Cellphones fall into either the Apple iOS category or the Android category. And since your cellphone doubles as cameras, it’s a good idea to backup the images regularly.
While I’m insistent on safeguarding the images on my cellphone, I’m also interested in doing so as easily and inexpensively as possible. So I’ve chosen several ways to do this that are simple and automated.
My cell is an iPhone so I don’t have a lot of experience with Android models. Android owners can use both the Google and Amazon services for backup up their images.
Apple Photos app
My iPhone can automatically upload all of my photos to the Apple cloud for safekeeping.
- Go to the Settings menu:
- Beneath your name choose Apple ID, iCloud+, Media & Purchases.
- Choose iCloud
- Choose Photos
- Next to Sync this iPhone turn the button on
Apple iCloud users are entitled to 5GB of storage with their account. This amount of storage is enough for about 2500 photos of average size. For larger photo collections, you can purchase 50GB additional storage for $.99 (99 cents) a month. I have 8,000 photos and 1,300 videos in my current collection. If you have a huge collection you can purchase 2TB of storage for $9.99 a month.
Google Photos app
I also have Google Photos app installed on my iPhone. Google Photos copies the photos on my iPhone to my Google Library in the cloud. I purchased 100 GB of storage which cost $1.99 per month. Currently I have more than 30,000 images but using only 36 GB of the allocated storage. There are other options to purchase additional storage on the Google cloud. For Android users the Google Photos app has an option to backup the photos on your cell phone to your Google Library in the cloud.
Google Photos has features to edit, add descriptions and comments, identify faces, organize images into albums and share images.
Google Photos users are entitled to 15GB of storage with their account. This amount of storage is enough for about 7500 photos of average size. For larger photo collections, you can purchase 100GB additional storage for $1.99 a month.
Amazon Photos app
The Amazon Photos app is also installed on my iPhone. Amazon Prime members receive unlimited free storage for photos and 5 GB for videos. You can use either their iOS (iPhone/iPad) or Android app to automatically backup your images. Non-Prime members can purchase 100 GB of storage on the Amazon cloud for $19.99 per year ($1.66/month). Currently, I have about 9,000 photos and 2000 videos stored on the Amazon’s cloud using 82 GB of storage.
Amazon Photos has features to edit, apply filters, add text and organize images into albums or groups and share images.
As you can see, I have safeguarded my cellphone photos in three different places. Maybe it’s “overkill” to have three different backups but the process is automatic. Since I have more images than the allotted free space for the various services I don’t mind the few dollars a month since it saves me the worry that I might otherwise loose an important event.
It’s easy and either free or inexpensive so please don’t forget to protect your photos and videos.
Written by: Arnie Lee
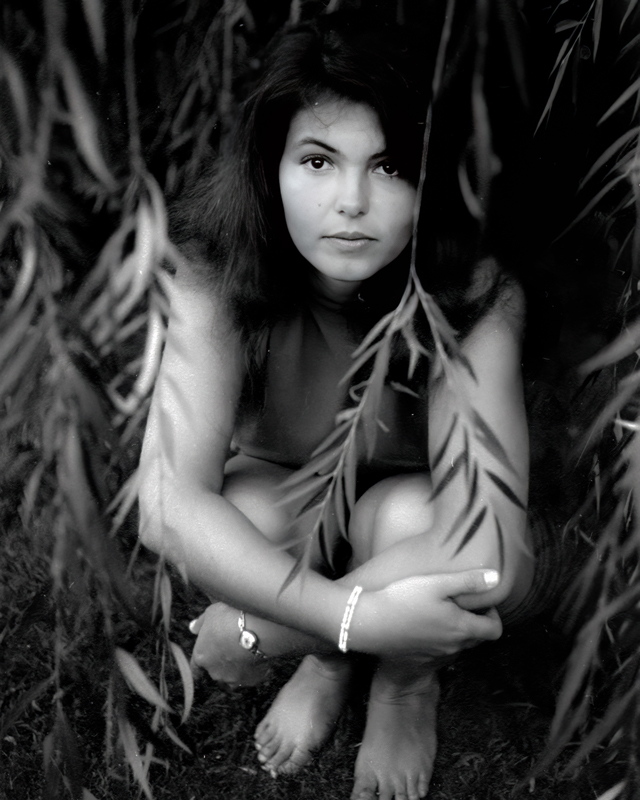
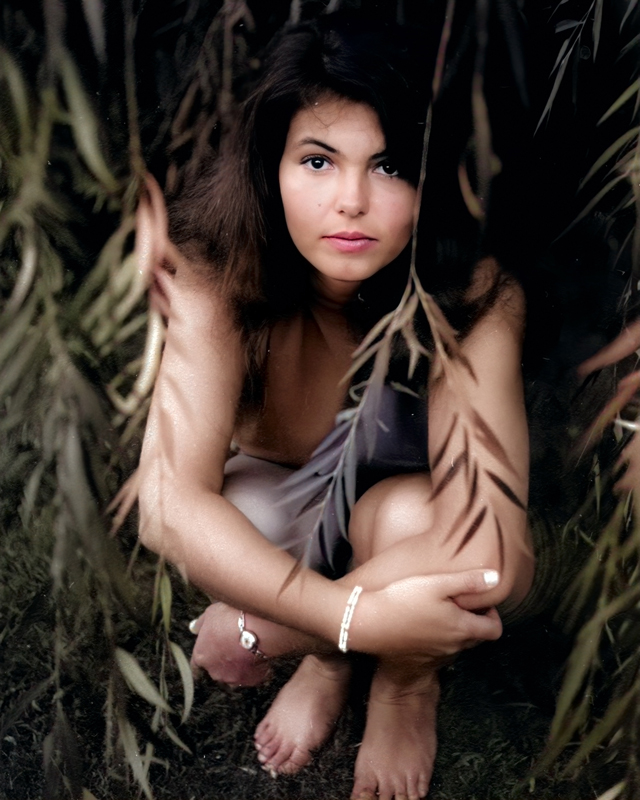
Black & White to Color – Instantly
27th March 2023
Not Quite Magic, But Amazing Nonetheless
Like many photography buffs, I subscribe to Adobe Creative Cloud that provides me a set of applications for editing my images. For all of the years that I’ve been using the computer for photography, I’ve never been a regular user of Photoshop. While I’ve used it on occasion I’ve instead relied on the company’s younger offspring Lightroom for most of my image editing.
As a subscriber I receive regular electronically delivered newsletters about Creative Cloud. A few weeks ago one of the articles drew my interest – colorizing black and white images.
Those of us who grew up taking pictures in the 1950s and 1960s have a large stash of black and white photos – and I have my share. I clicked on the article to find out more about this magical process.
The process involved using one of Photoshop’s built-in filters. Being a Photoshop novice I was unfamiliar with these filters so I had to dig deeper.
Well it turns out that I didn’t have to dig very much. The newsletter explained that the only thing I needed to do was to choose “Neural Filter” from Photoshop’s top menu and then click the “Colorize” button. Instantly – yes instantly – the black and white photo was converted to a color version.
The images are colorized using a best guess model that Adobe employs. The processing is not perfect but most of the images that I tried turned out acceptable. The few inconsistencies that I noticed did not detract from the overall results. And a few of the colorized images exceeded my expectations.
Below are a few of the B&W’s – including some of my favorites – that I was anxious to try.
|
|
|
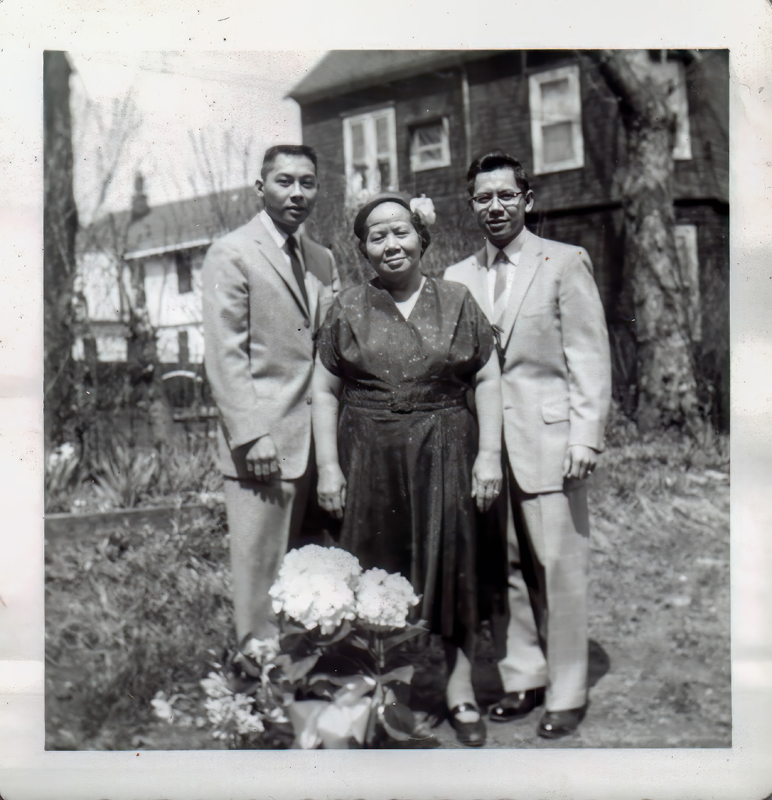 A photo of my Grandmother and two uncles taken in the 1950s. |
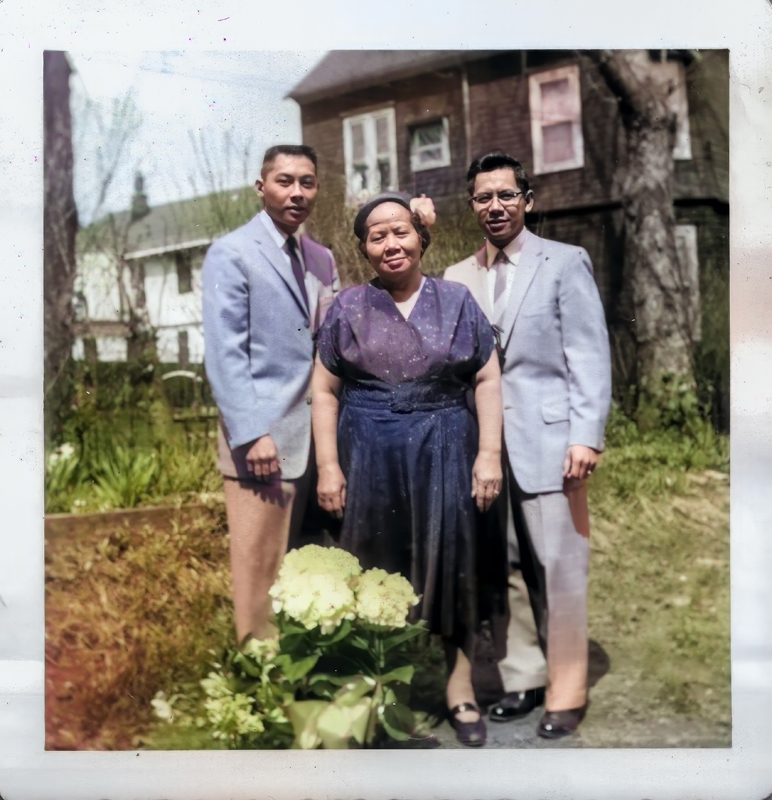 The colorized version fails to maintain consistent color of the suits. |
|
|
|
 A high school photo of a student from the 1960s. |
 The colorized version is good except the student didn’t use lipstick. |
|
|
|
 Writer William F Buckley lecturing at the Univ of Michigan in 1969. |
 Above you will notice that the background does not maintain the same color. |
|
|
|
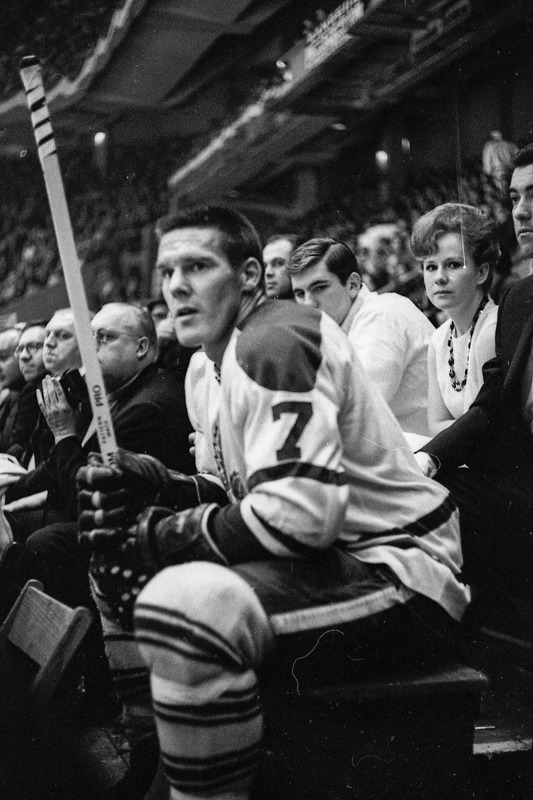 Hockey star Tim Horton sitting in the penalty box at Madison Square Garden about 1964. |
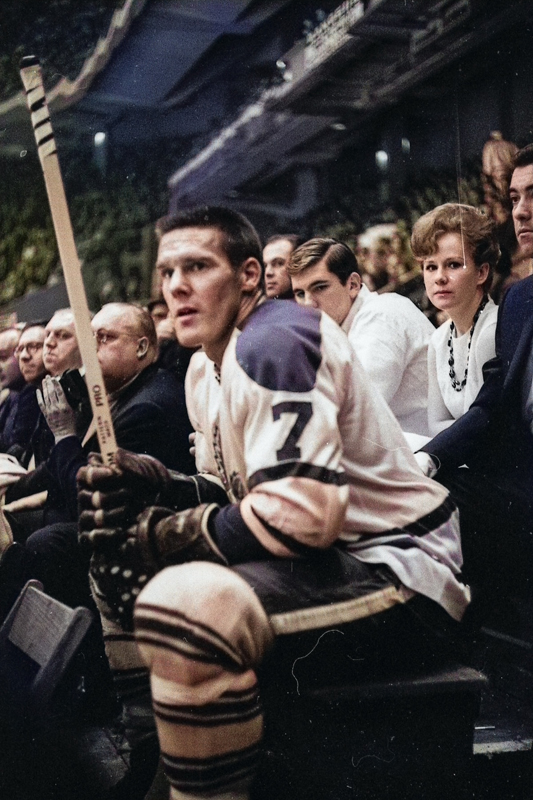 The color processing chose blue for Tim’s jersey which happens to be the color of the Toronto Maple Leaf uniform. Good guess. |
|
|
|
 Singer Ron Townsend of the Fifth Dimension performing in Ann Arbor in 1970 |
 An amazing transformation. I don’t know if the colors are accurate to his 1970’s outfit but they appear authentic. |
|
|
|
 A snapshot of my wife while we were enjoying nature and the outdoors in 1969. |
 Photoshop’s choice of colors is less important to me than the warm feeling that I receive from the colorized photo. |
|
|
|
|
|
|
I’m still excited when I find another older black & white photo that I can colorize.
Written by: Arnie Lee
Wearing Many Hats
27th March 2023
Turning on the Studio Lights
It’s been a couple of years since I’ve used my electronic studio strobes. I wasn’t even sure that they were still working. So I asked my favorite lovely model if she would pose for a few photos and she kindly accepted.
On this day, the outside sky was overcast there wasn’t much light coming through the windows. So I went to work moving the lights into position for the quick shooting session. I was using only two lights – one main light, slightly to the left of the subject and about ten feet away and a second light positioned low and the the right of the subject to illuminate the background.
Here are a few of the photos from this session.
To see more detail of the lighting and coloring, click on any of the images.
|
|
|
 |
 |
|
|
|
 |
 |
|
|
|
 |
 |
|
|
|
 |
 The above photo was taken at a different time using an IR (infrared camera that removes all of the color. |
|
|
|
There was nothing exciting about my quick session, but I did enjoy working with a model who made these couple of hats look nicely perched.
Written by: Arnie Lee